Securing Keycloak with OIDC SPA and Phase Two


Our pal over at Keycloakify has been working on creating a simple OpenId Connect (OIDC) library called, OIDC Spa. As with Joseph's usual approach to user friendliness, OIDC SPA simplifies a lot of the integration work that can come with adding an Authentication and Authorization layer to your application. Follow along as we show you how to integrate OIDC SPA with Phase Two's Keycloak, running on your machine or in a hosted Phase Two cluster.
We're going to work through an example of how to add OIDC SPA to a React application. If you just want to skip to code, check out our React example.
Setting up a Keycloak Instance
Instructions
If you already have a Keycloak instance, skip to the next section.
You can run Keycloak on your machine with Docker, or use a hosted Phase Two cluster. Both come with Phase Two's Keycloak extensions.
Run Keycloak locally
The Phase Two examples repo includes a local Phase Two Keycloak that is already set up for the examples: a p2examples realm with a client for each example and a demo user. You need Docker with the Compose plugin.
git clone https://github.com/p2-inc/examples.git
cd examples
docker compose -f keycloak/docker-compose.yml up -d --wait
| What | Value |
|---|---|
| Issuer URL | http://localhost:8080/auth/realms/p2examples |
| Admin console | localhost:8080/auth/admin, admin / admin |
| Demo user | demo / demo |
The client and the user from the next two sections already exist in this realm, so you can skip both. The local Keycloak README lists the client of each example. docker compose -f keycloak/docker-compose.yml down stops Keycloak, and the next up starts again from a fresh realm.
Use a hosted Phase Two cluster
- Sign up on the Phase Two Dashboard with an email address, a GitHub account or a Google account.
- Create a Starter cluster, which is free for 30 days, and add a realm to it.
- Click Open Console to open the realm in the Keycloak admin console.
The app connects to Keycloak through the realm's issuer URL, https://<your-keycloak-host>/auth/realms/<your-realm>. In the admin console, Realm settings > General > Endpoints > OpenID Endpoint Configuration shows it as issuer.
Keep the admin console open: the next sections create the app's client and a user there.
Setting up an OIDC Client
Instructions
The app needs an OpenID Connect client in Keycloak. The app runs in the browser, where it can't keep a secret, so it gets a public client and logs users in with the authorization code flow and PKCE. Keycloak's docs describe all the client settings.
-
Open the Keycloak admin console and select your realm.
-
Click Clients in the menu.
-
Click Create client.
-
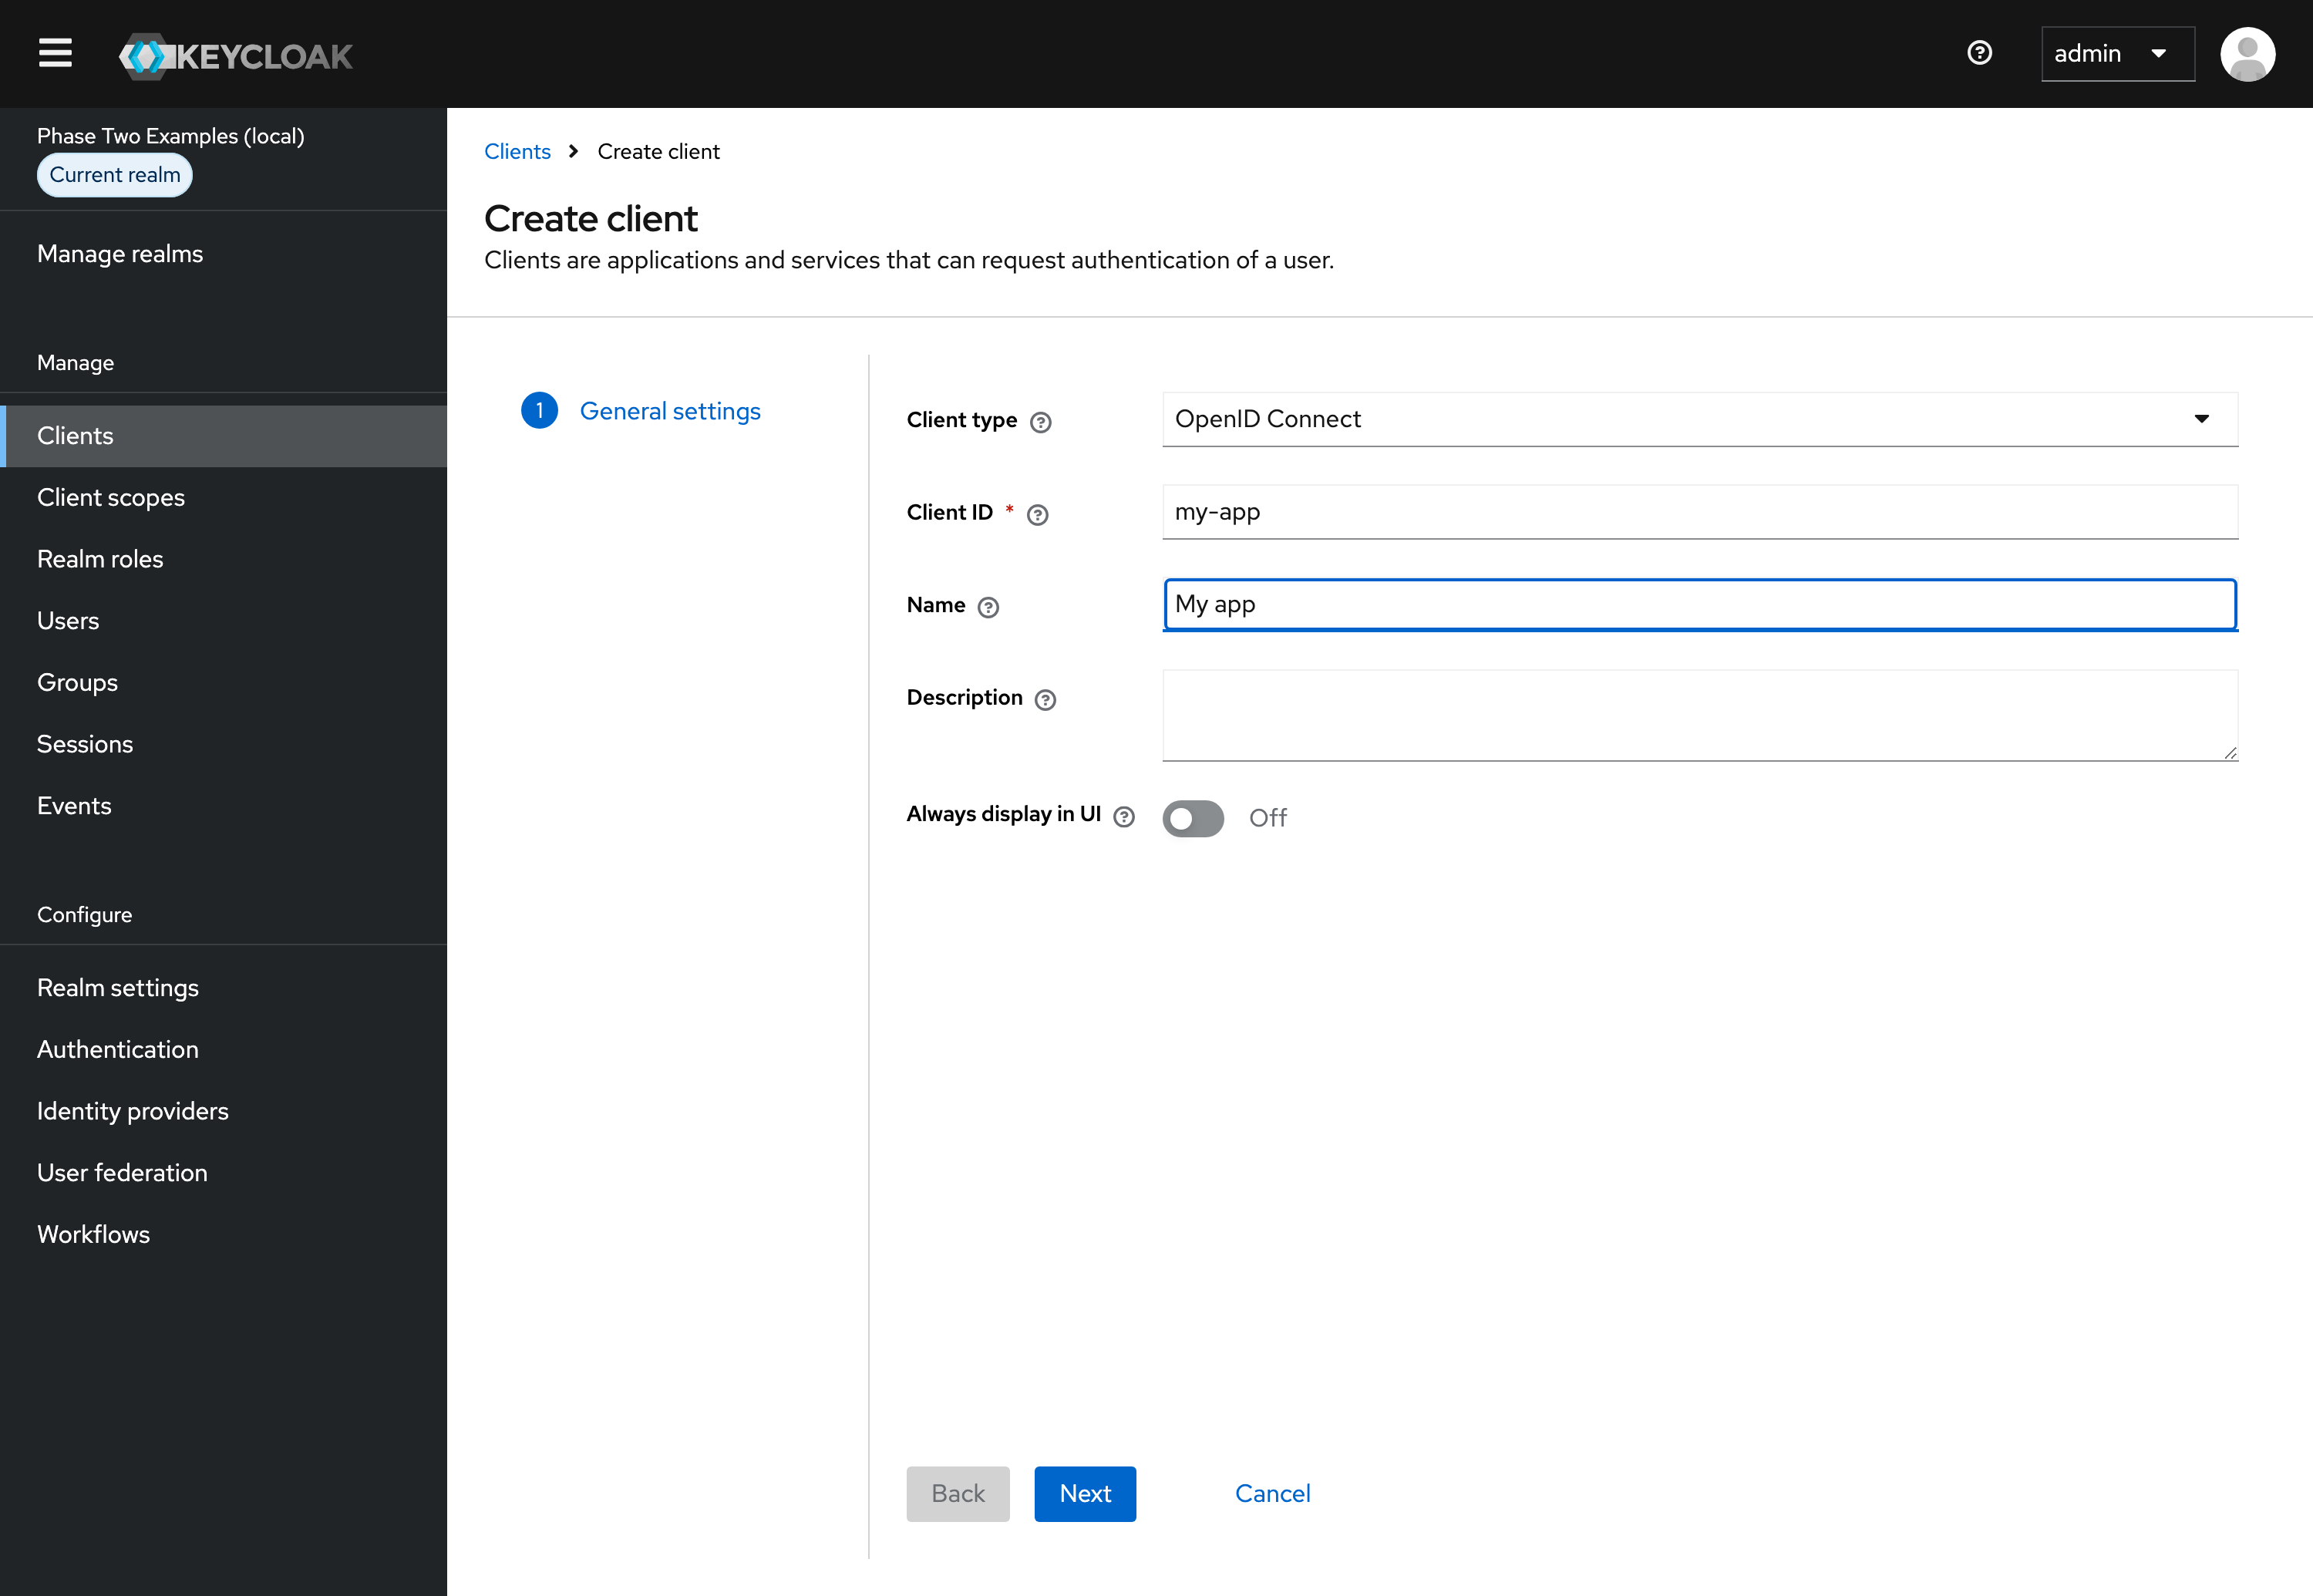
Leave Client type set to OpenID Connect.
-
Enter a Client ID. The app sends this ID in its OpenID Connect requests.
-
Supply a Name for the client.
-
Click Next.
-
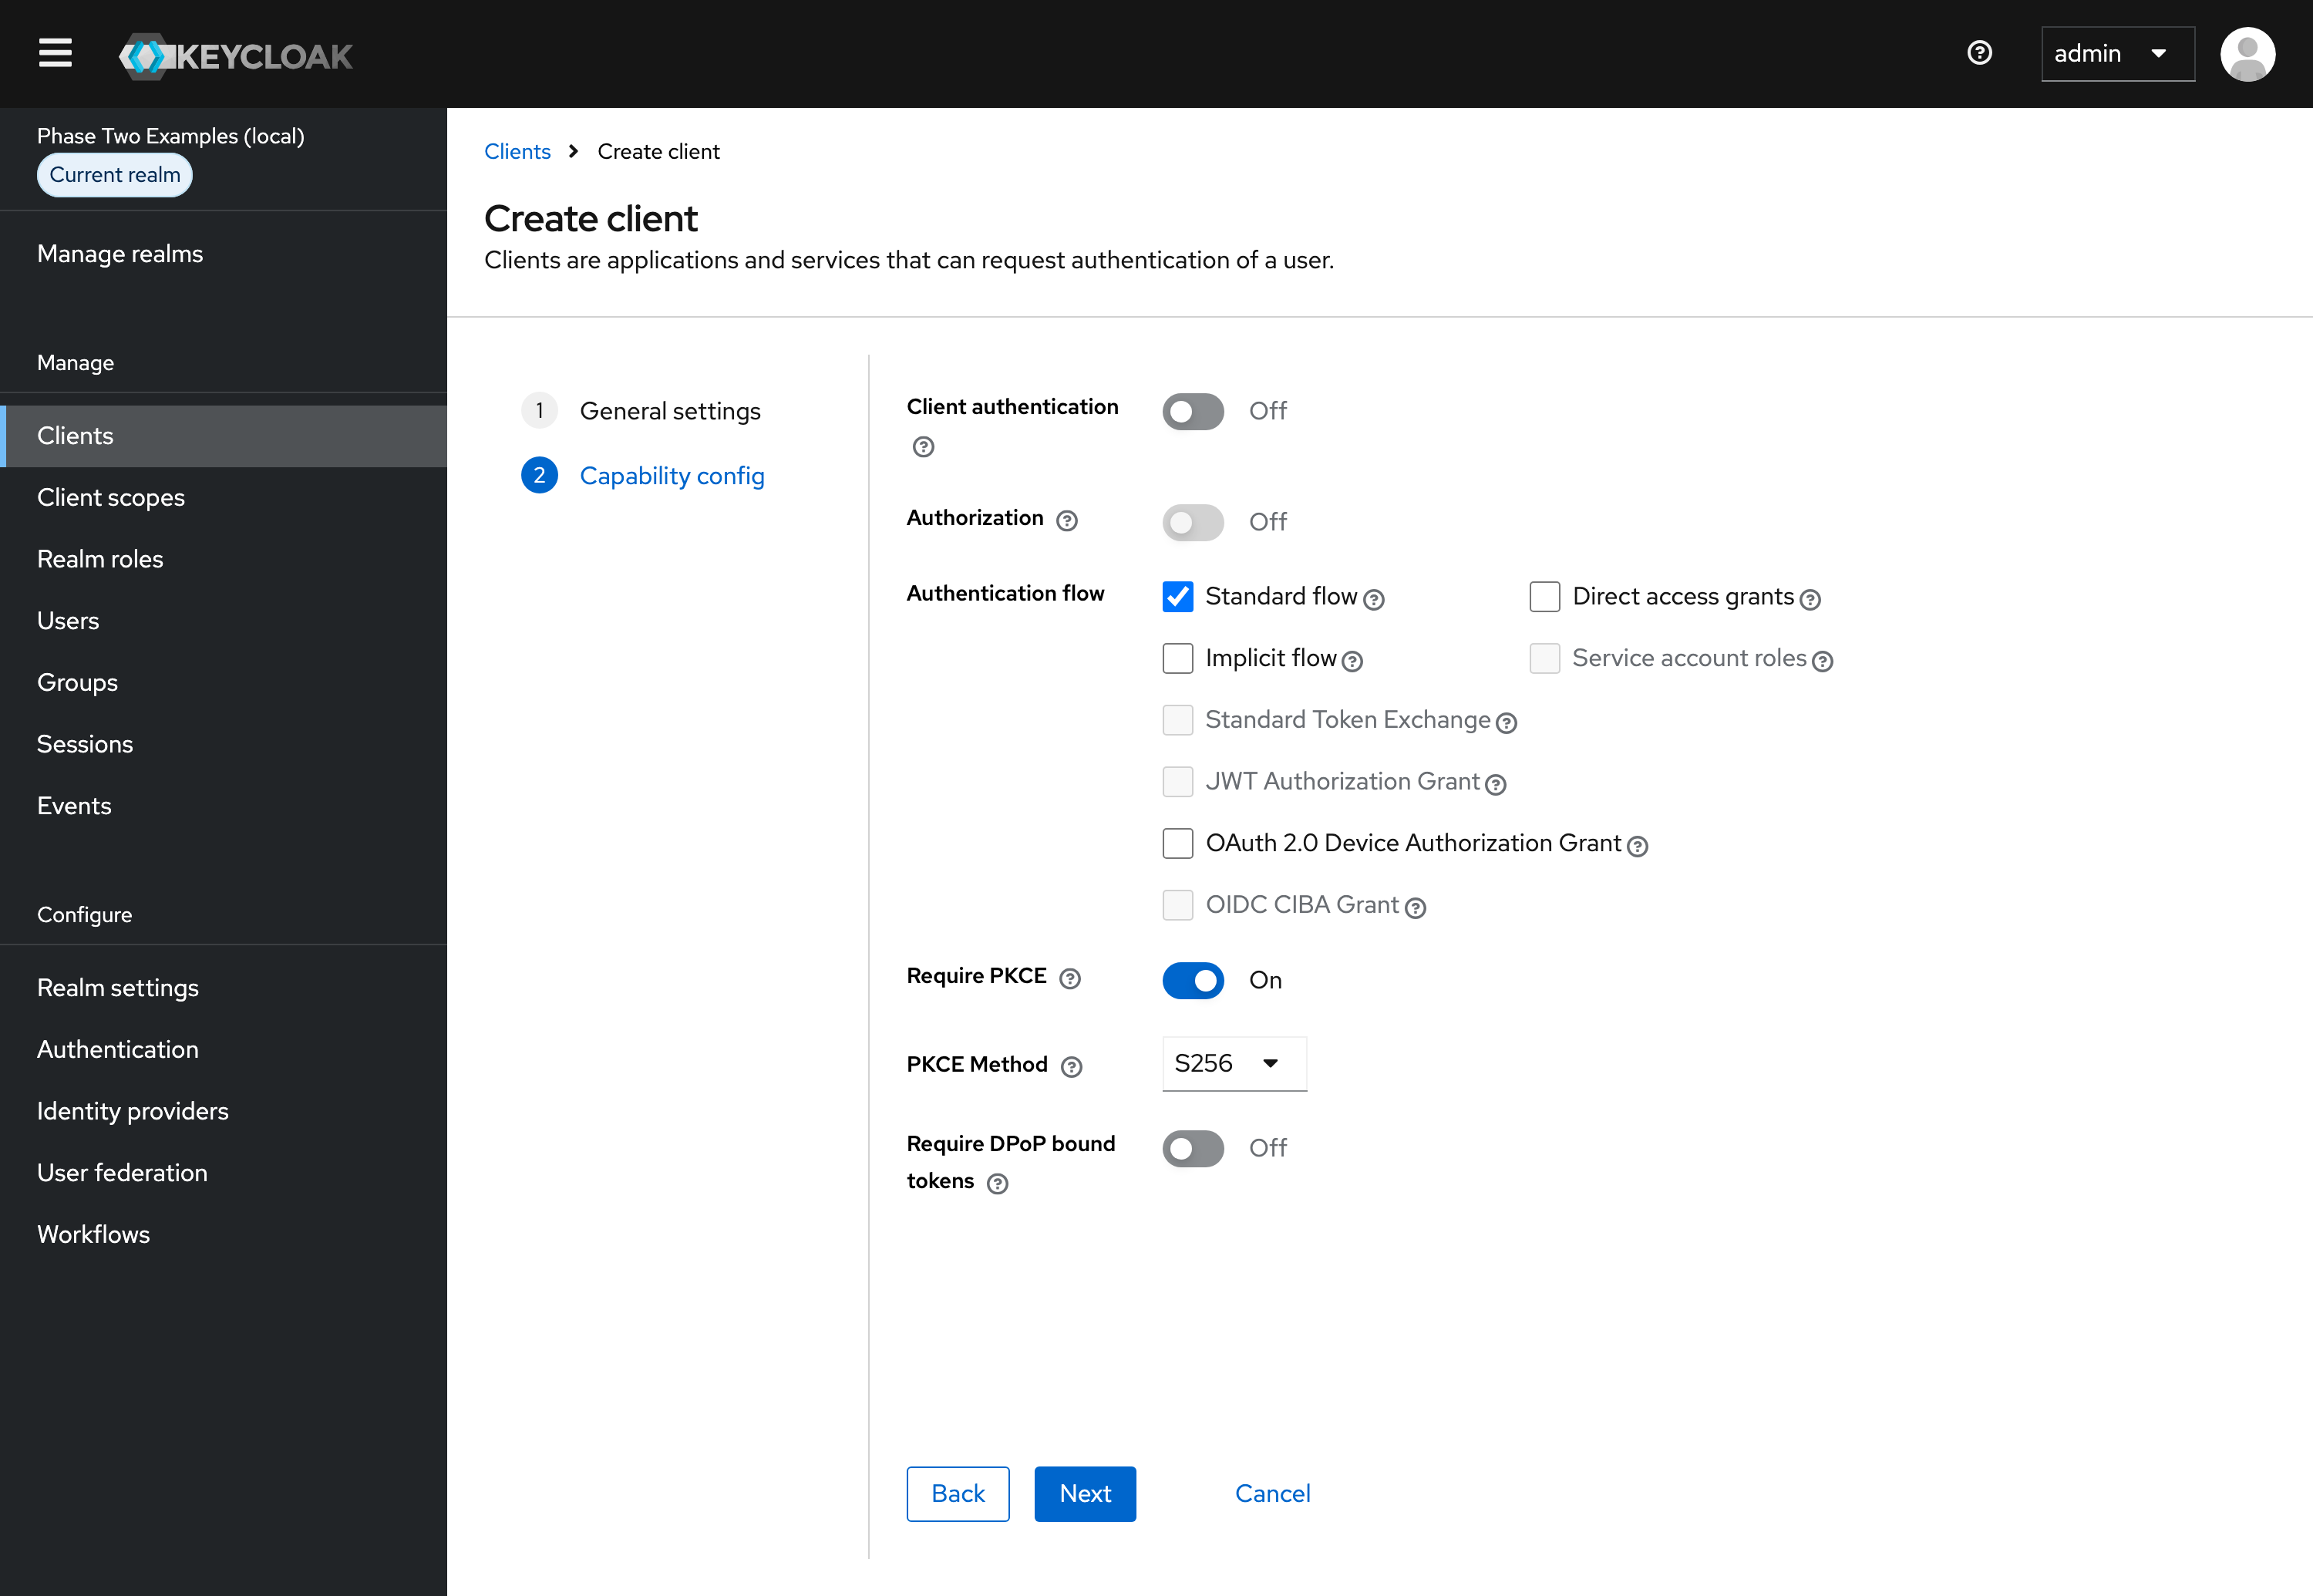
Under Capability config:
- Leave Client authentication off.
- Leave Standard flow checked and Direct access grants unchecked. The app logs users in through Keycloak's login page, so it never needs their password.
- Turn Require PKCE on, and leave PKCE Method set to S256.
-
Click Next.
-
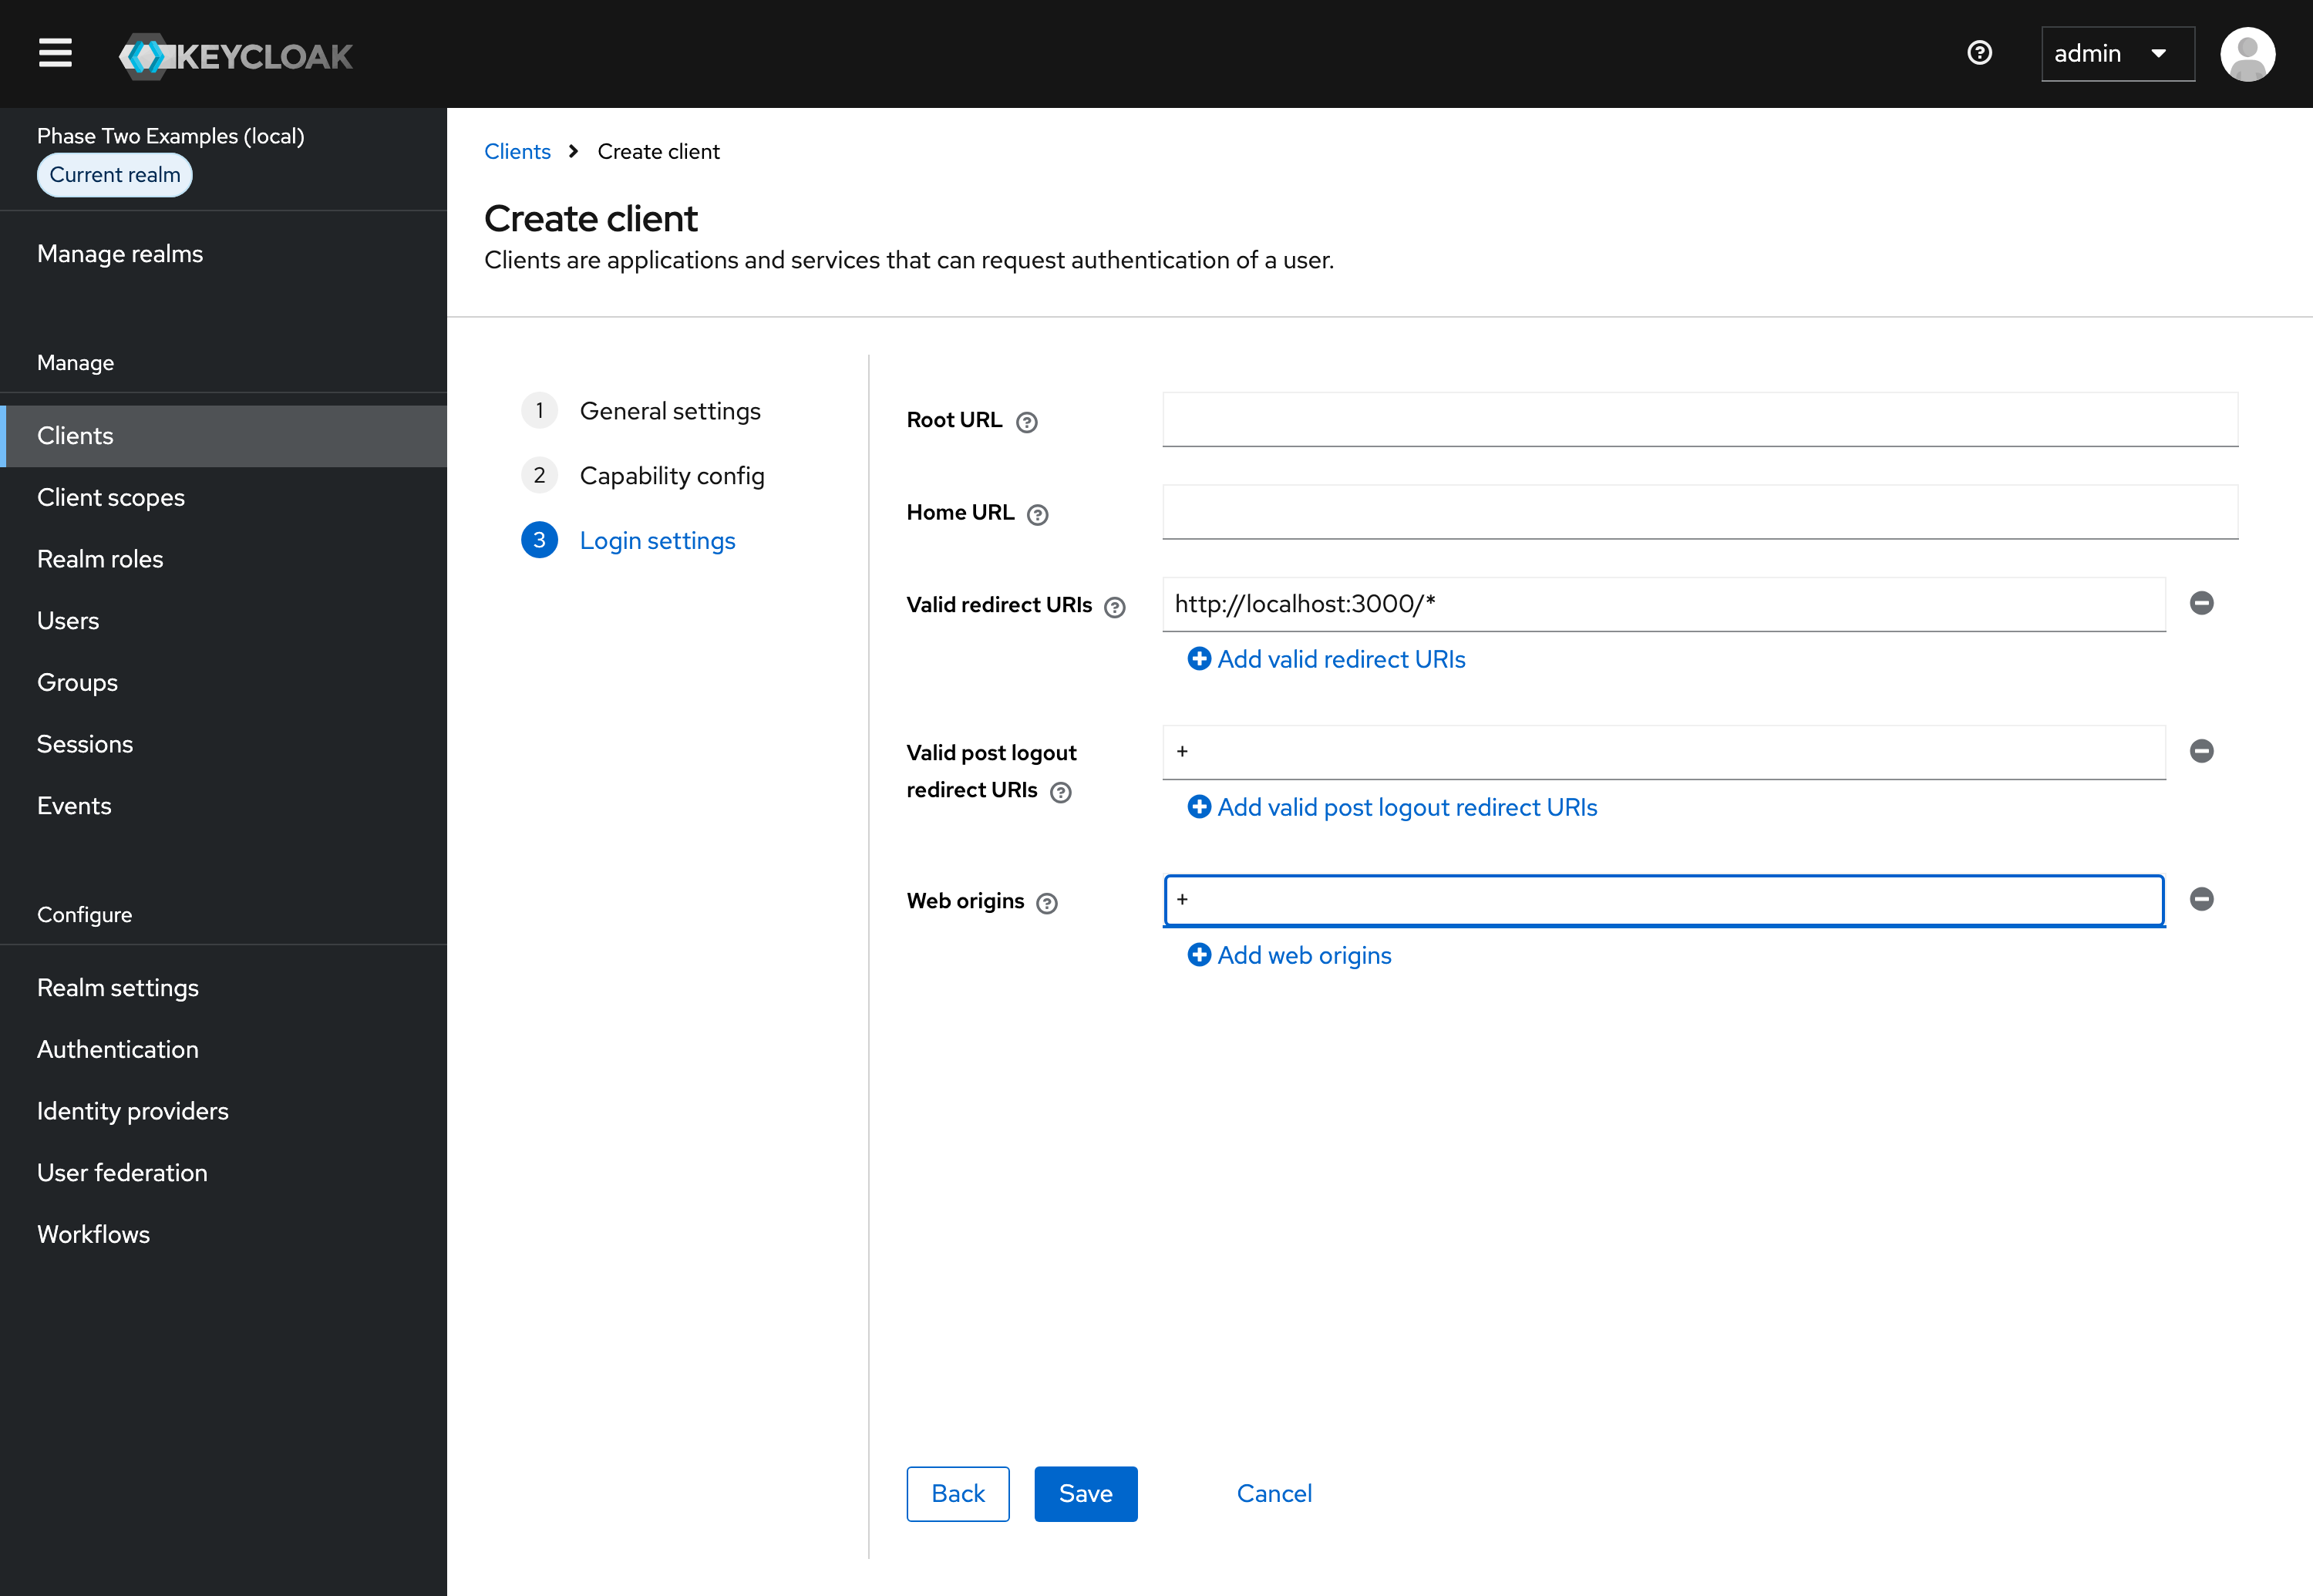
Under Login settings, enter the app's URLs. For an app running on
http://localhost:3000:Valid redirect URIs (where Keycloak may send users back after they log in)
http://localhost:3000/*Valid post logout redirect URIs (where Keycloak may send users back after they log out;
+means the valid redirect URIs)+Web origins (the origins allowed to call Keycloak from the browser, for example to get tokens;
+means the origins of the valid redirect URIs)+URI and Origin Details
Use the port of the app you run: most examples run on port 3000, and the Angular examples on 4200. For an app deployed somewhere, use its URL instead of
localhost. -
Click Save.
OIDC Config
The app needs two values from Keycloak:
- Issuer URL: the realm's URL, such as
http://localhost:8080/auth/realms/p2examplesfor the local Keycloak, orhttps://<your-keycloak-host>/auth/realms/<your-realm>. Realm settings > General > Endpoints > OpenID Endpoint Configuration shows it asissuer. - Client ID: the ID you entered when you created the client.
Adding a Non-Admin User
Instructions
It is bad practice to use your admin user to sign in to an application.
The local Keycloak from the examples repo already has a non-admin user, demo / demo. On any other Keycloak, add one:
- Open the Keycloak admin console and select your realm.
- Click Users in the menu.
- Click Add user.
- Fill out the Username, Email, First name and Last name. Click Create.
- Open the Credentials tab and click Set password. Enter a password for the user. For this tutorial, you can turn Temporary off.
- Click Save, then confirm with Save password.
Setting up a ReactJS Project
As this is a more interactive project, we're going to walk through a bit more integration. We've got a very basic starter template: a React app built with Vite and Tailwind CSS, with the Phase Two example layout and no authentication yet. This tutorial uses oidc-spa 10. If you'd like to see more examples, check out the oidc-spa repo.
-
Clone the Phase Two example repo, if you haven't already, and open the starter in
frameworks/reactjs/oidc-spa-starter. You need Node.js 24 and pnpm. Install the dependencies:pnpm install -
Point the app at your Keycloak. The code you add below reads two environment variables,
VITE_OIDC_ISSUER_URIandVITE_OIDC_CLIENT_ID..envholds the values of the hosted Phase Two demo realm, and.env.localoverrides them. For the local Keycloak, copy.env.local.sampleto.env.local:cp .env.local.sample .env.localIt holds the issuer URL of the local Keycloak and the client it already has for the React examples,
reactjs-example:VITE_OIDC_ISSUER_URI=http://localhost:8080/auth/realms/p2examplesVITE_OIDC_CLIENT_ID=reactjs-exampleFor another Keycloak, copy the file the same way and replace both values with the Issuer URL and the Client ID from the OIDC Config section. The client ID is the one you entered when you created the client, so it may not be
reactjs-example. -
Install oidc-spa, and zod to describe the ID token:
pnpm add oidc-spa zod -
Create
src/oidc.ts:import { oidcSpa } from "oidc-spa/react-spa";import { z } from "zod";export const { bootstrapOidc, useOidc, getOidc, OidcInitializationGate } =oidcSpa.withExpectedDecodedIdTokenShape({decodedIdTokenSchema: z.looseObject({sub: z.string(),name: z.string().optional(),email: z.string().optional(),}),}).createUtils();bootstrapOidc({implementation: "real",issuerUri: import.meta.env.VITE_OIDC_ISSUER_URI,clientId: import.meta.env.VITE_OIDC_CLIENT_ID,scopes: ["profile", "email"],});The zod schema describes the claims you expect in the ID token, so
decodedIdTokenis typed, andz.looseObjectkeeps the other claims too.createUtils()returns the hook and helpers the rest of the app imports from this file.bootstrapOidcstarts oidc-spa with the issuer URL and the client ID from the environment, and asks for theprofileandemailscopes on top ofopenid. -
Add the oidc-spa Vite plugin to
vite.config.ts, so oidc-spa starts before the app and protects the tokens. The file then looks like this:import tailwindcss from "@tailwindcss/vite";import react from "@vitejs/plugin-react";import { oidcSpa } from "oidc-spa/vite-plugin";import { defineConfig } from "vite";export default defineConfig({plugins: [react(),tailwindcss(),oidcSpa({ browserRuntimeFreeze: { enabled: true } }),],server: { port: 3000, strictPort: true },preview: { port: 3000, strictPort: true },});browserRuntimeFreezekeeps scripts on the page from altering core JavaScript behavior to steal the tokens. The oidc-spa docs explain it. -
In
src/App.tsx, wrap<Auth />so it renders once oidc-spa is ready:import { OidcInitializationGate } from "./oidc.ts";<OidcInitializationGate><Auth /></OidcInitializationGate>;OidcInitializationGaterenders its children once oidc-spa has initialized, that is, once it knows whether the user is logged in. The finished example also passes it afallbackprop, which renders in the meantime. -
Replace
src/Auth.tsx. It uses theuseOidchook fromsrc/oidc.tsto check if the user is logged in, log them in and log them out:import { useOidc } from "./oidc.ts";export default function Auth() {const oidc = useOidc();return (<div><div className="pb-8 text-xl italic">Your current status is:</div>{oidc.isUserLoggedIn ? (<><div className="mb-2 text-2xl text-p2blue-700">Authenticated</div><div className="mb-6 text-p2blue-700">{oidc.decodedIdToken.email}</div><button onClick={() => oidc.logout({ redirectTo: "home" })}>Log out</button></>) : (<><div className="mb-6 text-2xl text-p2blue-700">Not authenticated.</div><button onClick={() => oidc.login()}>Log in</button></>)}</div>);}Looking at what comes back from
useOidc(), we have a few main items:isUserLoggedIn- A boolean value that tells you if the user is logged in. The other items depend on it.login- A function that sends the user to the Keycloak login page. It is there while the user is logged out.logout- A function that logs the user out of the app and of Keycloak. It is there while the user is logged in, andredirectTo: "home"brings them back to the app's home page afterwards.decodedIdToken- The claims of the ID token, typed by the schema insrc/oidc.ts, such as the user'semail.
infoOne of the nicest things that OIDC SPA does well is handling your token refresh for you. This is a common issue with OIDC libraries and OIDC SPA has a nice solution.
-
Run the application:
pnpm dev -
Open localhost:3000 and test the login and logout functionality. Sign in with the non-admin user we created, or
demo/demoon the local Keycloak. You should see the user's email displayed when logged in.
The finished example also shows the decoded tokens, a link to the Keycloak account console, a mock mode for working without Keycloak, a fetchWithAuth helper for calling APIs, and a warning before an idle session expires.
Bonus
A very common use case is securing API calls. The finished example's src/oidc.ts exports a fetchWithAuth function, which works like fetch and adds the user's access token to the Authorization header:
export const fetchWithAuth: typeof fetch = async (input, init) => {
  const oidc = await getOidc();

  if (!oidc.isUserLoggedIn) {
    return fetch(input, init);
  }

  const headers = new Headers(init?.headers);
  headers.set("Authorization", `Bearer ${await oidc.getAccessToken()}`);
  return fetch(input, { ...init, headers });
};
getOidc() gives you access to oidc-spa outside of React components. getAccessToken() returns a valid access token, and refreshes it first if it has expired or is about to. We aren't setting up a backend here, but the oidc-spa docs show how your API can validate the token.
Conclusion
This only covers the most very basic installation and usage of this library. There are a lot of different ways you leverage the tool and we invite you to investigate further. Some of which are:
- Auto Logout (due to inactivity)
- Error Management (when login fails)
- Globally enforced authentication (every route requires authentication)
- Usage with routing libraries
We'd love to hear how you're using OIDC SPA in your applications. If you have any questions or need help, feel free to reach out to us at Phase Two. We're always happy to help.
Phase Two's enhanced Keycloak provides many ways to quickly control and tweak the log in and user management experience. Our blog has many use cases from customizing login pages, setting up magic links (passwordless sign in), and Organization workflows.