Securing SvelteKit Apps with Keycloak

In this article we'll be using Keycloak to quickly secure a SvelteKit application with user management and single sign on (SSO) using the open source IAMs Keycloak for Authentication and Authorization. We will demonstrate the integration by securing a page for logged-in users. This quickly provides a jump-off point to more complex integrations.
If you just want to skip to the code, visit the Phase Two SvelteKit example.
Setting up a Keycloak Instance
Instructions
If you already have a Keycloak instance, skip to the next section.
You can run Keycloak on your machine with Docker, or use a hosted Phase Two cluster. Both come with Phase Two's Keycloak extensions.
Run Keycloak locally
The Phase Two examples repo includes a local Phase Two Keycloak that is already set up for the examples: a p2examples realm with a client for each example and a demo user. You need Docker with the Compose plugin.
git clone https://github.com/p2-inc/examples.git
cd examples
docker compose -f keycloak/docker-compose.yml up -d --wait
| What | Value |
|---|---|
| Issuer URL | http://localhost:8080/auth/realms/p2examples |
| Admin console | localhost:8080/auth/admin, admin / admin |
| Demo user | demo / demo |
The client and the user from the next two sections already exist in this realm, so you can skip both. The local Keycloak README lists the client of each example. docker compose -f keycloak/docker-compose.yml down stops Keycloak, and the next up starts again from a fresh realm.
Use a hosted Phase Two cluster
- Sign up on the Phase Two Dashboard with an email address, a GitHub account or a Google account.
- Create a Starter cluster, which is free for 30 days, and add a realm to it.
- Click Open Console to open the realm in the Keycloak admin console.
The app connects to Keycloak through the realm's issuer URL, https://<your-keycloak-host>/auth/realms/<your-realm>. In the admin console, Realm settings > General > Endpoints > OpenID Endpoint Configuration shows it as issuer.
Keep the admin console open: the next sections create the app's client and a user there.
Setting up an OIDC Client
Instructions
The app needs an OpenID Connect client in Keycloak. The app logs users in from its server, so it gets a confidential client: the server authenticates to Keycloak with a client secret that never reaches the browser. Keycloak's docs describe all the client settings.
-
Open the Keycloak admin console and select your realm.
-
Click Clients in the menu.
-
Click Create client.
-
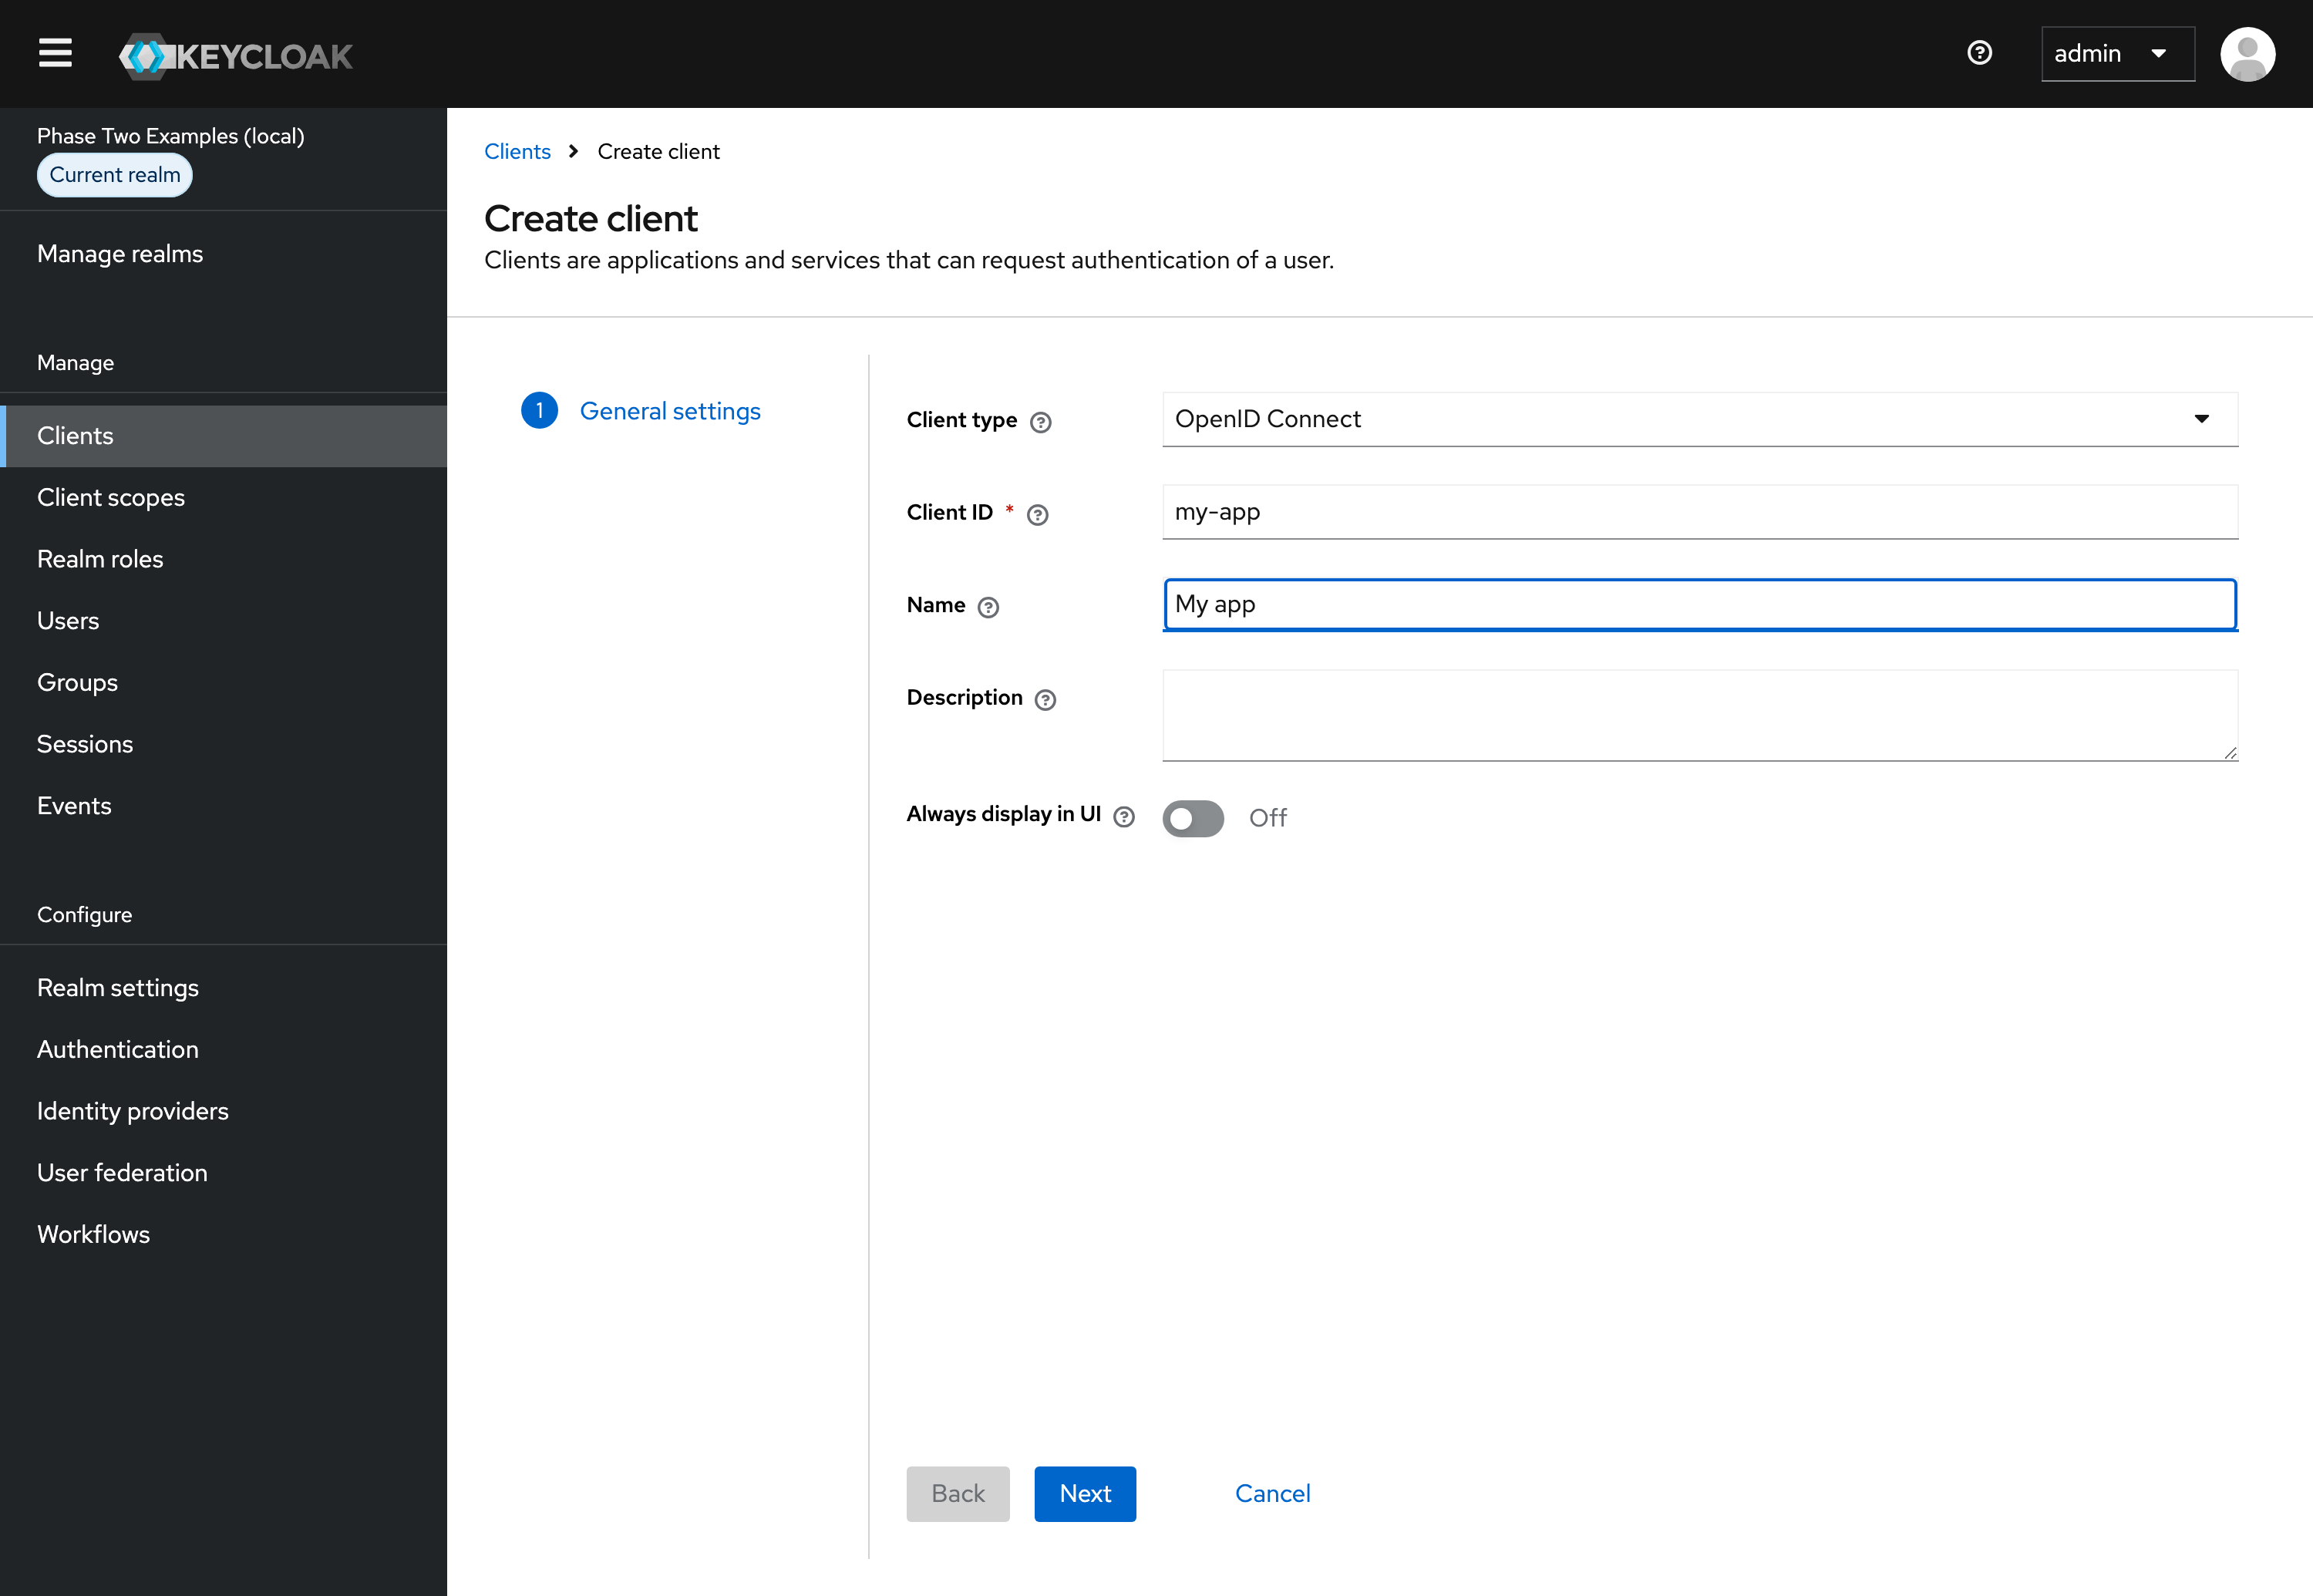
Leave Client type set to OpenID Connect.
-
Enter a Client ID. The app sends this ID in its OpenID Connect requests.
-
Supply a Name for the client.
-
Click Next.
-
Under Capability config:
- Turn Client authentication on.
- Leave Standard flow checked and Direct access grants unchecked. The app logs users in through Keycloak's login page, so it never needs their password.
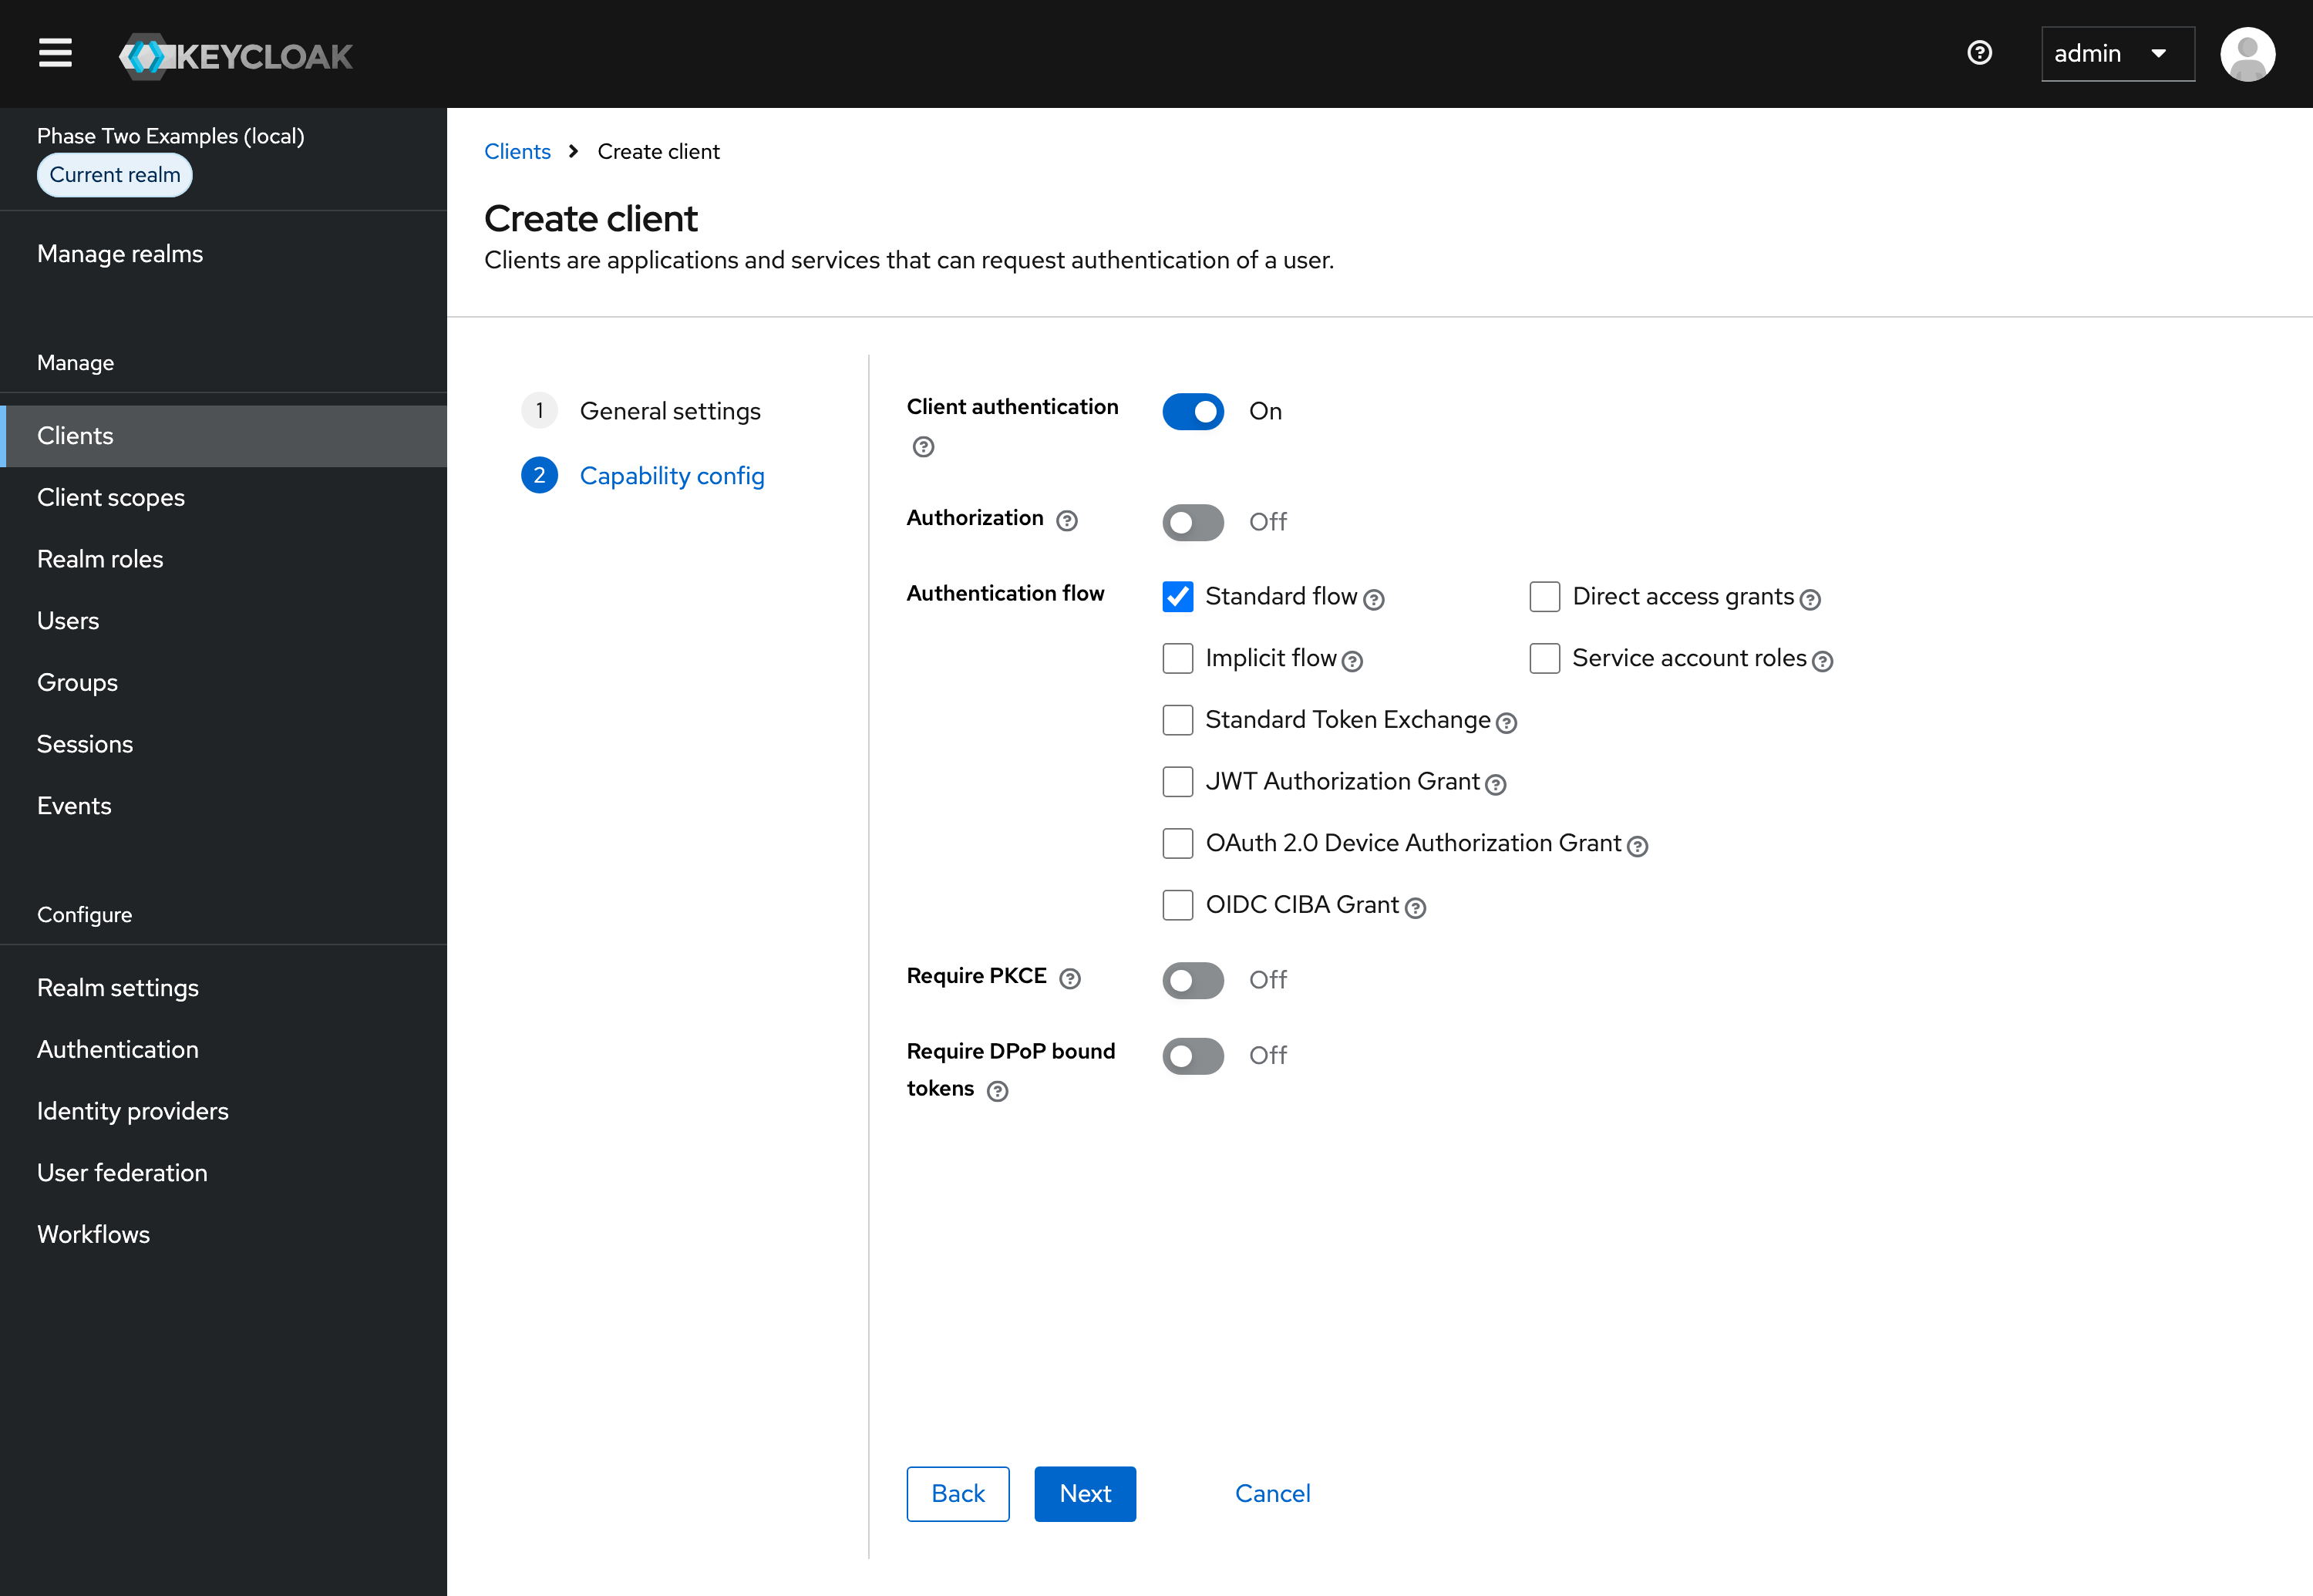
Click Next.
-
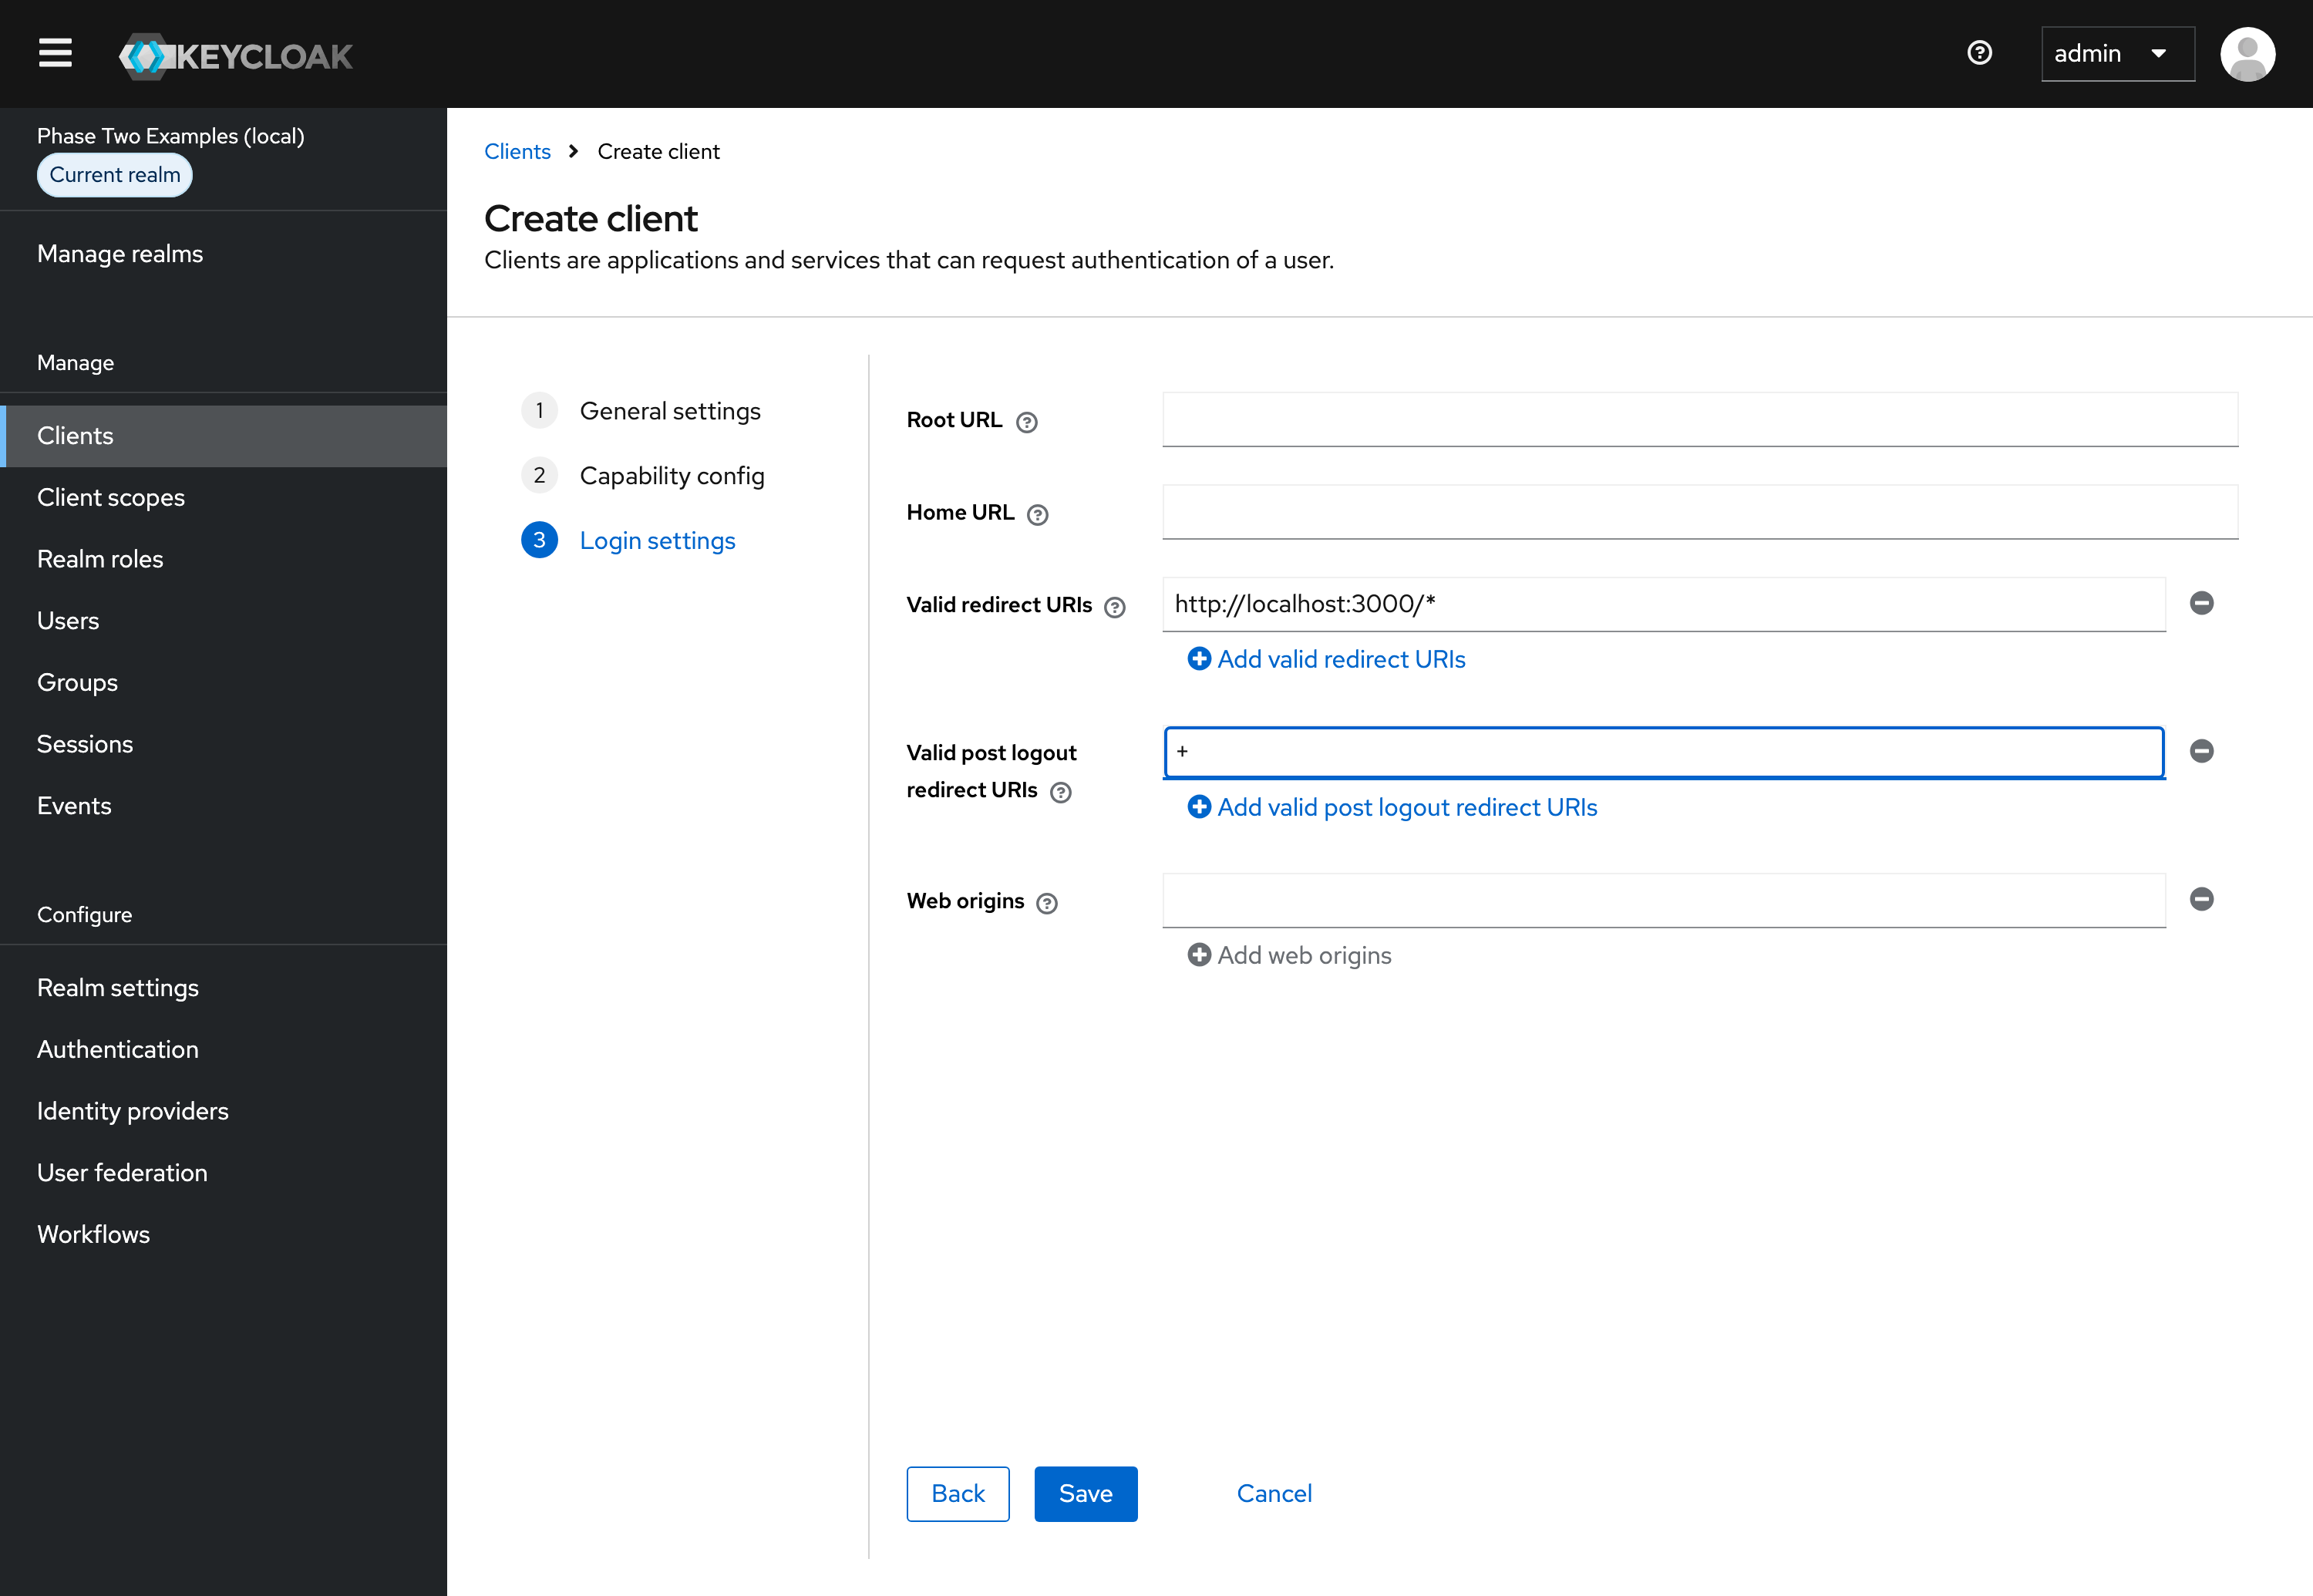
Under Login settings, enter the app's URLs. For an app running on
http://localhost:3000:Valid redirect URIs (where Keycloak may send users back after they log in)
http://localhost:3000/*Valid post logout redirect URIs (where Keycloak may send users back after they log out;
+means the valid redirect URIs)+The app's server calls Keycloak itself, so Web origins can stay empty.
URI Details
Use the port of the app you run: most examples run on port 3000, and the Django example on 8000. For an app deployed somewhere, use its URL instead of
localhost. -
Click Save.
-
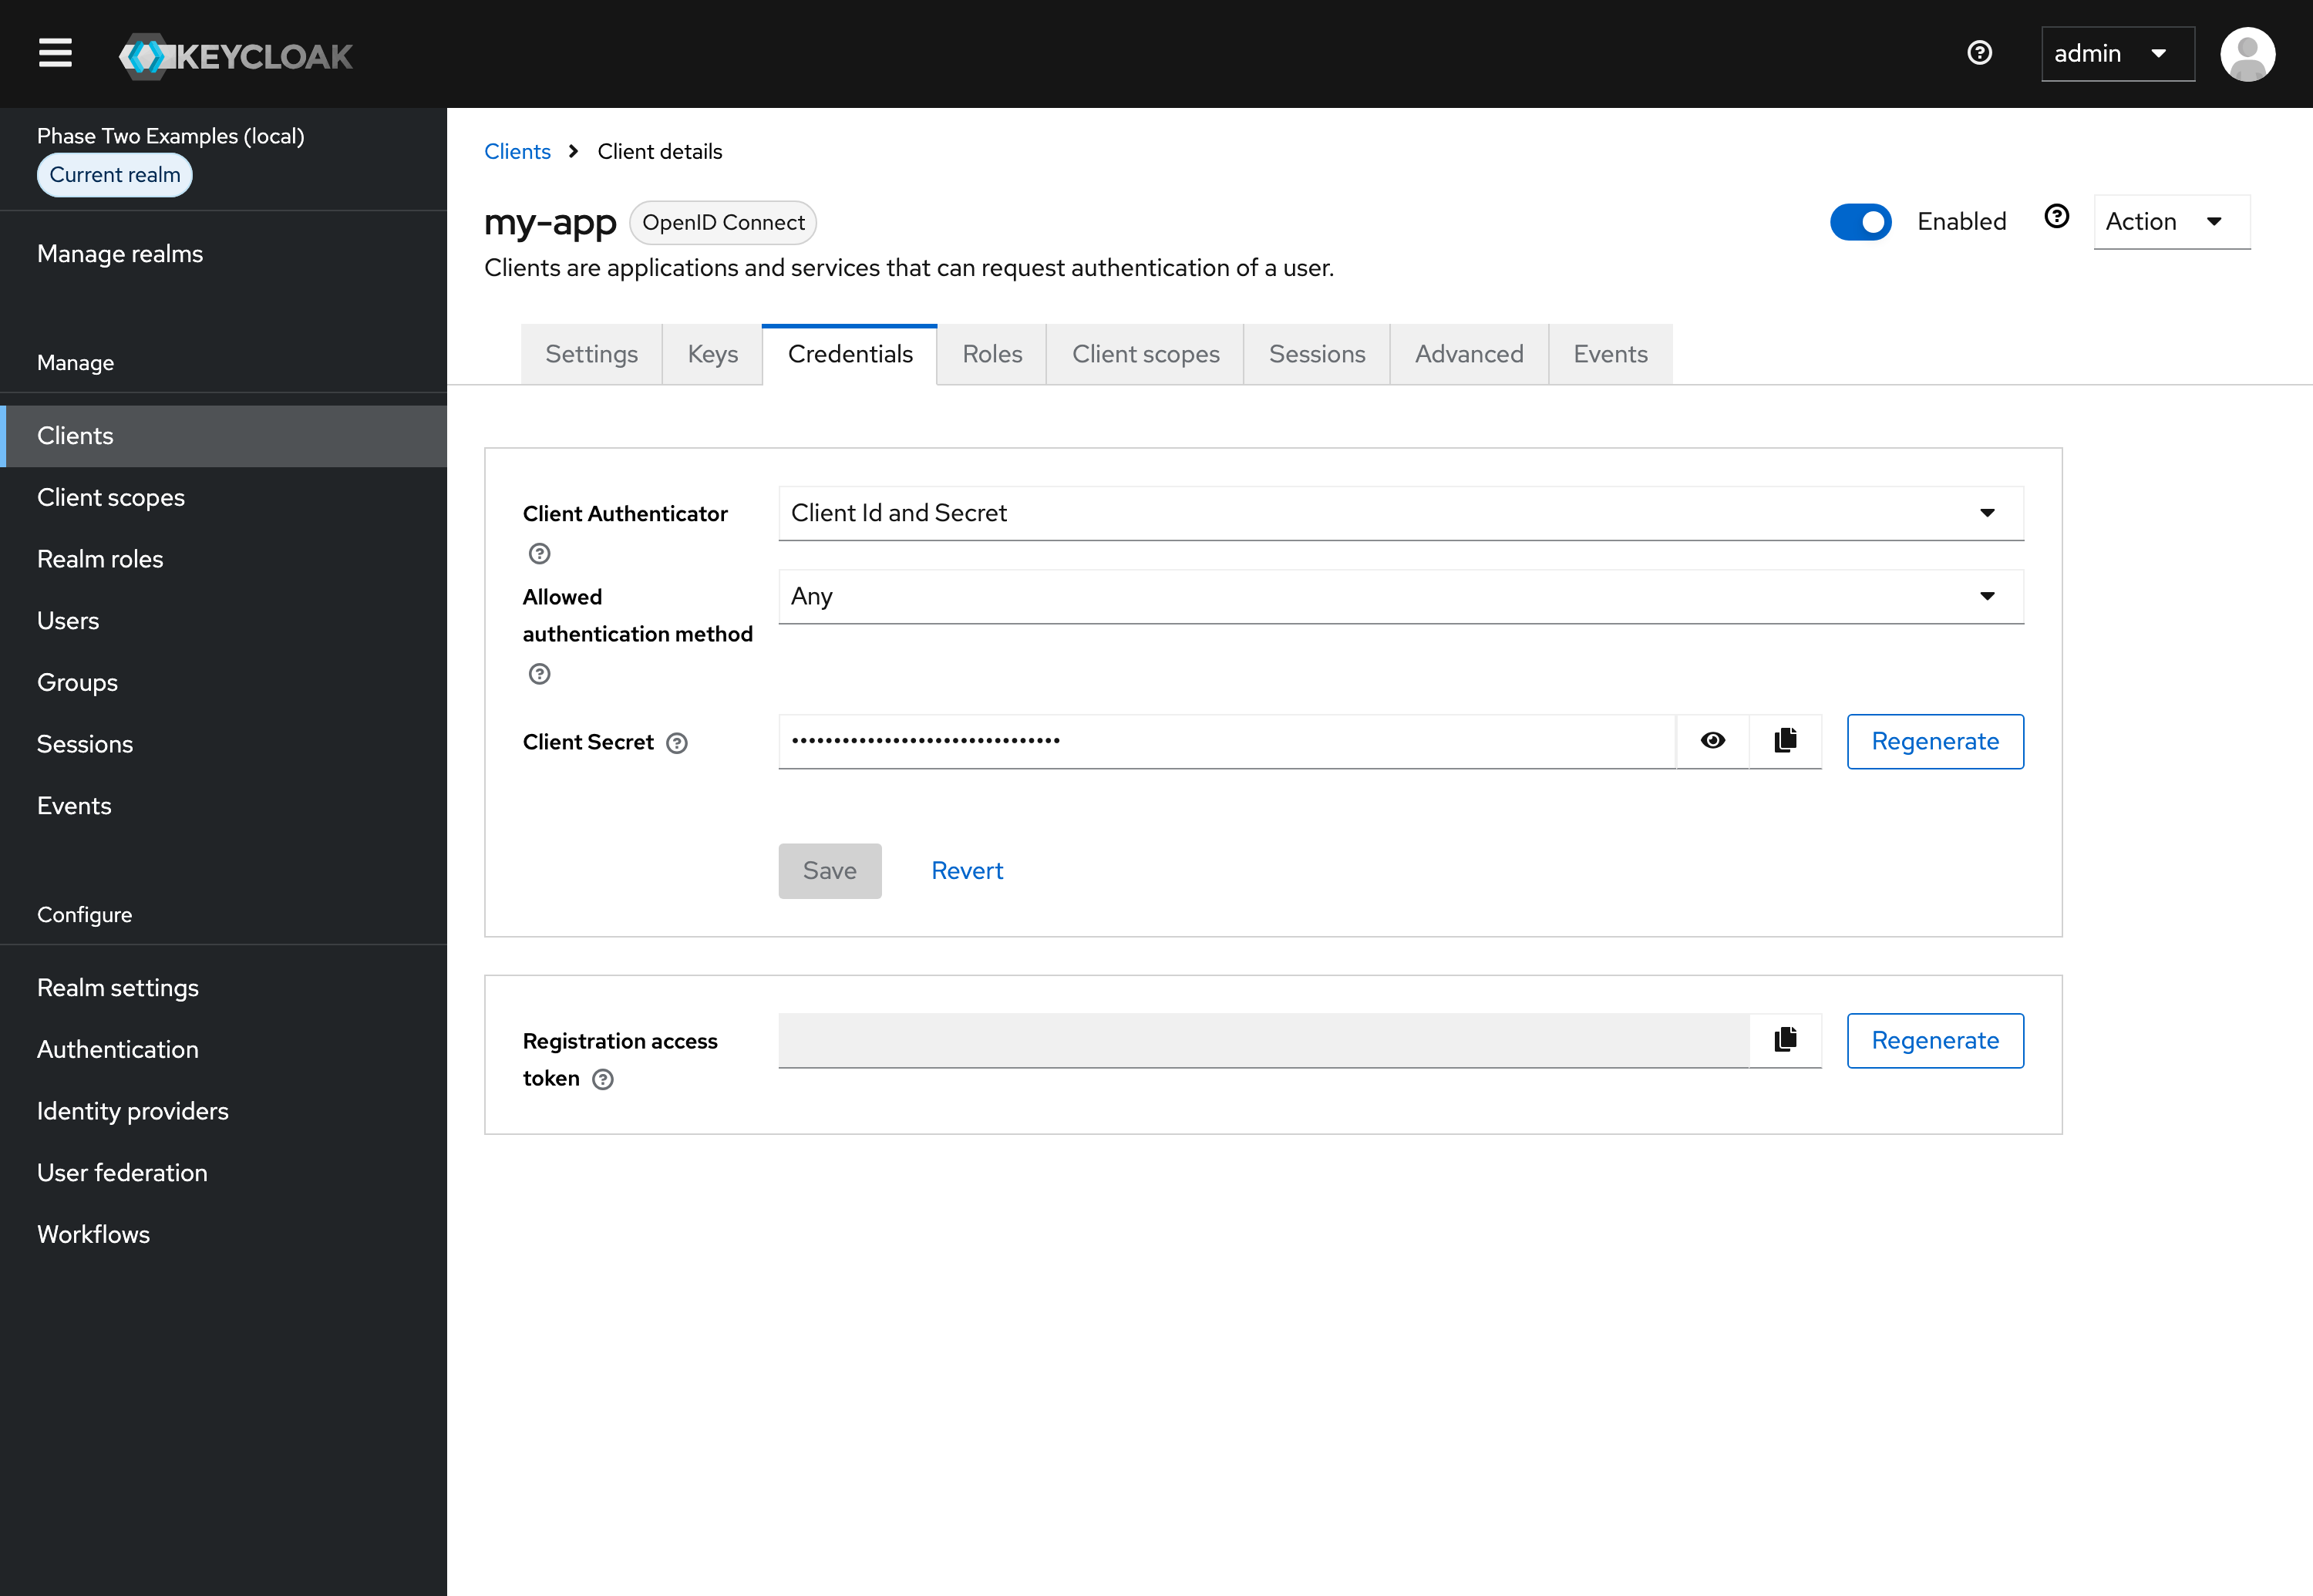
Open the Credentials tab and copy the Client Secret. Keep it for later in this tutorial, and out of your source code and version control.
OIDC Config
The app needs three values from Keycloak:
- Issuer URL: the realm's URL, such as
http://localhost:8080/auth/realms/p2examplesfor the local Keycloak, orhttps://<your-keycloak-host>/auth/realms/<your-realm>. Realm settings > General > Endpoints > OpenID Endpoint Configuration shows it asissuer. - Client ID: the ID you entered when you created the client.
- Client secret: the secret you copied from the Credentials tab.
Adding a Non-Admin User
Instructions
It is bad practice to use your admin user to sign in to an application.
The local Keycloak from the examples repo already has a non-admin user, demo / demo. On any other Keycloak, add one:
- Open the Keycloak admin console and select your realm.
- Click Users in the menu.
- Click Add user.
- Fill out the Username, Email, First name and Last name. Click Create.
- Open the Credentials tab and click Set password. Enter a password for the user. For this tutorial, you can turn Temporary off.
- Click Save, then confirm with Save password.
Setting up a SvelteKit Project
We will use the Phase Two SvelteKit example code here, but the logic could easily be applied to any existing application.
The example is a SvelteKit 2 app with Svelte 5. It logs users in with Auth.js (@auth/sveltekit 1.11) and its Keycloak provider. The login runs on the server: the tokens stay in an encrypted, HTTP-only session cookie, and the browser only sees their decoded claims. You need Node.js 24 and pnpm.
-
Clone the Phase Two example repo if you haven't yet, and open the SvelteKit folder:
git clone https://github.com/p2-inc/examples.gitcd examples/frameworks/sveltekit -
Copy
.env.exampleto.env:cp .env.example .env.env.examplepoints at the local Keycloak of the example repo. Itsp2examplesrealm already has the example'ssveltekitclient and a non-admin user,demo/demo. If it isn't running yet, start it from the root of the repo withdocker compose -f keycloak/docker-compose.yml up -d --wait.Auth.js reads these variables at runtime:
Variable Description Local Keycloak AUTH_SECRETRandom secret that encrypts the session Generate your own AUTH_KEYCLOAK_IDClient ID sveltekitAUTH_KEYCLOAK_SECRETClient secret sveltekit-local-dev-secretAUTH_KEYCLOAK_ISSUERIssuer URL of the realm http://localhost:8080/auth/realms/p2examplesSet
AUTH_SECRETin.envto a random value, such as the output ofopenssl rand -base64 32.To use another Keycloak, set
AUTH_KEYCLOAK_ISSUERto your realm's issuer URL, andAUTH_KEYCLOAK_IDandAUTH_KEYCLOAK_SECRETto the ID and secret of a confidential client there, withhttp://localhost:3000/*as valid redirect URI and+as valid post logout redirect URI. Use your own client's ID, sincesveltekitis only the client of the local Keycloak..envis ignored by git, so your secrets stay out of version control. -
Install the dependencies and start the app:
pnpm installpnpm dev -
The project makes use of the following SvelteKit items: a server hook, a layout
loadfunction, form actions and the@auth/sveltekitmodule. We'll review each in turn. -
Open
src/auth.ts, where the example configures Auth.js. This file runs only on the server and reads the Keycloak settings at runtime through$env/dynamic/private. At the top ofsrc/auth.ts,refreshAccessTokentrades the refresh token for new tokens at Keycloak's token endpoint:import type { JWT } from '@auth/core/jwt';import { SvelteKitAuth } from '@auth/sveltekit';import Keycloak from '@auth/sveltekit/providers/keycloak';import { env } from '$env/dynamic/private';import { decodeJwtPayload } from '$lib/server/jwt';async function refreshAccessToken(token: JWT): Promise<JWT> {if (!token.refreshToken) {return { ...token, error: 'RefreshAccessTokenError' };}const response = await fetch(`${env.AUTH_KEYCLOAK_ISSUER}/protocol/openid-connect/token`, {method: 'POST',body: new URLSearchParams({grant_type: 'refresh_token',client_id: env.AUTH_KEYCLOAK_ID ?? '',client_secret: env.AUTH_KEYCLOAK_SECRET ?? '',refresh_token: token.refreshToken})});if (!response.ok) {return { ...token, error: 'RefreshAccessTokenError' };}const tokens = await response.json();return {...token,accessToken: tokens.access_token,idToken: tokens.id_token ?? token.idToken,refreshToken: tokens.refresh_token ?? token.refreshToken,expiresAt: Math.floor(Date.now() / 1000) + tokens.expires_in,error: undefined};}Further down in
src/auth.ts,SvelteKitAuthcreates thehandlehook and thesignInandsignOutactions:export const { handle, signIn, signOut } = SvelteKitAuth({trustHost: true,providers: [Keycloak],callbacks: {async jwt({ token, account }) {if (account) {return {...token,accessToken: account.access_token,idToken: account.id_token,refreshToken: account.refresh_token,expiresAt: account.expires_at};}if (token.expiresAt && Date.now() < (token.expiresAt - 30) * 1000) {return token;}return refreshAccessToken(token);},session({ session, token }) {return {...session,error: token.error,accessTokenClaims: decodeJwtPayload(token.accessToken),idTokenClaims: decodeJwtPayload(token.idToken)};}},events: {async signOut(message) {const refreshToken = 'token' in message ? message.token?.refreshToken : undefined;if (!refreshToken) {return;}await fetch(`${env.AUTH_KEYCLOAK_ISSUER}/protocol/openid-connect/logout`, {method: 'POST',body: new URLSearchParams({client_id: env.AUTH_KEYCLOAK_ID ?? '',client_secret: env.AUTH_KEYCLOAK_SECRET ?? '',refresh_token: refreshToken})});}}});providers: [Keycloak]passes the provider without options: Auth.js reads its client ID, client secret and issuer from theAUTH_KEYCLOAK_*variables, and its own secret fromAUTH_SECRET.- The
jwtcallback stores Keycloak's access, ID and refresh tokens in the encrypted session cookie when the user logs in. When the access token has less than 30 seconds left, it callsrefreshAccessToken. - The
sessioncallback decides what the app gets from the session: the decoded claims of the access and ID tokens, and anerrorif the refresh failed. The tokens themselves never leave the server. - The
signOutevent posts the refresh token to Keycloak's logout endpoint, so logging out of the app also ends the Keycloak session.
decodeJwtPayloadis insrc/lib/server/jwt.ts, andsrc/app.d.tsadds these fields to theSessionandJWTtypes. -
Next, let's review the hooks file. SvelteKit runs its
handlehook on every request, so Auth.js can answer its own routes under/auth, such as the callback that Keycloak redirects to after the login, and addauth()toevent.locals.src/hooks.server.tsre-exportshandlefromsrc/auth.ts:export { handle } from './auth'; -
To get the session during server-side rendering,
src/routes/+layout.server.tscallsevent.locals.auth()from SvelteKit Locals and returns the session to every page:import type { LayoutServerLoad } from './$types';export const load: LayoutServerLoad = async (event) => {return { session: await event.locals.auth() };}; -
src/routes/+page.sveltereceives that data with$props()and passes the session on to theUserStatuscomponent:<script lang="ts">import Footer from '$lib/components/Footer.svelte';import Header from '$lib/components/Header.svelte';import UserStatus from '$lib/components/UserStatus.svelte';let { data } = $props();</script><div class="page-bg min-h-screen"><Header /><main class="py-8"><div class="mx-auto max-w-3xl px-6 text-center lg:px-8"><UserStatus session={data.session} /></div></main><Footer /></div> -
UserStatusshows Not authenticated. and a Log in button, or your name and email, the decoded tokens and a Log out button. If the token refresh failed, it asks you to log in again. Insrc/lib/components/UserStatus.svelte, the buttons are plain HTML forms that post to/signinand/signout:<script lang="ts">import type { Session } from '@auth/sveltekit';import TokenPanels from './TokenPanels.svelte';let { session }: { session: Session | null } = $props();const buttonClasses ='cursor-pointer rounded-md bg-indigo-600 px-2.5 py-1.5 text-sm font-semibold text-white shadow-xs hover:bg-indigo-500 focus-visible:outline-2 focus-visible:outline-offset-2 focus-visible:outline-indigo-600';</script>{#snippet loginForm()}<form method="POST" action="/signin"><input type="hidden" name="providerId" value="keycloak" /><input type="hidden" name="redirectTo" value="/" /><button type="submit" class={buttonClasses}>Log in</button></form>{/snippet}<div><div class="pb-8 text-xl italic">Your current status is:</div>{#if session?.error}<div class="mb-2 text-2xl text-p2blue-700">Authentication error.</div><div class="mb-6">Your session expired. Please log in again.</div>{@render loginForm()}{:else if session}<div class="mb-2 text-2xl text-p2blue-700">Authenticated</div><div class="mb-6 text-p2blue-700"><div>{session.user?.name}</div><div>{session.user?.email}</div></div><form method="POST" action="/signout"><input type="hidden" name="redirectTo" value="/" /><button type="submit" class={buttonClasses}>Log out</button></form><TokenPanels {session} />{:else}<div class="mb-6 text-2xl text-p2blue-700">Not authenticated.</div>{@render loginForm()}{/if}</div>Each of those routes only has a form action: the
signInorsignOutaction fromsrc/auth.ts. Insrc/routes/signin/+page.server.ts:import { signIn } from '../../auth';import type { Actions } from './$types';export const actions = { default: signIn } satisfies Actions;src/routes/signout/+page.server.tsdoes the same withsignOut. The hiddenproviderIdfield makessignIngo straight to Keycloak, andredirectTobrings you back to the home page.Protect other routes the same way: call
event.locals.auth()in theirloadfunctions and actions, and check that it returns a session. -
Open localhost:3000. You will see the Phase Two example landing page. Your current status should be Not authenticated. Click Log in. This will redirect you to the Keycloak login page.
infoSign in with a non-admin user, such as
demo/demoon the local Keycloak. -
Enter the user's credentials and sign in. You will then be redirected to the application. The Phase Two example landing page now shows your Authenticated state, your user's name and email, and the decoded access token and ID token.
-
Click Log out. The app also ends your Keycloak session, so the next time you click Log in, Keycloak asks for your credentials again.
Learning more
Phase Two's enhanced Keycloak provides many ways to quickly control and tweak the log in and user management experience. Our blog has many use cases from customizing login pages, setting up magic links (passwordless sign in), and Organization workflows.