Securing Angular Apps with Keycloak

In this article we'll be using Keycloak to quickly secure an Angular application with user management and single sign on (SSO) using the open source IAMs Keycloak for Authentication and Authorization. We will demonstrate the integration by securing a page for logged-in users. This quickly provides a jump-off point to more complex integrations.
If you just want to skip to the code, visit the Phase Two Angular example.
If you want to see a live example, visit the Phase Two Angular example.
Setting up a Keycloak Instance
Instructions
If you already have a Keycloak instance, skip to the next section.
You can run Keycloak on your machine with Docker, or use a hosted Phase Two cluster. Both come with Phase Two's Keycloak extensions.
Run Keycloak locally
The Phase Two examples repo includes a local Phase Two Keycloak that is already set up for the examples: a p2examples realm with a client for each example and a demo user. You need Docker with the Compose plugin.
git clone https://github.com/p2-inc/examples.git
cd examples
docker compose -f keycloak/docker-compose.yml up -d --wait
| What | Value |
|---|---|
| Issuer URL | http://localhost:8080/auth/realms/p2examples |
| Admin console | localhost:8080/auth/admin, admin / admin |
| Demo user | demo / demo |
The client and the user from the next two sections already exist in this realm, so you can skip both. The local Keycloak README lists the client of each example. docker compose -f keycloak/docker-compose.yml down stops Keycloak, and the next up starts again from a fresh realm.
Use a hosted Phase Two cluster
- Sign up on the Phase Two Dashboard with an email address, a GitHub account or a Google account.
- Create a Starter cluster, which is free for 30 days, and add a realm to it.
- Click Open Console to open the realm in the Keycloak admin console.
The app connects to Keycloak through the realm's issuer URL, https://<your-keycloak-host>/auth/realms/<your-realm>. In the admin console, Realm settings > General > Endpoints > OpenID Endpoint Configuration shows it as issuer.
Keep the admin console open: the next sections create the app's client and a user there.
Setting up an OIDC Client
Instructions
The app needs an OpenID Connect client in Keycloak. The app runs in the browser, where it can't keep a secret, so it gets a public client and logs users in with the authorization code flow and PKCE. Keycloak's docs describe all the client settings.
-
Open the Keycloak admin console and select your realm.
-
Click Clients in the menu.
-
Click Create client.
-
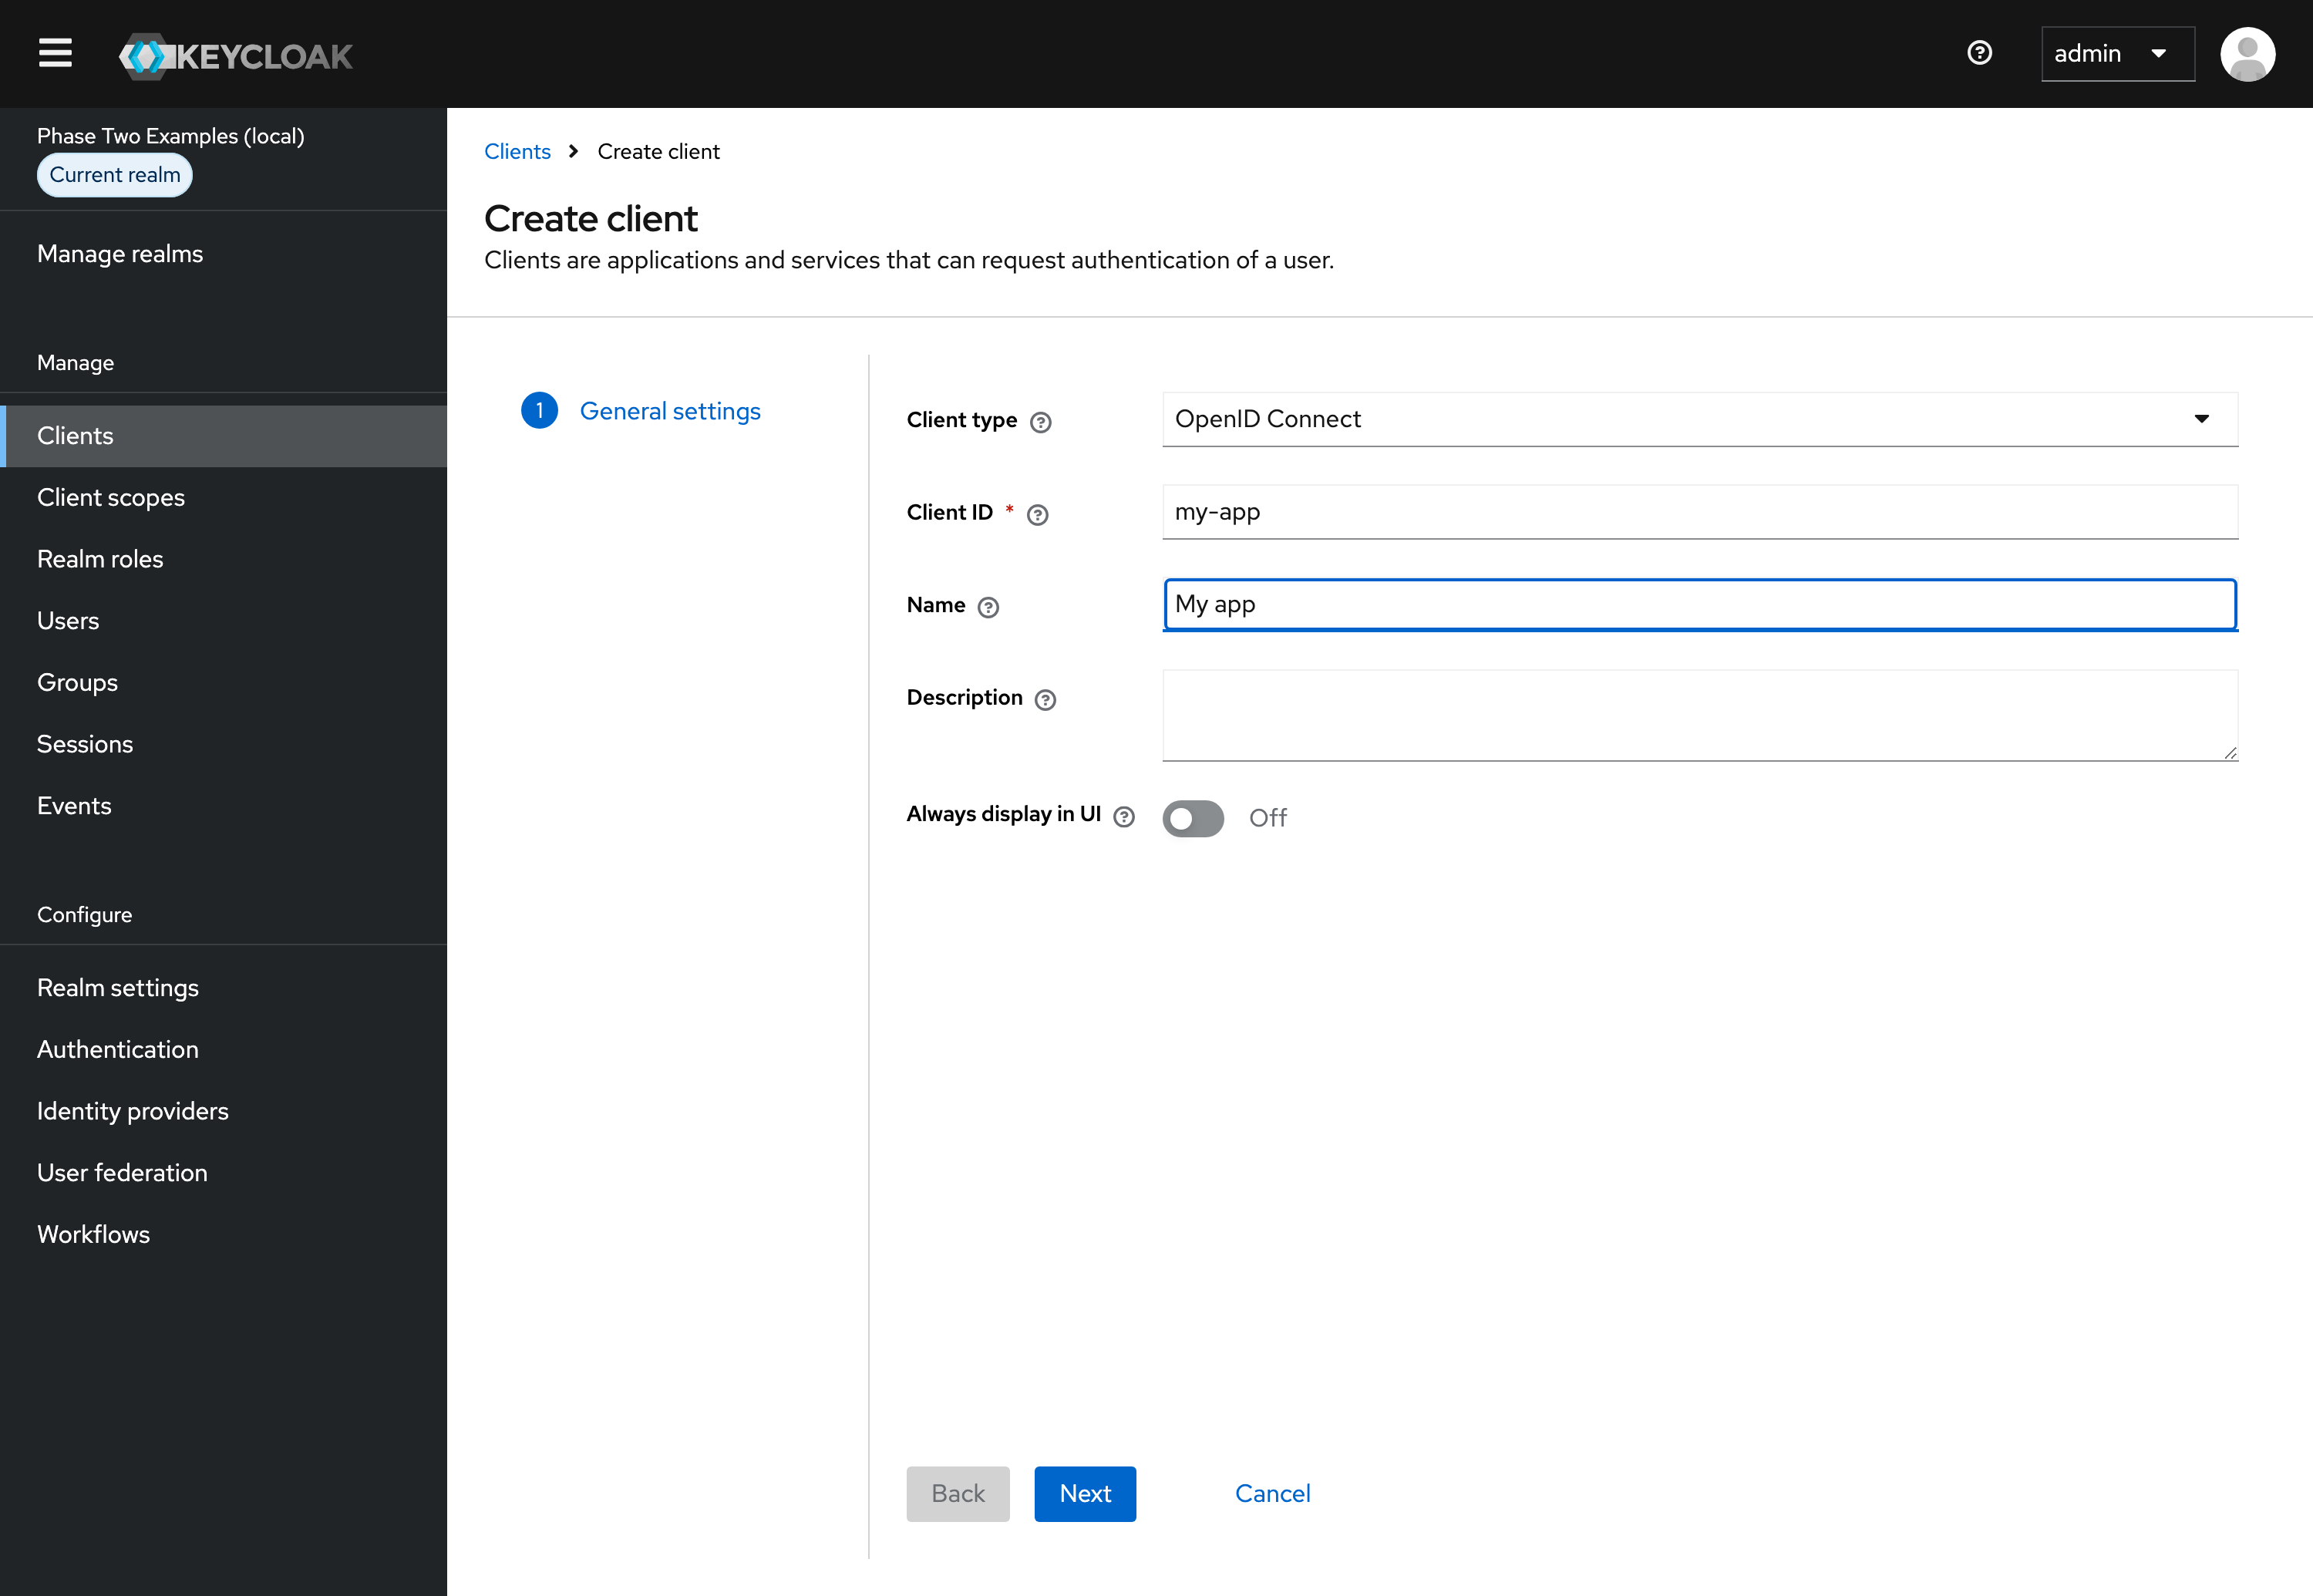
Leave Client type set to OpenID Connect.
-
Enter a Client ID. The app sends this ID in its OpenID Connect requests.
-
Supply a Name for the client.
-
Click Next.
-
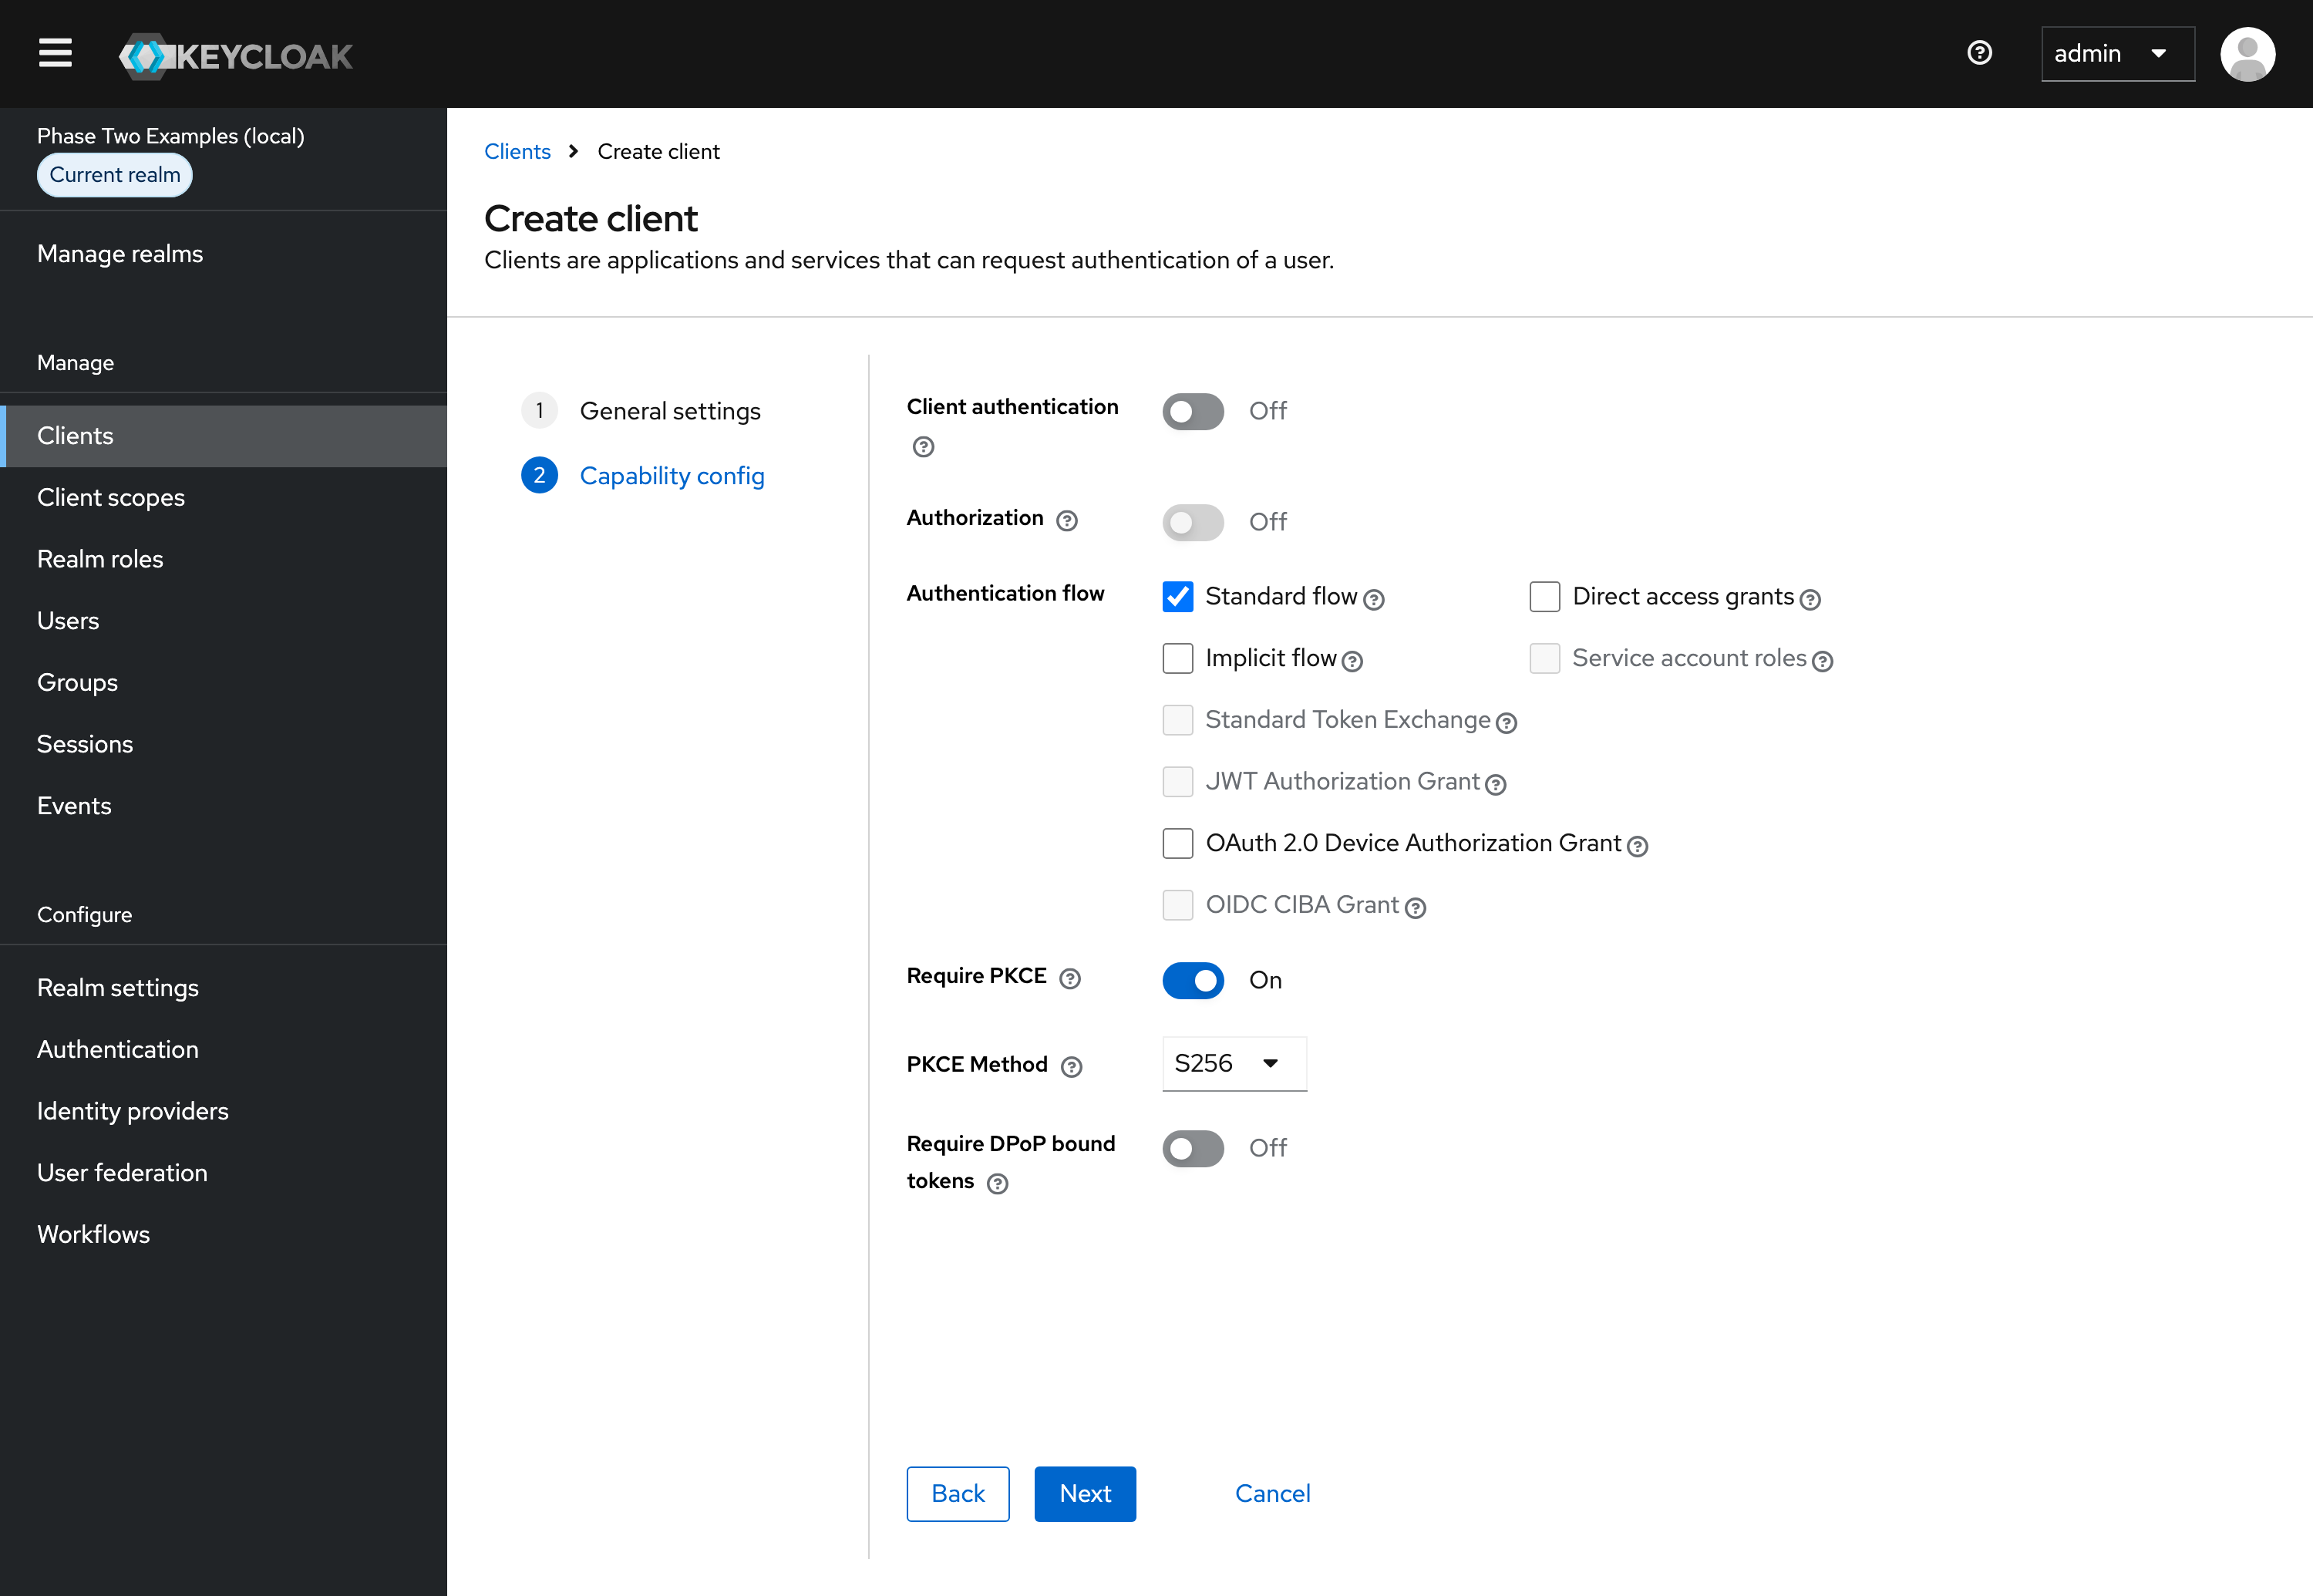
Under Capability config:
- Leave Client authentication off.
- Leave Standard flow checked and Direct access grants unchecked. The app logs users in through Keycloak's login page, so it never needs their password.
- Turn Require PKCE on, and leave PKCE Method set to S256.
-
Click Next.
-
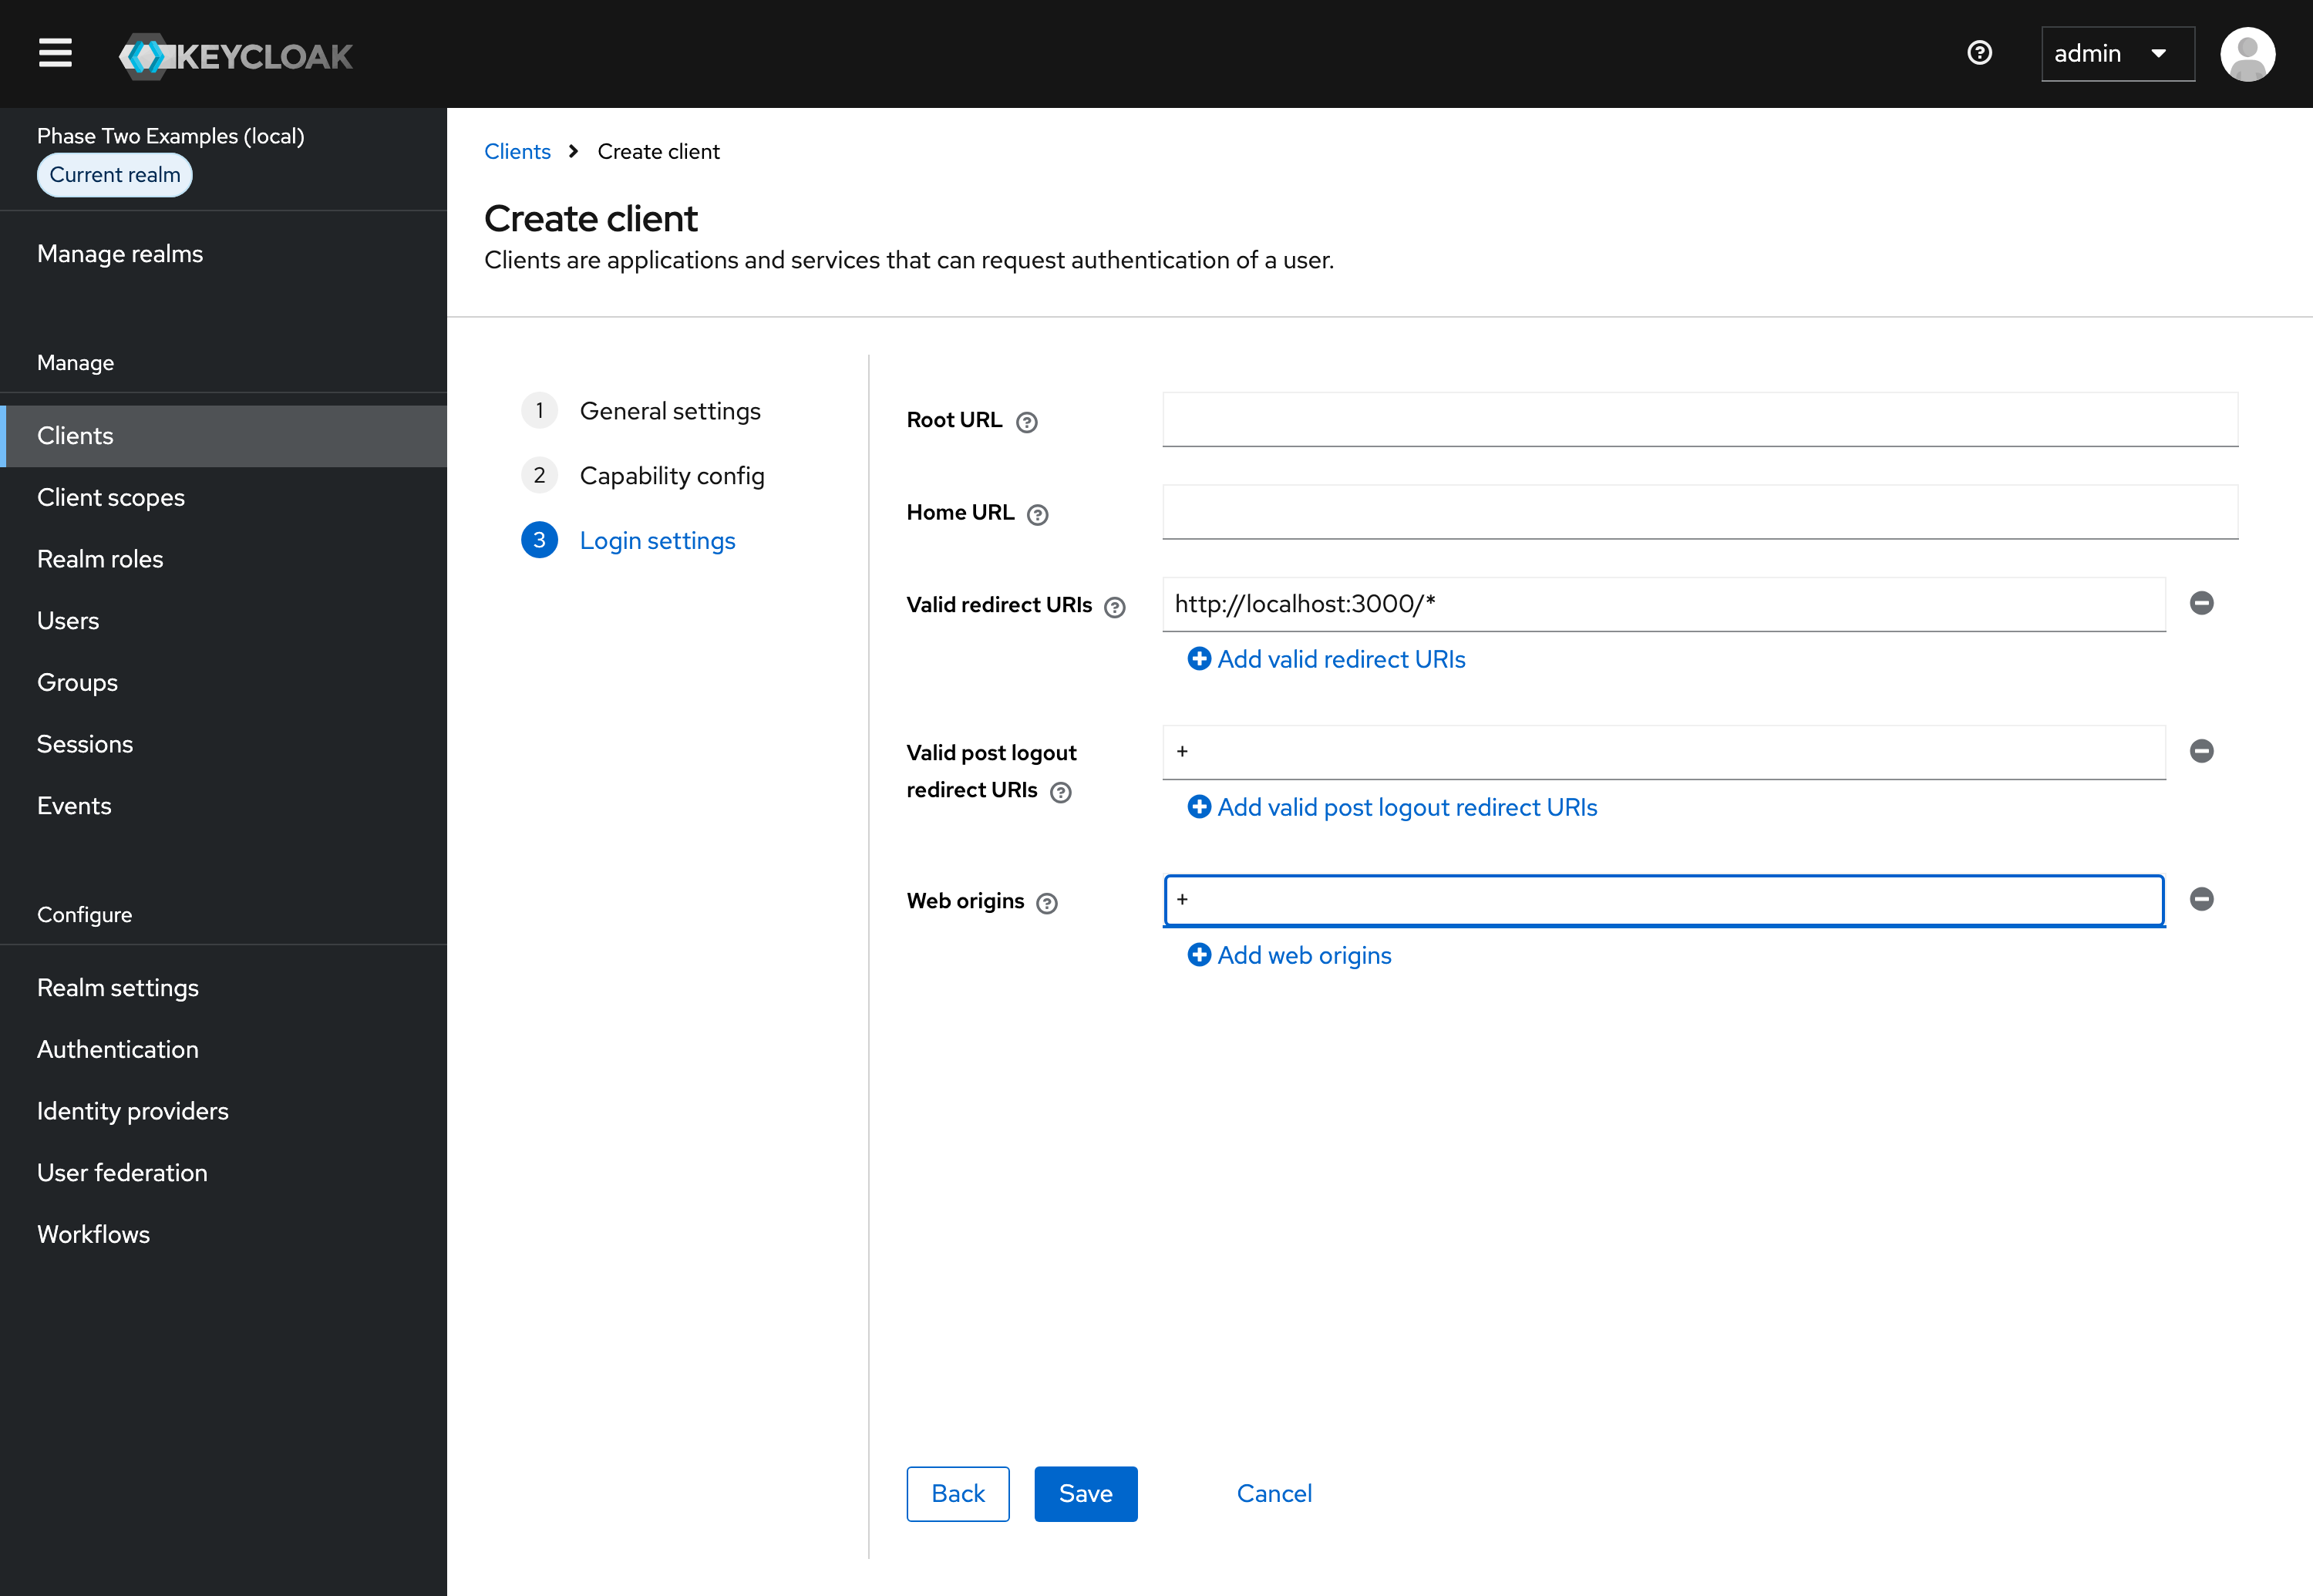
Under Login settings, enter the app's URLs. For an app running on
http://localhost:3000:Valid redirect URIs (where Keycloak may send users back after they log in)
http://localhost:3000/*Valid post logout redirect URIs (where Keycloak may send users back after they log out;
+means the valid redirect URIs)+Web origins (the origins allowed to call Keycloak from the browser, for example to get tokens;
+means the origins of the valid redirect URIs)+URI and Origin Details
Use the port of the app you run: most examples run on port 3000, and the Angular examples on 4200. For an app deployed somewhere, use its URL instead of
localhost. -
Click Save.
OIDC Config
The app needs two values from Keycloak:
- Issuer URL: the realm's URL, such as
http://localhost:8080/auth/realms/p2examplesfor the local Keycloak, orhttps://<your-keycloak-host>/auth/realms/<your-realm>. Realm settings > General > Endpoints > OpenID Endpoint Configuration shows it asissuer. - Client ID: the ID you entered when you created the client.
Adding a Non-Admin User
Instructions
It is bad practice to use your admin user to sign in to an application.
The local Keycloak from the examples repo already has a non-admin user, demo / demo. On any other Keycloak, add one:
- Open the Keycloak admin console and select your realm.
- Click Users in the menu.
- Click Add user.
- Fill out the Username, Email, First name and Last name. Click Create.
- Open the Credentials tab and click Set password. Enter a password for the user. For this tutorial, you can turn Temporary off.
- Click Save, then confirm with Save password.
Setting up an Angular Project
We will use the Phase Two Angular example code here, but the logic could easily be applied to any existing application.
-
Clone the Phase Two example repo.
-
Open the Angular folder within
/frameworks/angular. It's an Angular 22 app that leverages angular-oauth2-oidc to log users in with the authorization code flow and PKCE. You need Node.js 24 and pnpm. -
Point the app at your Keycloak. The OIDC settings come from the environment files in
src/environments:environment.development.tsis used bypnpm startand points to the local Keycloak from the examples repo.environment.tsis used by production builds (pnpm build) and points to the hosted Phase Two demo realm.
Both use the client ID
angular, the example's client in the local Keycloak, so with the local Keycloak there's nothing to change. For another Keycloak, setoidcIssuerUriinsrc/environments/environment.development.tsto your realm's issuer URL andoidcClientIdto the ID of your client:export const environment = {oidcIssuerUri: 'http://localhost:8080/auth/realms/p2examples',oidcClientId: 'angular',};For production builds, change
src/environments/environment.tsthe same way. The app runs in the browser, so it uses a public client and no client secret. It runs on port 4200, so the client needshttp://localhost:4200/*as valid redirect URI, and+as web origin and as valid post logout redirect URI. -
Run
pnpm installand thenpnpm start. -
We'll review where we configure the OIDC client. Open the
src/app/auth/auth.config.tsfile. It builds the angular-oauth2-oidc settings from the environment file:import type { AuthConfig } from 'angular-oauth2-oidc';import { environment } from '../../environments/environment';export const authConfig: AuthConfig = {issuer: environment.oidcIssuerUri,clientId: environment.oidcClientId,redirectUri: `${window.location.origin}/`,postLogoutRedirectUri: `${window.location.origin}/`,responseType: 'code',scope: 'openid profile email',};Keycloak sends the user back to the app's origin after they log in and after they log out.
-
The
src/app/app.config.tsfile registers angular-oauth2-oidc withprovideOAuthClient().provideAppInitializerrunsAuthService.init()before the app renders, so the login completes first.import {type ApplicationConfig,inject,provideAppInitializer,provideBrowserGlobalErrorListeners,} from '@angular/core';import { provideHttpClient } from '@angular/common/http';import { provideOAuthClient } from 'angular-oauth2-oidc';import { AuthService } from './auth/auth.service';export const appConfig: ApplicationConfig = {providers: [provideBrowserGlobalErrorListeners(),provideHttpClient(),provideOAuthClient(),provideAppInitializer(() => inject(AuthService).init()),],}; -
The
src/app/auth/auth.service.tsfile configures theOAuthServicewithauthConfig. It exposes the login state and the decoded tokens as signals, and theloginandlogoutmethods:import { computed, inject, Injectable, signal } from '@angular/core';import { toSignal } from '@angular/core/rxjs-interop';import { OAuthService } from 'angular-oauth2-oidc';import { jwtDecode } from 'jwt-decode';import { authConfig } from './auth.config';@Injectable({ providedIn: 'root' })export class AuthService {private readonly oauthService = inject(OAuthService);private readonly lastEvent = toSignal(this.oauthService.events, { initialValue: null });readonly error = signal<string | null>(null);readonly isAuthenticated = computed(() => {this.lastEvent();return this.oauthService.hasValidAccessToken();});readonly idTokenClaims = computed(() => {this.lastEvent();return this.oauthService.getIdentityClaims() as Record<string, unknown> | null;});readonly accessTokenClaims = computed(() => {this.lastEvent();const accessToken = this.oauthService.getAccessToken();return accessToken ? jwtDecode<Record<string, unknown>>(accessToken) : null;});async init(): Promise<void> {this.oauthService.configure(authConfig);this.oauthService.setupAutomaticSilentRefresh();try {await this.oauthService.loadDiscoveryDocumentAndTryLogin();} catch (error) {this.error.set(error instanceof Error ? error.message : 'Could not reach Keycloak');}}login(): void {this.oauthService.initCodeFlow();}logout(): void {this.oauthService.logOut();}}loadDiscoveryDocumentAndTryLogin()reads Keycloak's OpenID configuration and completes the login when Keycloak redirects back to the app. If Keycloak can't be reached,errorholds the message instead. angular-oauth2-oidc keeps the tokens in session storage, andsetupAutomaticSilentRefresh()refreshes them before they expire. The signals readlastEvent, so they update on everyOAuthServiceevent.logout()also ends the Keycloak session. -
The
UserStatuscomponent insrc/app/user-status/user-status.tsinjects theAuthServiceand turns the token claims into JSON for the template.import { Component, computed, inject } from '@angular/core';import { AuthService } from '../auth/auth.service';@Component({selector: 'app-user-status',templateUrl: './user-status.html',})export class UserStatus {protected readonly auth = inject(AuthService);protected readonly accessTokenJson = computed(() =>JSON.stringify(this.auth.accessTokenClaims() ?? {}, null, 2),);protected readonly idTokenJson = computed(() =>JSON.stringify(this.auth.idTokenClaims() ?? {}, null, 2),);protected readonly buttonClasses ='cursor-pointer rounded-md bg-indigo-600 px-2.5 py-1.5 text-sm font-semibold text-white shadow-xs hover:bg-indigo-500 focus-visible:outline-2 focus-visible:outline-offset-2 focus-visible:outline-indigo-600';protected readonly textareaClasses ='block w-full rounded-md bg-purple-200/50 px-2 py-1.5 font-mono text-xs text-gray-900 ring-1 ring-gray-300 ring-inset';} -
Switching to the html template for the component,
src/app/user-status/user-status.html, we can see how the login and logout buttons are rendered.@ifblocks render them based on the user's authentication status fromauth.isAuthenticated(), and show the message fromauth.error()when the login fails.<div class="pb-8 text-xl italic">Your current status is:</div>@if (auth.isAuthenticated()) {<div class="mb-2 text-2xl text-p2blue-700">Authenticated</div><div class="mb-6 text-p2blue-700"><div>{{ auth.idTokenClaims()?.['name'] }}</div><div>{{ auth.idTokenClaims()?.['email'] }}</div></div><button type="button" [class]="buttonClasses" (click)="auth.logout()">Log out</button><div class="mt-8 space-y-4 text-left"><div><label for="access-token" class="mb-1 block text-sm font-semibold text-gray-900">Access token (decoded)</label><textareaid="access-token"rows="12"readonly[class]="textareaClasses"[value]="accessTokenJson()"></textarea></div><div><label for="id-token" class="mb-1 block text-sm font-semibold text-gray-900">ID token (decoded)</label><textareaid="id-token"rows="12"readonly[class]="textareaClasses"[value]="idTokenJson()"></textarea></div></div>} @else if (auth.error()) {<div class="mb-2 text-2xl text-p2blue-700">Authentication error.</div><div class="mb-6">{{ auth.error() }}</div><button type="button" [class]="buttonClasses" (click)="auth.login()">Log in</button>} @else {<div class="mb-6 text-2xl text-p2blue-700">Not authenticated.</div><button type="button" [class]="buttonClasses" (click)="auth.login()">Log in</button>}The logic using the
AuthServiceto conditionally determine the authenticated state can be used to secure routes, components, and more. -
Open localhost:4200. You will see the Phase Two example landing page. Your current state should be Not authenticated. Click Log in. This will redirect you to your login page.
infoUse a non-admin user to sign in:
demo/demoon the local Keycloak, or a user you added to your realm. -
Enter the credentials of the non-admin user and sign in. You will then be redirected to the application. The Phase Two example landing page now loads your Authenticated state, displaying your user's name and email, and the decoded access and ID tokens.
-
Neat! Click Log out. The app also ends your Keycloak session, so the next Log in asks for your credentials again.
Learning more
Phase Two's enhanced Keycloak provides many ways to quickly control and tweak the log in and user management experience. Our blog has many use cases from customizing login pages, setting up magic links (passwordless sign in), and Organization workflows.