Instant MCP authorization using Keycloak

If you are exposing tools over MCP, you usually do not want every client on the network calling them anonymously. Even for a local prototype, you typically want a real login flow, consent, scoped access tokens, and a clean way to validate who is allowed to run what.
Keycloak is the easiest way to do that without inventing your own authorization layer. It already handles browser login, consent, token issuance, JWKS discovery, and OAuth metadata. Your MCP server just needs to behave like a protected resource and validate bearer tokens correctly.
In this guide, we will build a tiny calculator MCP server in Python, protect it with Keycloak, and connect to it from VS Code using Dynamic Client Registration (DCR). By the end, VS Code will open a browser to Keycloak, you will sign in, approve access to the mcp:run scope, and then call your MCP tools directly from chat.
This walkthrough uses:
- The official MCP Python SDK
- One MCP endpoint at
http://localhost:8000/mcp - Keycloak as the authorization server
- A Keycloak client scope named
mcp:run - An Audience mapper that sets
aud = http://localhost:8000/mcp Include in token scopeenabled formcp:run- Trusted Hosts removed from anonymous client registration policies so VS Code's DCR request is accepted
If you do not want to host and configure Keycloak yourself, you can create a free realm in the Phase Two Dashboard and use that instead of a self-hosted local Keycloak instance. The rest of the MCP-side setup stays the same.
What you are building
We will create a small MCP server that exposes three tools:
add_numbersmultiply_numbersdivide_numbers
The server will run locally and expose its MCP endpoint at:
http://localhost:8000/mcp
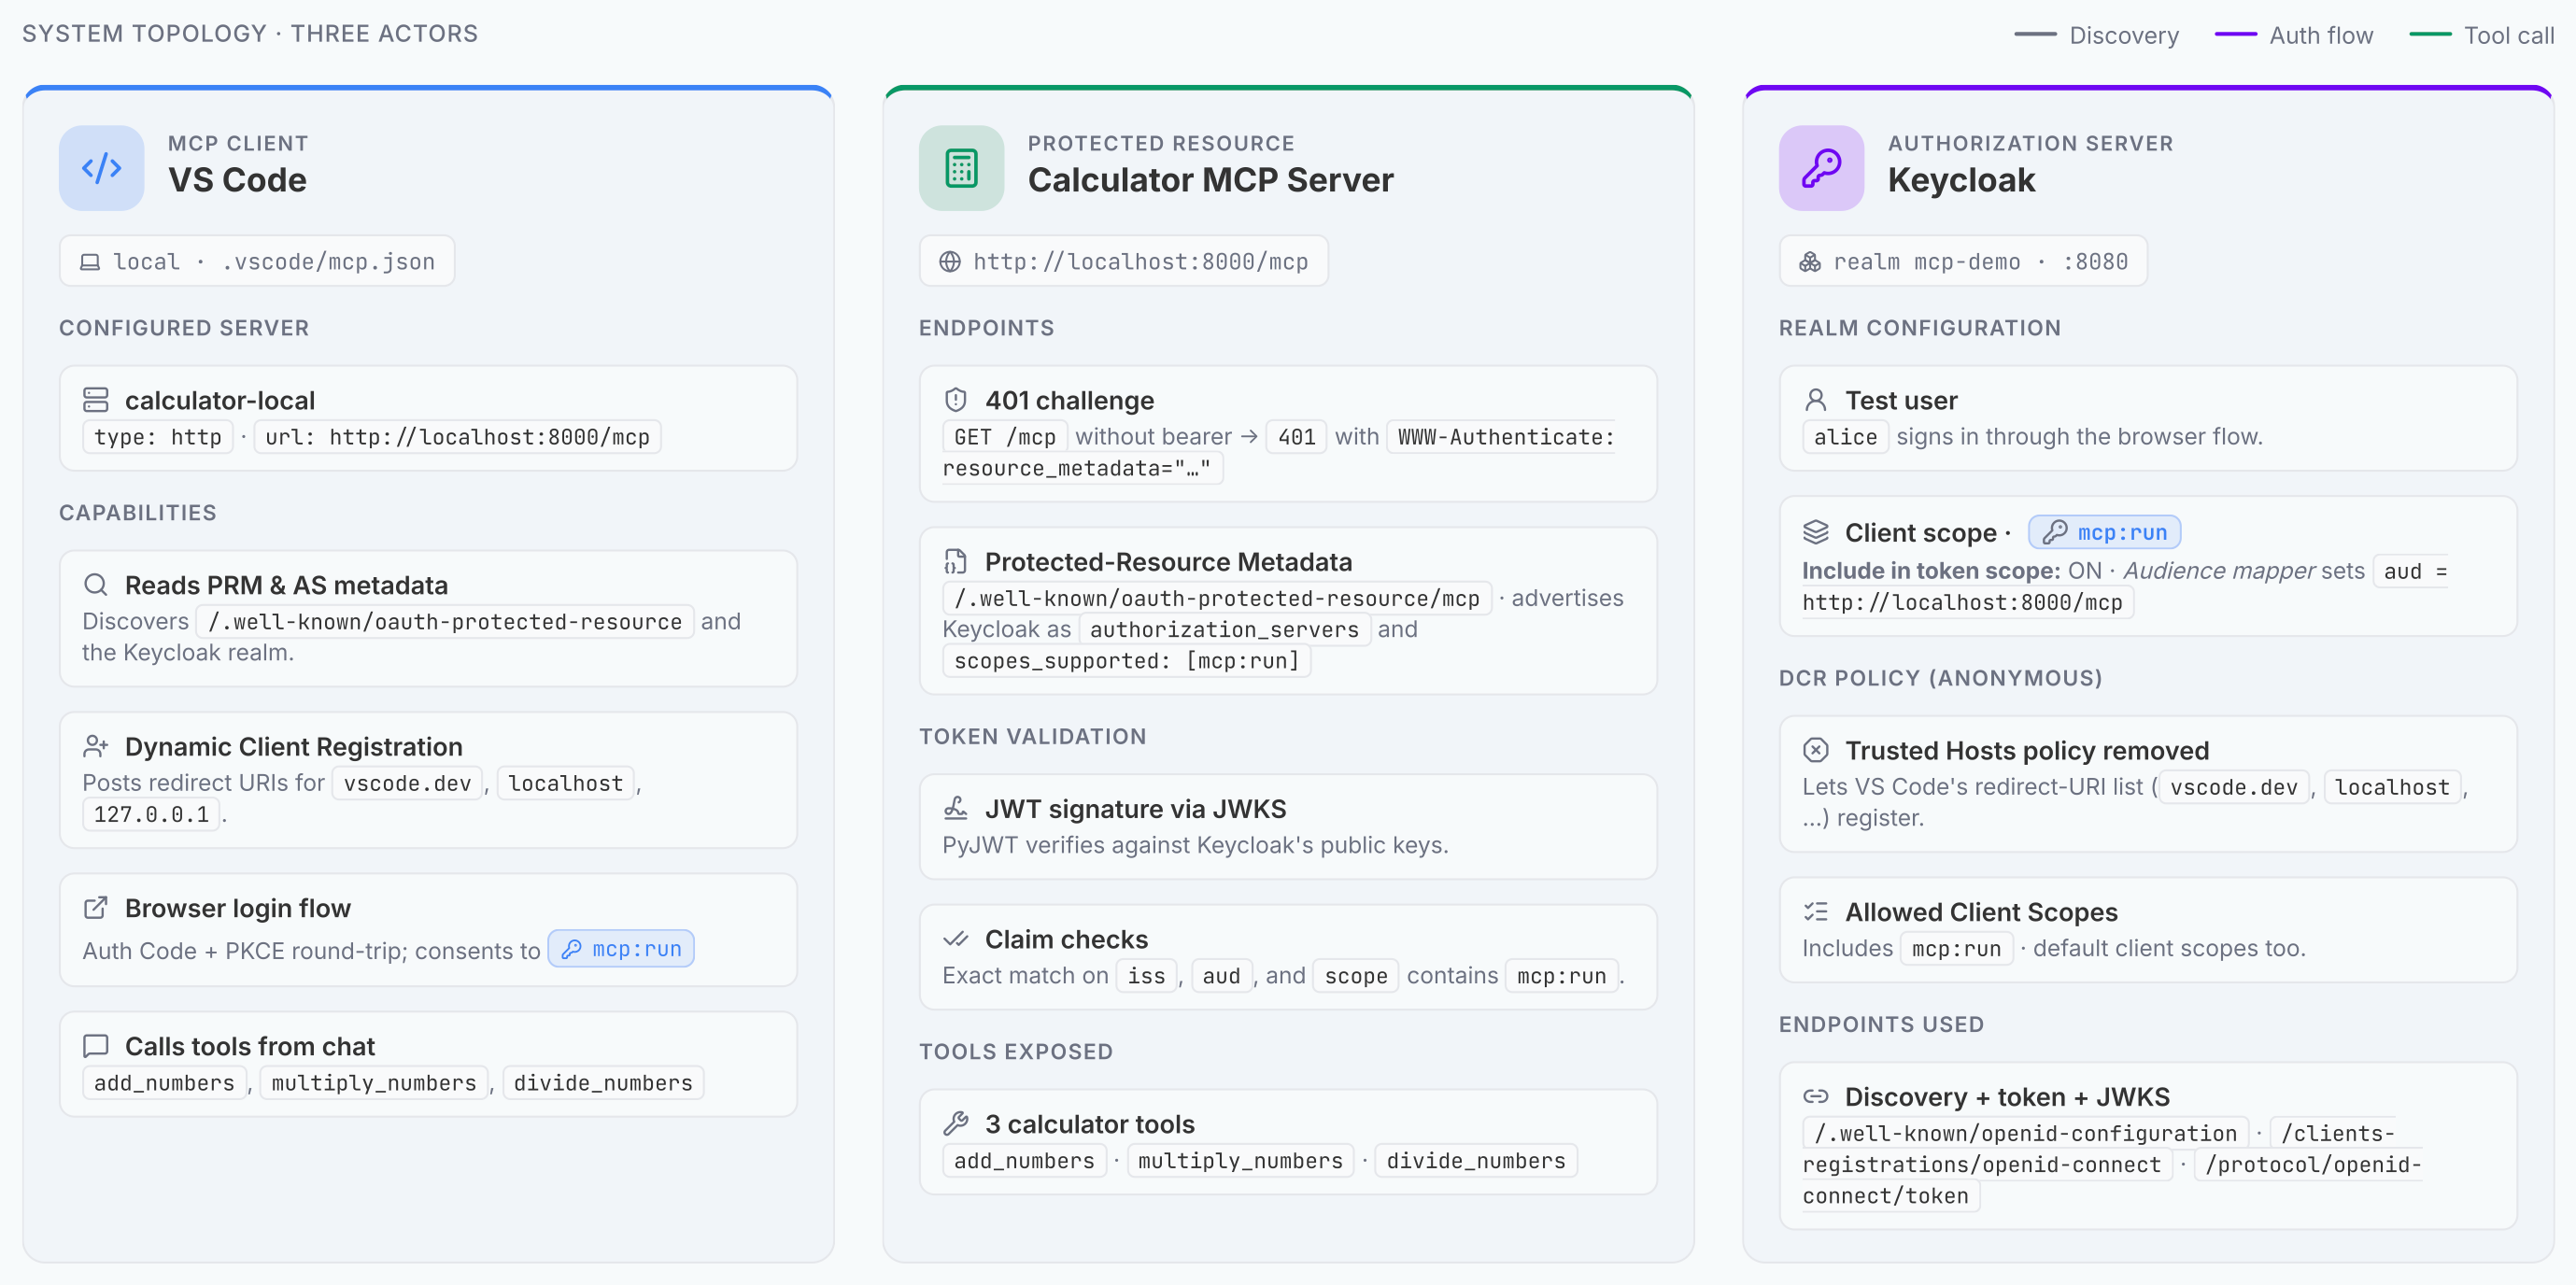
VS Code will connect to that URL, discover the MCP server's protected-resource metadata, discover Keycloak as the authorization server, dynamically register itself, send you through the browser login flow, and then call the tools with an access token.
That is the key mental model: the MCP server is the protected resource, and Keycloak is the authorization server.
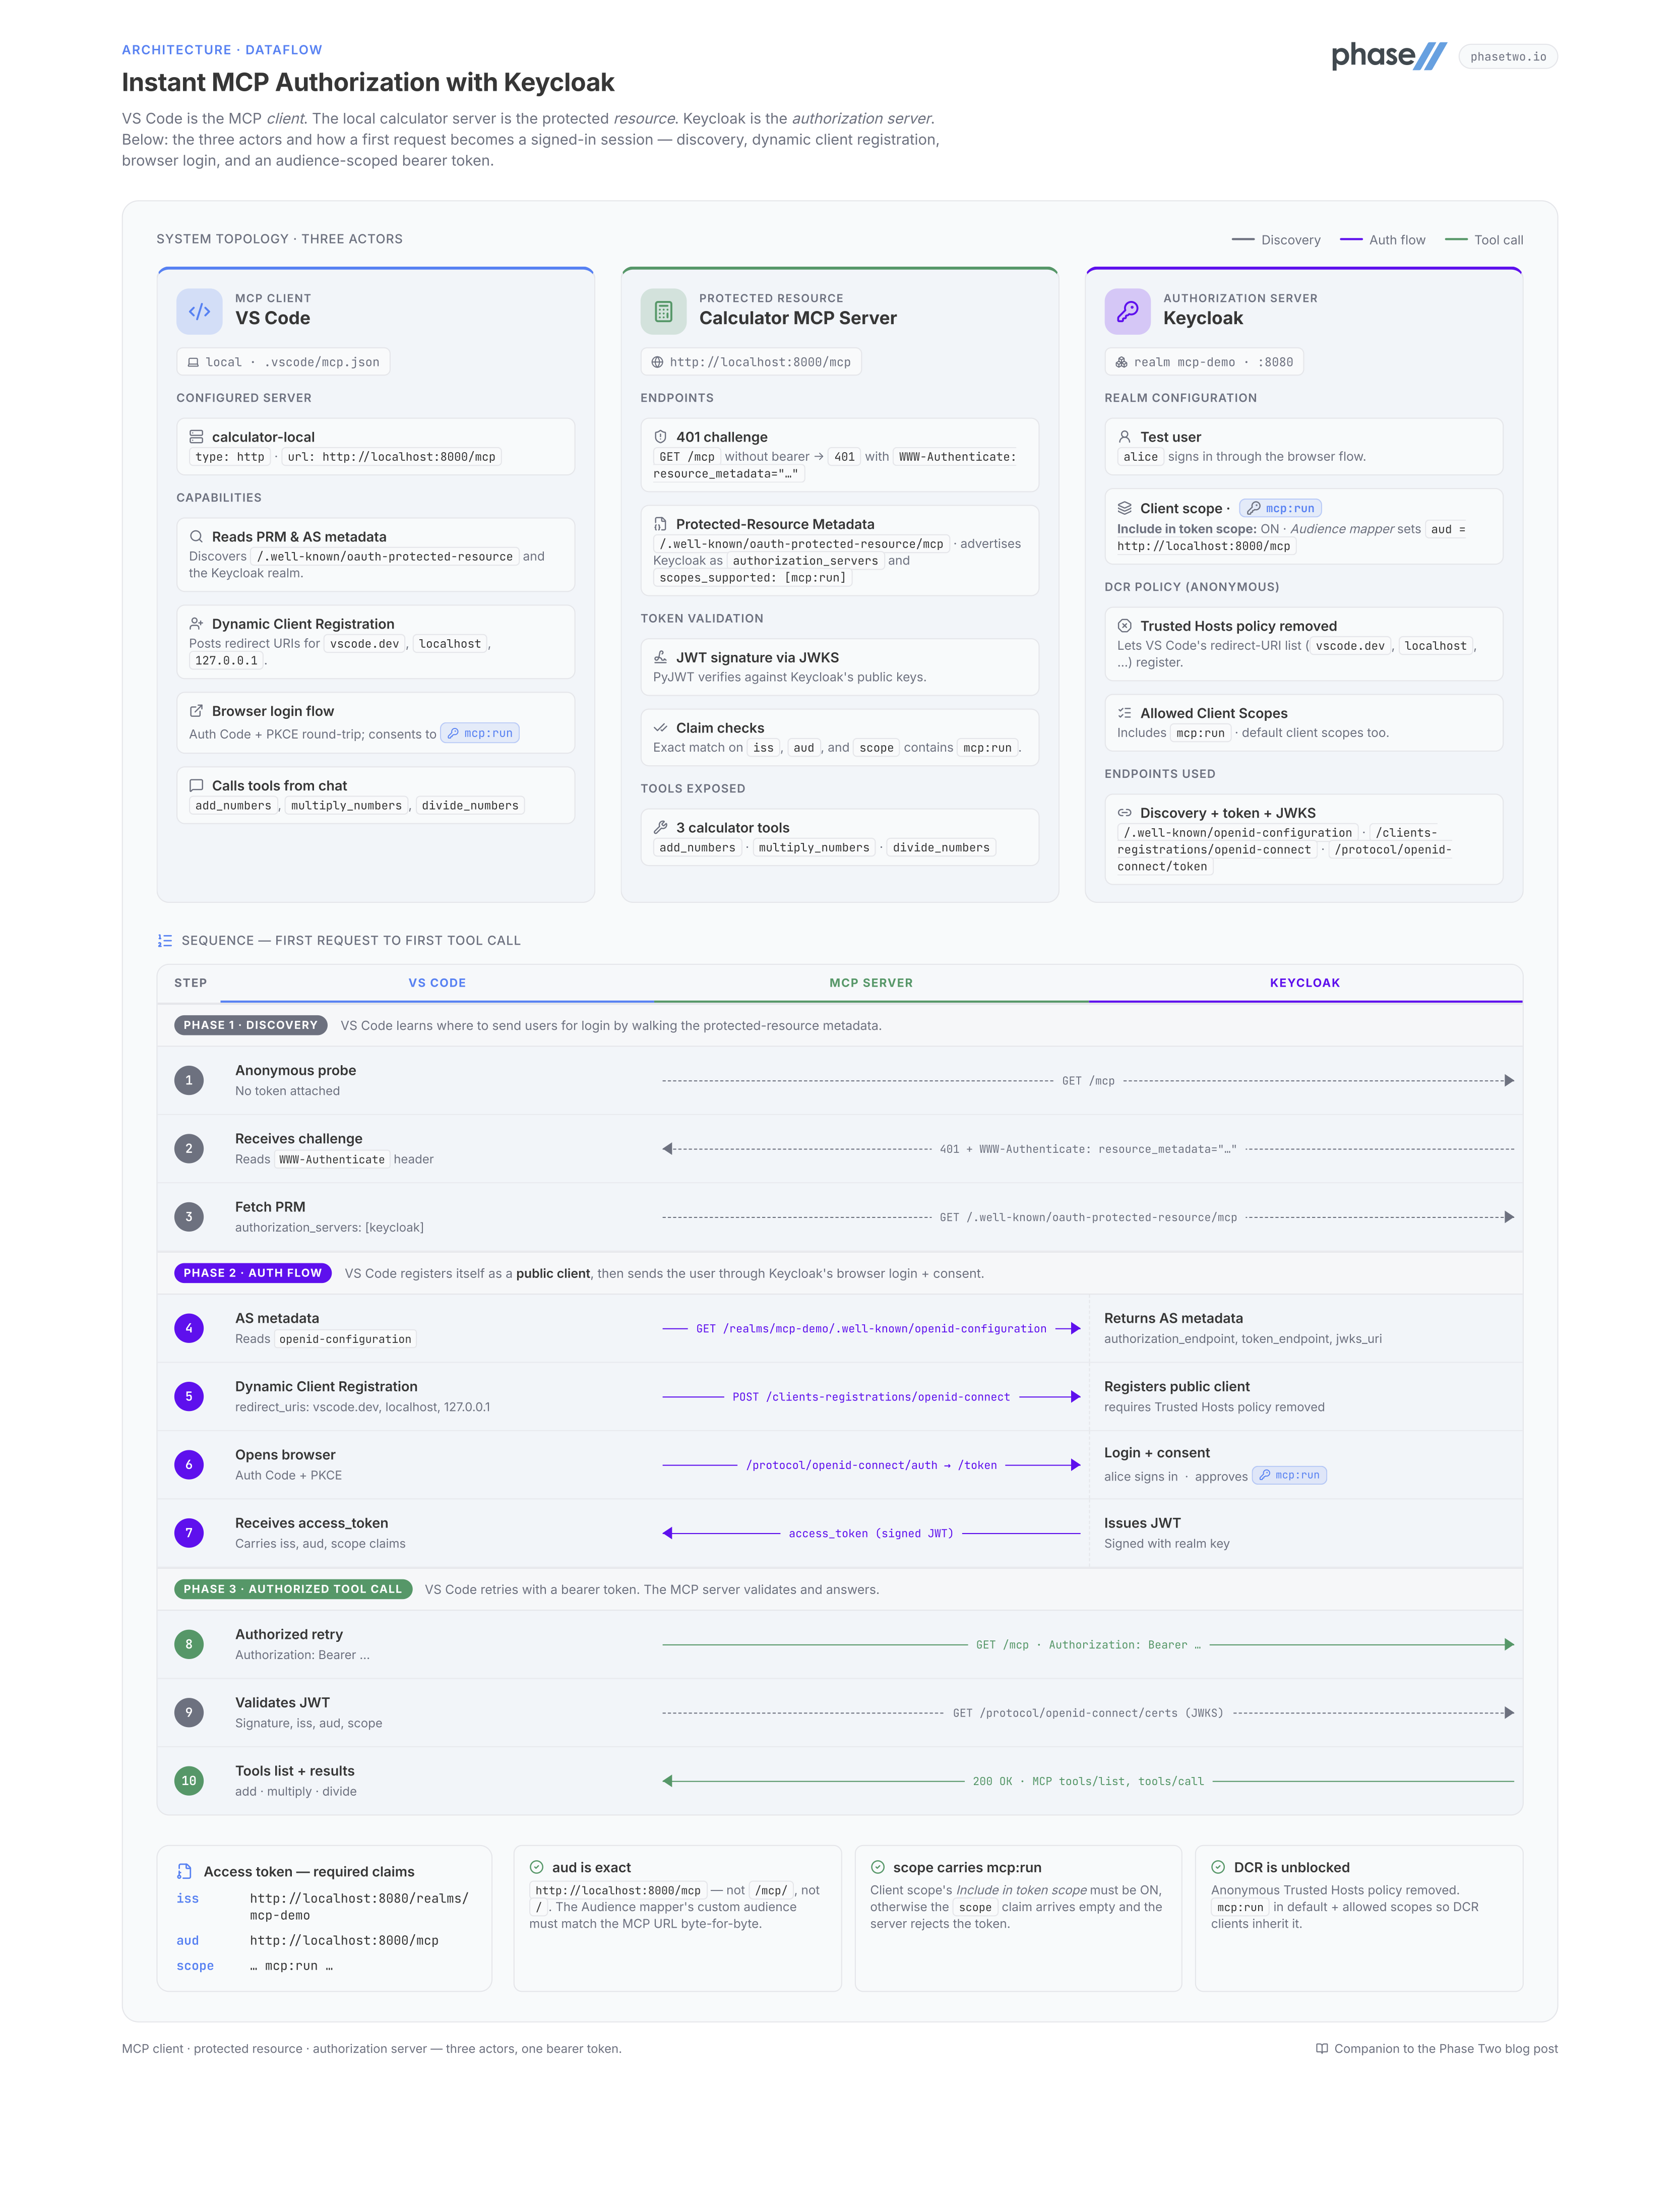
A high-level diagram of the topology looks like this:
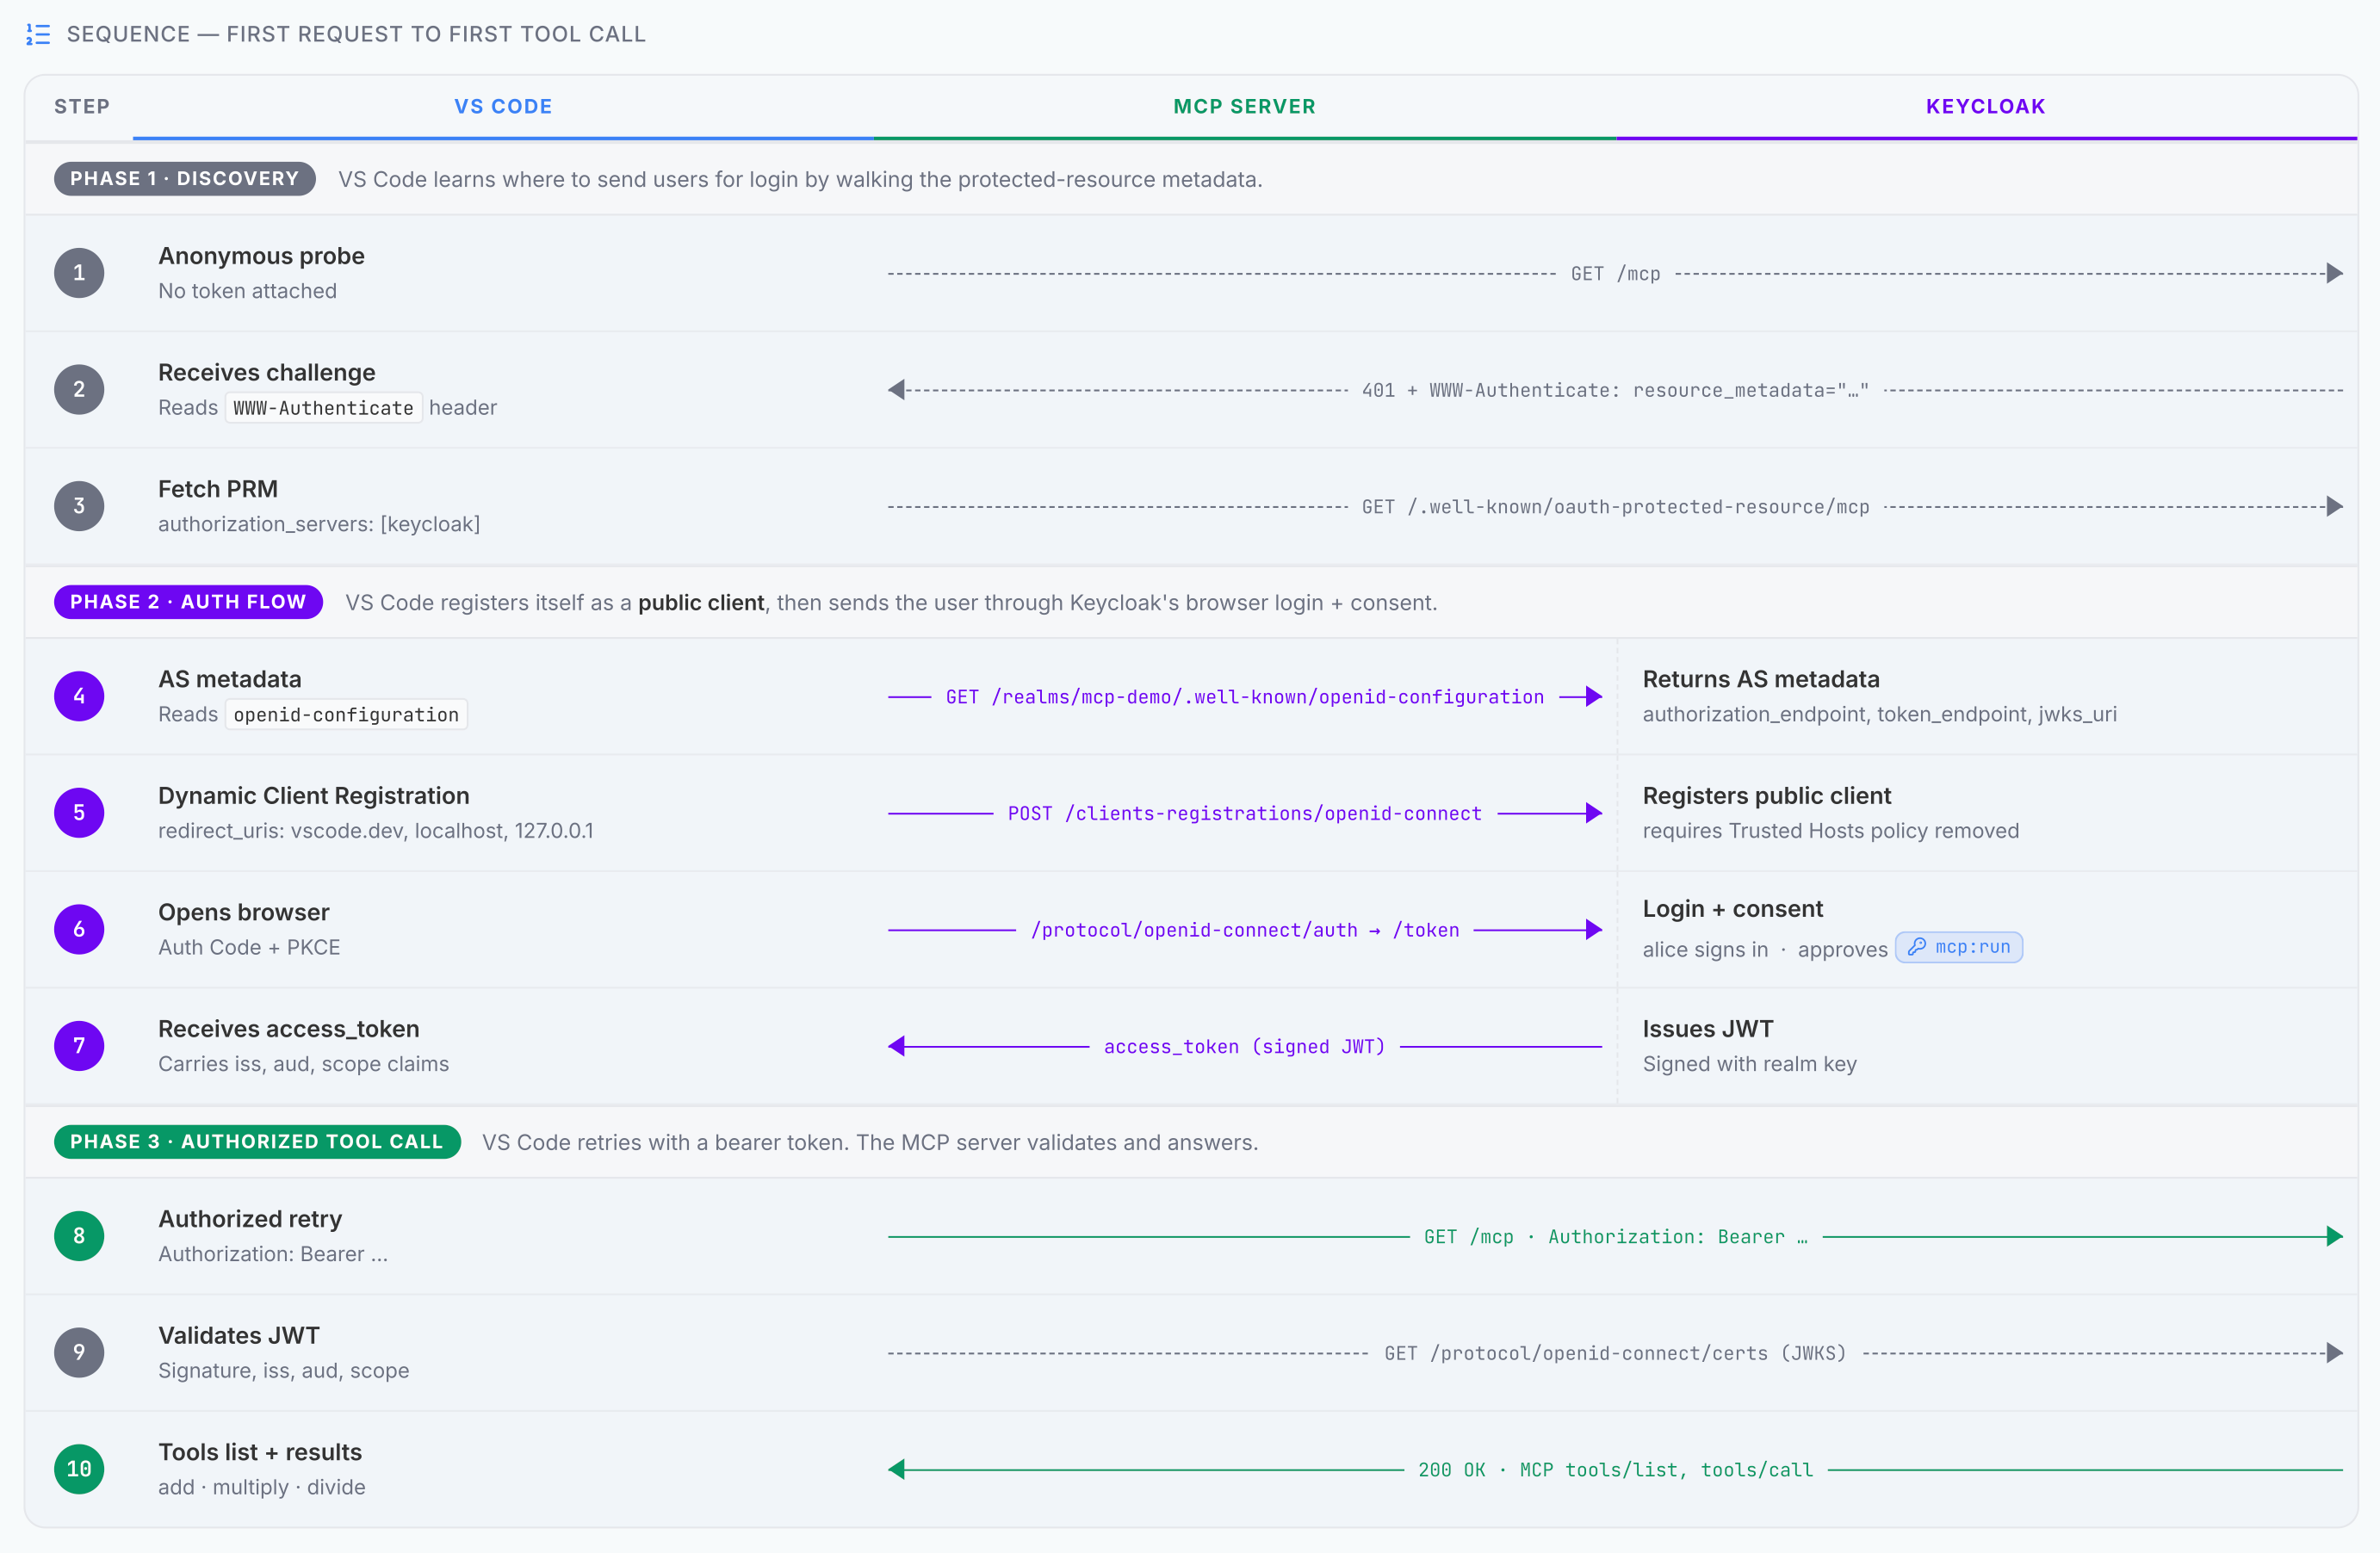
with data flowing through it like this:
What you need installed
Install these first:
- Python 3.11 or newer
- Docker Desktop
- VS Code
- GitHub Copilot or another model-enabled chat workflow in VS Code
Then create a virtual environment and install dependencies:
mkdir keycloak-mcp-demo
cd keycloak-mcp-demo

python -m venv .venv
source .venv/bin/activate

pip install "mcp[cli]" "pyjwt[crypto]>=2.8.0"
This setup uses the official MCP Python SDK and PyJWT to validate Keycloak-issued access tokens.
How the auth flow works
When VS Code first hits your MCP endpoint, it does not already have a token. The server should reject that first request with 401 Unauthorized and include a WWW-Authenticate header pointing to a protected-resource metadata document.
VS Code then:
- Fetches the protected-resource metadata
- Learns which authorization server protects this MCP server
- Discovers the authorization server metadata from Keycloak
- Dynamically registers a public client
- Opens your browser for login and consent
- Gets an access token back
- Retries the MCP request with
Authorization: Bearer ...
For this to work, two endpoints have to behave correctly:
GET /mcpmust return a401challenge when no token is presentGET /.well-known/oauth-protected-resource/mcpmust advertise the Keycloak realm and the exact MCP resource URL
Step 1: Create the MCP server
Download the complete example server here:
This server:
- Validates the token signature against Keycloak's JWKS
- Checks the token issuer
- Checks that the token audience matches the exact MCP URL
- Checks that the
mcp:runscope appears in the token'sscopeclaim
Start the server:
python server.py
That scope check matters. If mcp:run exists as a Keycloak client scope but is not included in token scope, the access token can come back with the correct audience but an empty scope claim, and the server will reject it. If you hit this, paste the access token into our JWT Decoder — it surfaces the scope claim and aud so you can see exactly what Keycloak emitted.
Step 2: Verify the server before using VS Code
Before touching Keycloak or VS Code, make sure the server is advertising the right OAuth metadata.
Check the protected-resource metadata:
curl -s http://localhost:8000/.well-known/oauth-protected-resource/mcp
You should get something like:
{
  "resource": "http://localhost:8000/mcp",
  "authorization_servers": ["http://localhost:8080/realms/mcp-demo"],
  "scopes_supported": ["mcp:run"],
  "bearer_methods_supported": ["header"]
}
Then check the unauthenticated MCP endpoint:
curl -i http://localhost:8000/mcp
You should get 401 Unauthorized, and the WWW-Authenticate header should point to:
resource_metadata="http://localhost:8000/.well-known/oauth-protected-resource/mcp"
If those two responses are correct, VS Code has the discovery information it needs.
Step 3: Start Keycloak locally
Run Keycloak in development mode:
docker run --rm \
  -p 127.0.0.1:8080:8080 \
  -e KC_BOOTSTRAP_ADMIN_USERNAME=admin \
  -e KC_BOOTSTRAP_ADMIN_PASSWORD=admin \
  quay.io/keycloak/keycloak start-dev
Then open:
http://localhost:8080
Sign in as:
- Username:
admin - Password:
admin
If you want to skip self-hosting, create a free realm in the Phase Two Dashboard instead. For this tutorial, that is usually the fastest route because you avoid local Keycloak setup, bootstrap admin credentials, and one-off realm configuration from scratch.
Step 4: Create the realm and a test user
Create a realm named:
mcp-demo
Then create a test user such as alice, set a password, and make sure you can sign in with it.
The realm issuer your server expects is:
http://localhost:8080/realms/mcp-demo
That exact URL must match the issuer your Python server validates.
If you want a faster setup than clicking through each screen manually, you can also import the example realm configuration:
If you are using a hosted realm from Phase Two instead of local Keycloak, use the hosted realm's issuer URL everywhere the tutorial currently shows http://localhost:8080/realms/mcp-demo.
Step 5: Create the mcp:run client scope
Create a new client scope named:
mcp:run
Then configure it like this:
Include in token scope: ONDisplay on consent screen: ON is fine
That first setting is essential for this implementation. The server checks the access token's scope claim, so Keycloak must actually emit mcp:run into the token.
Add the Audience mapper
Inside mcp:run, add an Audience mapper with:
Included Custom Audience:http://localhost:8000/mcpAdd to access token: ONAdd to introspection: ON is fineAdd to ID token: OFF is fine
This is what causes the access token to carry:
"aud": "http://localhost:8000/mcp"
That audience must exactly match the MCP server URL the Python server expects.
Step 6: Make mcp:run available to DCR-created clients
For VS Code DCR to work smoothly, dynamically registered public clients must be able to get the mcp:run scope without any manual client editing.
There are two places to check.
Add mcp:run to the realm's default client scopes
Make sure mcp:run is included in the realm's default client scopes.
That way, a newly registered public client will inherit it automatically.
Allow mcp:run in anonymous client registration
In the realm's client registration policies, keep the anonymous Allowed Client Scopes policy and make sure it includes:
mcp:run
That tells Keycloak that anonymous DCR clients are allowed to request the MCP scope.
Step 7: Remove the Trusted Hosts policy
This is the piece that tends to block VS Code.
VS Code's DCR request includes multiple URLs, including redirect URIs for vscode.dev, insiders.vscode.dev, localhost, and 127.0.0.1, plus a client URI for the VS Code website. Keycloak's default Trusted Hosts registration policy rejects that request.
For this local tutorial setup, remove the Trusted Hosts policy from the realm's anonymous client-registration policies.
That is what allows VS Code's DCR payload to succeed.
You can keep the other anonymous registration policies in place, especially:
- Allowed Client Scopes
- Allowed Registration Web Origins
- Allowed Protocol Mapper Types
- Consent Required
- Max Clients Limit
But Trusted Hosts needs to go for this workflow.
Step 8: Configure VS Code
Create .vscode/mcp.json, or download the example file:
The contents should look like:
{
  "servers": {
    "calculator-local": {
      "type": "http",
      "url": "http://localhost:8000/mcp"
    }
  }
}
Then in VS Code:
- Open the project
- Open the Command Palette
- Run
MCP: List Servers - Confirm
calculator-localappears - Start it
If you previously had failed auth attempts cached, run:
Authentication: Remove Dynamic Authentication Providers
Then restart VS Code before trying again.
Step 9: Sign in through Keycloak
Once VS Code connects to the server, it should:
- Discover the protected-resource metadata at
/.well-known/oauth-protected-resource/mcp - Discover Keycloak as the authorization server
- Dynamically register a public client
- Open your browser
- Send you to Keycloak login
- Show a consent prompt for
mcp:run - Redirect back to VS Code
- Retry the MCP request with a bearer token
If all the values are aligned, the server will accept the token and VS Code will discover the three tools.
At that point you can try a prompt such as:
Use calculator-local to add 12.5 and 7.25, then multiply the result by 3.
What to do if it still fails
If the browser flow works but the MCP server still responds with 401, the next thing to check is the token itself.
In practice, there are only three claims that matter most here:
issaudscope
Your server expects:
iss = http://localhost:8080/realms/mcp-demoaud = http://localhost:8000/mcpscopecontainsmcp:run
The most common problems are:
aud is wrong
The Audience mapper is missing or its custom audience value does not exactly match the MCP URL.
scope is empty
mcp:run exists as a client scope, but Include in token scope is still off.
DCR fails before login
The anonymous client registration policies still block VS Code's DCR payload. The first place to check is whether Trusted Hosts was actually removed.
VS Code behaves inconsistently
Clear stale auth state with:
Authentication: Remove Dynamic Authentication Providers
Then retry.
A few implementation notes worth remembering
The MCP server is not the identity provider
Your MCP server does not need to implement a full OAuth server. It only needs to behave like a protected resource:
- Advertise protected-resource metadata
- Challenge unauthenticated requests with
401 - Validate bearer tokens from Keycloak
VS Code cares about the metadata, not just the token endpoint
If the MCP endpoint does not return the right 401 challenge, or the protected-resource metadata does not point at the Keycloak realm correctly, VS Code will never get to DCR.
Audience matching is exact
http://localhost:8000/mcp is not the same as http://localhost:8000/mcp/ or http://localhost:8000/.
Use the exact same value everywhere:
- In VS Code
- In the server
- In Keycloak's Audience mapper
- In the protected-resource metadata
Final checklist
Before you call this done, make sure all of these match:
- VS Code MCP URL:
http://localhost:8000/mcp - Protected-resource metadata
resource:http://localhost:8000/mcp - Keycloak audience mapper custom audience:
http://localhost:8000/mcp - Python
MCP_SERVER_URL:http://localhost:8000/mcp - Required scope:
mcp:run mcp:runhasInclude in token scopeenabledmcp:runis available to DCR-created clients- Anonymous Trusted Hosts policy is removed
If those are true, you have a clean local setup for a Keycloak-protected MCP server that VS Code can discover, register against, and use.
Why Phase Two is the easiest way to run this for real
If you like this pattern but do not want to spend time standing up and operating Keycloak, Phase Two's hosted Keycloak offering is the fastest way to get there. You get a managed realm, a production-ready control plane, and a much shorter path from prototype to deployed MCP authorization server.
You can start with a free realm in the Phase Two Dashboard for testing, and when you are ready for a hosted setup with support, upgrades, and operational help, Phase Two's managed Keycloak offering is the easiest way to run an MCP authorization server without owning the infrastructure yourself.