Django Web Authentication with Keycloak

Django is a high-level, open-source web framework for building web applications using the Python programming language. It follows the Model-View-Controller (MVC) architectural pattern.
In this article we'll be using Keycloak to secure a Django Web application.
If you just want to skip to the code, visit the Phase Two Django example. We are also building Keycloak examples for other frameworks.
Setting up a Django Project
The following could be applied to an existing Django application, but we have chosen to use the excellent tutorial application built by Mozilla as our example. If you aren't yet familiar with Django, we encourage you to follow the tutorial there.
The Phase Two Django example is the completed code of that tutorial, from MDN's GitHub repository, with Keycloak login added. We'll clone it to get started.
Quick Start
To get this project up and running locally on your computer:
- Set up the Python development environment. The example uses Python 3.14, the version in its
.python-versionfile, and its pinned dependencies support Python 3.10 and newer. - Clone the Phase Two examples repo and open the Django example:
git clone https://github.com/p2-inc/examples.gitcd examples/frameworks/django
- Copy
.env.exampleto.env, create and activate a virtual environment, and install the requirements. Then set up the database, run the tests, create a local account for the admin site and start the server on port 8000:On Windows, activate the virtual environment withcp .env.example .envpython3 -m venv .venvsource .venv/bin/activatepip install -r requirements.txtpython manage.py migratepython manage.py testpython manage.py createsuperuserpython manage.py runserver 8000.venv\Scripts\activate. The tests don't need Keycloak..envturns onDJANGO_DEBUGfor local development and holds the Keycloak settings, which this tutorial explains below. - Open a browser to
http://localhost:8000/admin/to open the admin site. - Create a few test objects of each type.
- Open a tab to
http://localhost:8000to see the main site, with your new objects.
Setting up a Keycloak Instance
Before customizing the Django app, we need to set up and configure our Keycloak instance.
Instructions
If you already have a Keycloak instance, skip to the next section.
You can run Keycloak on your machine with Docker, or use a hosted Phase Two cluster. Both come with Phase Two's Keycloak extensions.
Run Keycloak locally
The Phase Two examples repo includes a local Phase Two Keycloak that is already set up for the examples: a p2examples realm with a client for each example and a demo user. You need Docker with the Compose plugin.
git clone https://github.com/p2-inc/examples.git
cd examples
docker compose -f keycloak/docker-compose.yml up -d --wait
| What | Value |
|---|---|
| Issuer URL | http://localhost:8080/auth/realms/p2examples |
| Admin console | localhost:8080/auth/admin, admin / admin |
| Demo user | demo / demo |
The client and the user from the next two sections already exist in this realm, so you can skip both. The local Keycloak README lists the client of each example. docker compose -f keycloak/docker-compose.yml down stops Keycloak, and the next up starts again from a fresh realm.
Use a hosted Phase Two cluster
- Sign up on the Phase Two Dashboard with an email address, a GitHub account or a Google account.
- Create a Starter cluster, which is free for 30 days, and add a realm to it.
- Click Open Console to open the realm in the Keycloak admin console.
The app connects to Keycloak through the realm's issuer URL, https://<your-keycloak-host>/auth/realms/<your-realm>. In the admin console, Realm settings > General > Endpoints > OpenID Endpoint Configuration shows it as issuer.
Keep the admin console open: the next sections create the app's client and a user there.
Setting up an OIDC Client
The Django app runs on port 8000, so use http://localhost:8000/* as the valid redirect URI instead of http://localhost:3000/*. Keep Keycloak's default profile and email client scopes on the client, which provide the username, name and email claims. The local Keycloak already has this client, with the ID django.
Instructions
The app needs an OpenID Connect client in Keycloak. The app logs users in from its server, so it gets a confidential client: the server authenticates to Keycloak with a client secret that never reaches the browser. Keycloak's docs describe all the client settings.
-
Open the Keycloak admin console and select your realm.
-
Click Clients in the menu.
-
Click Create client.
-
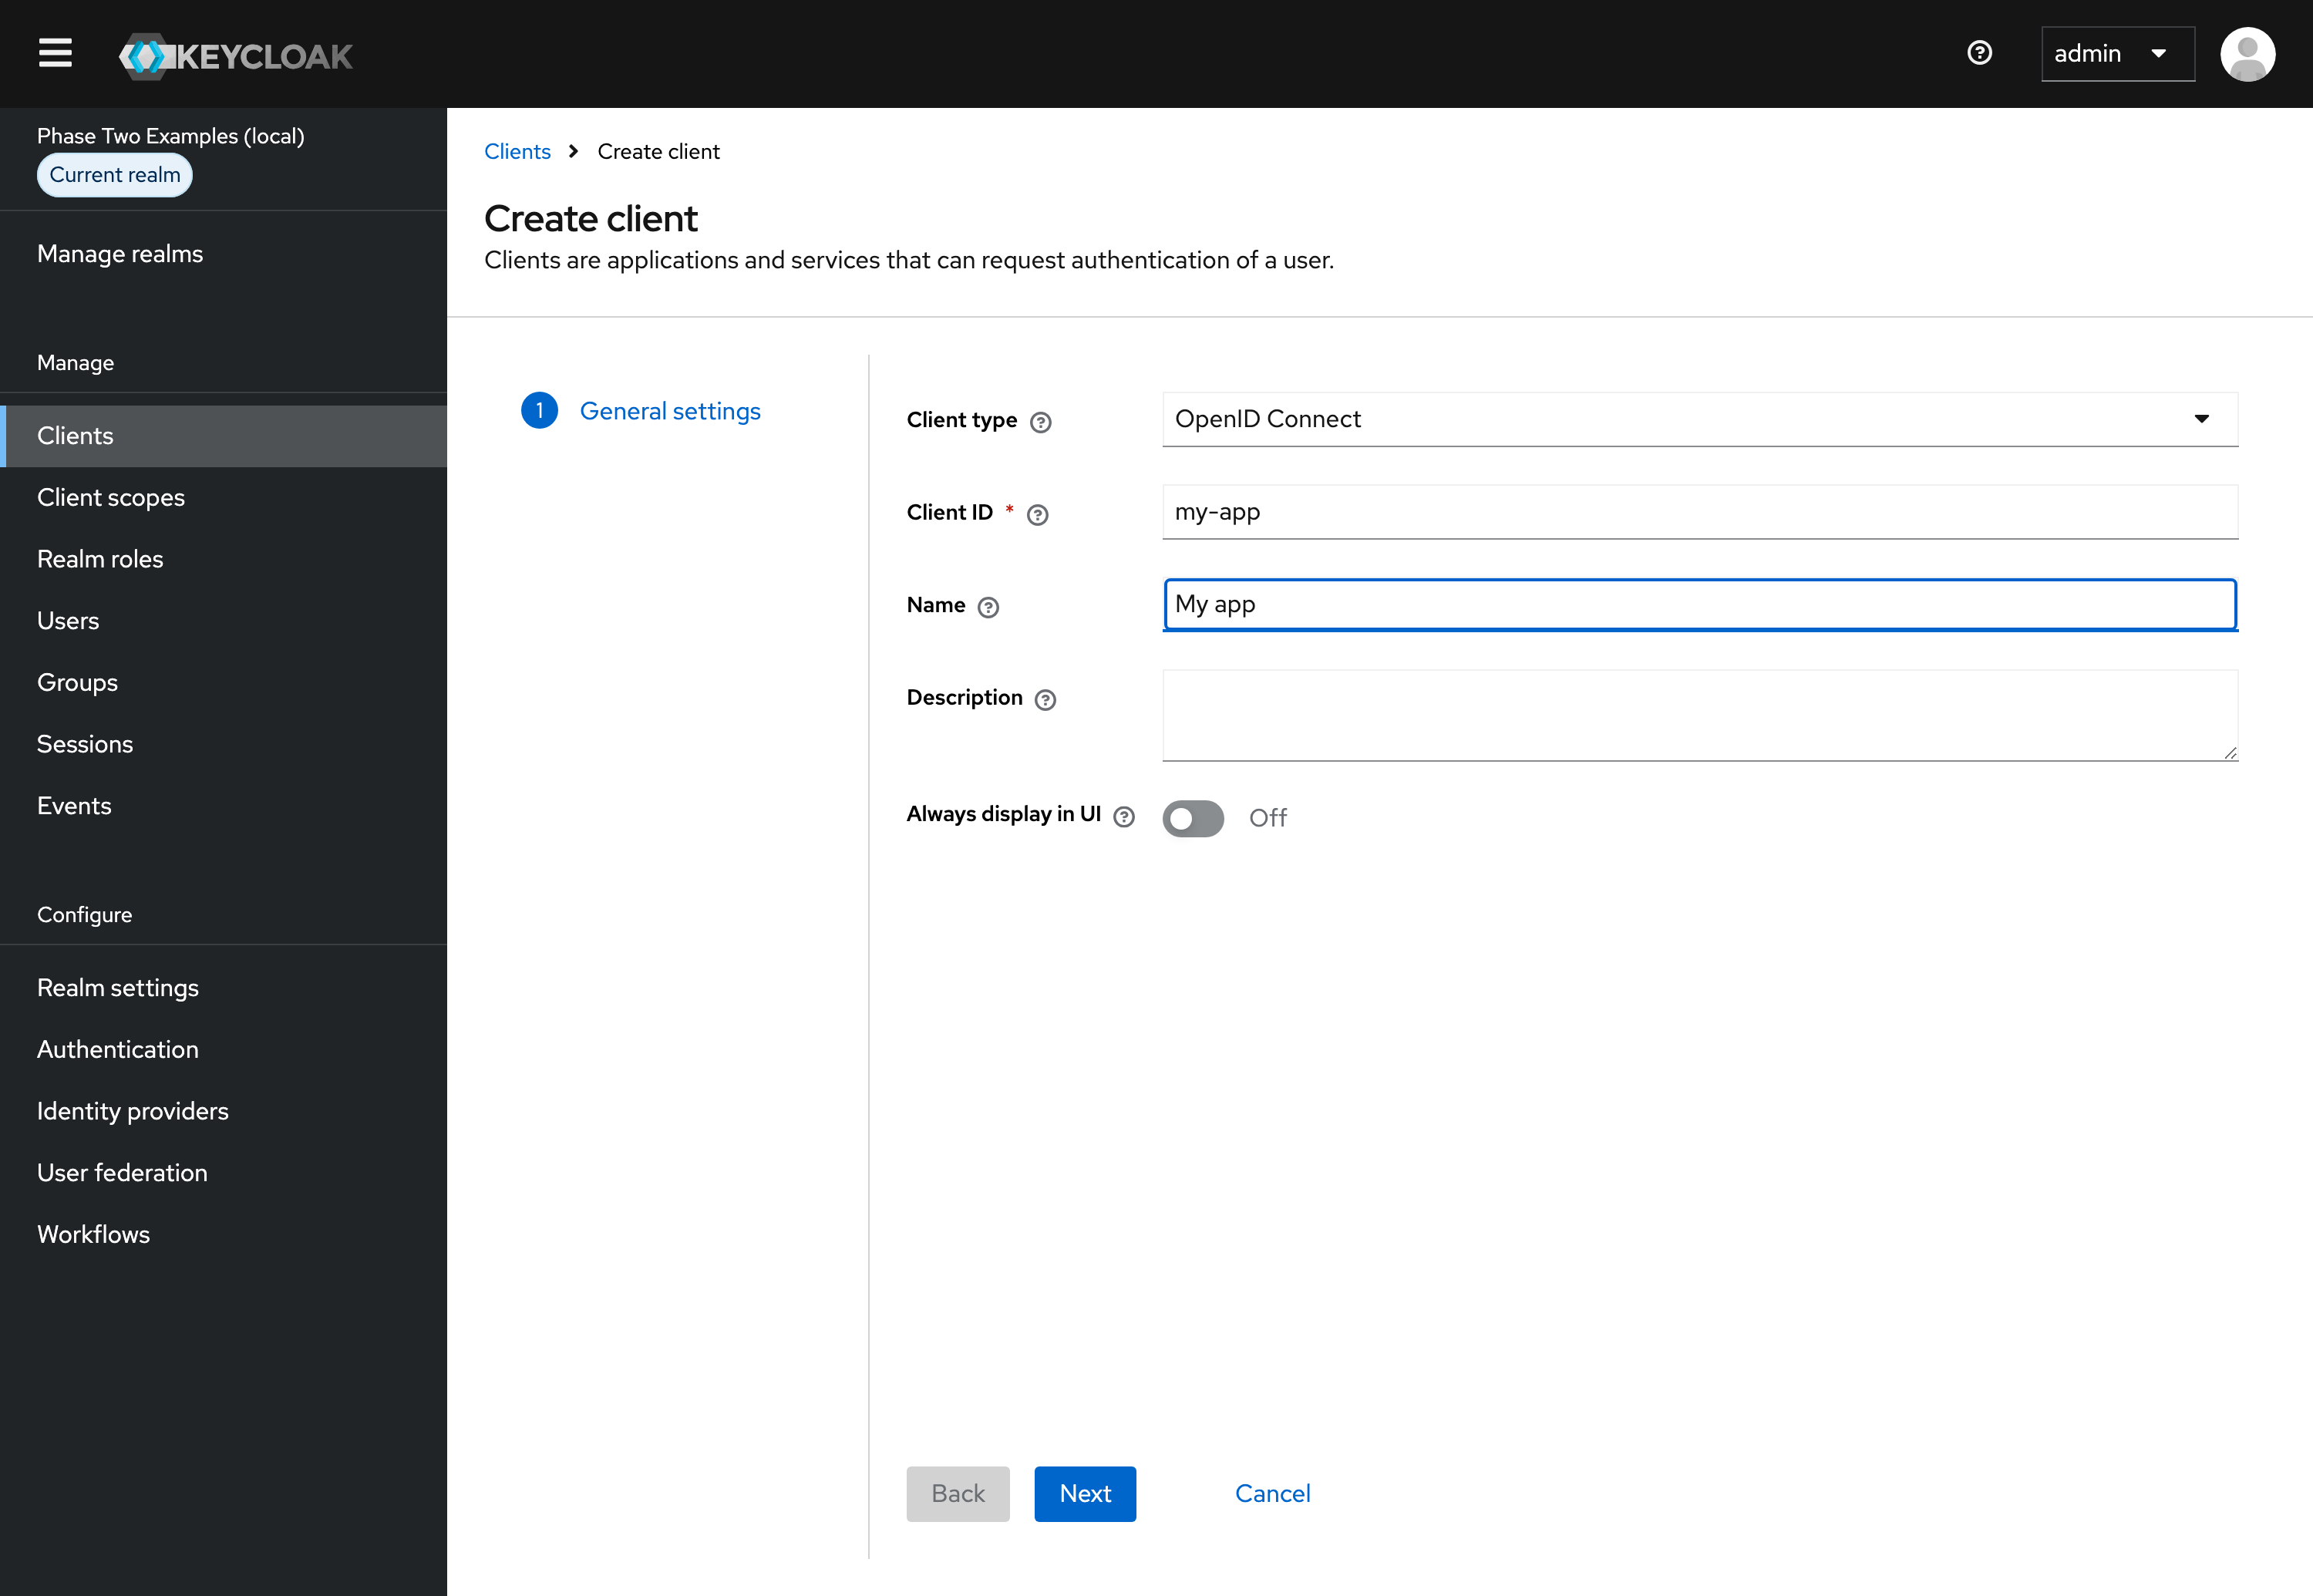
Leave Client type set to OpenID Connect.
-
Enter a Client ID. The app sends this ID in its OpenID Connect requests.
-
Supply a Name for the client.
-
Click Next.
-
Under Capability config:
- Turn Client authentication on.
- Leave Standard flow checked and Direct access grants unchecked. The app logs users in through Keycloak's login page, so it never needs their password.
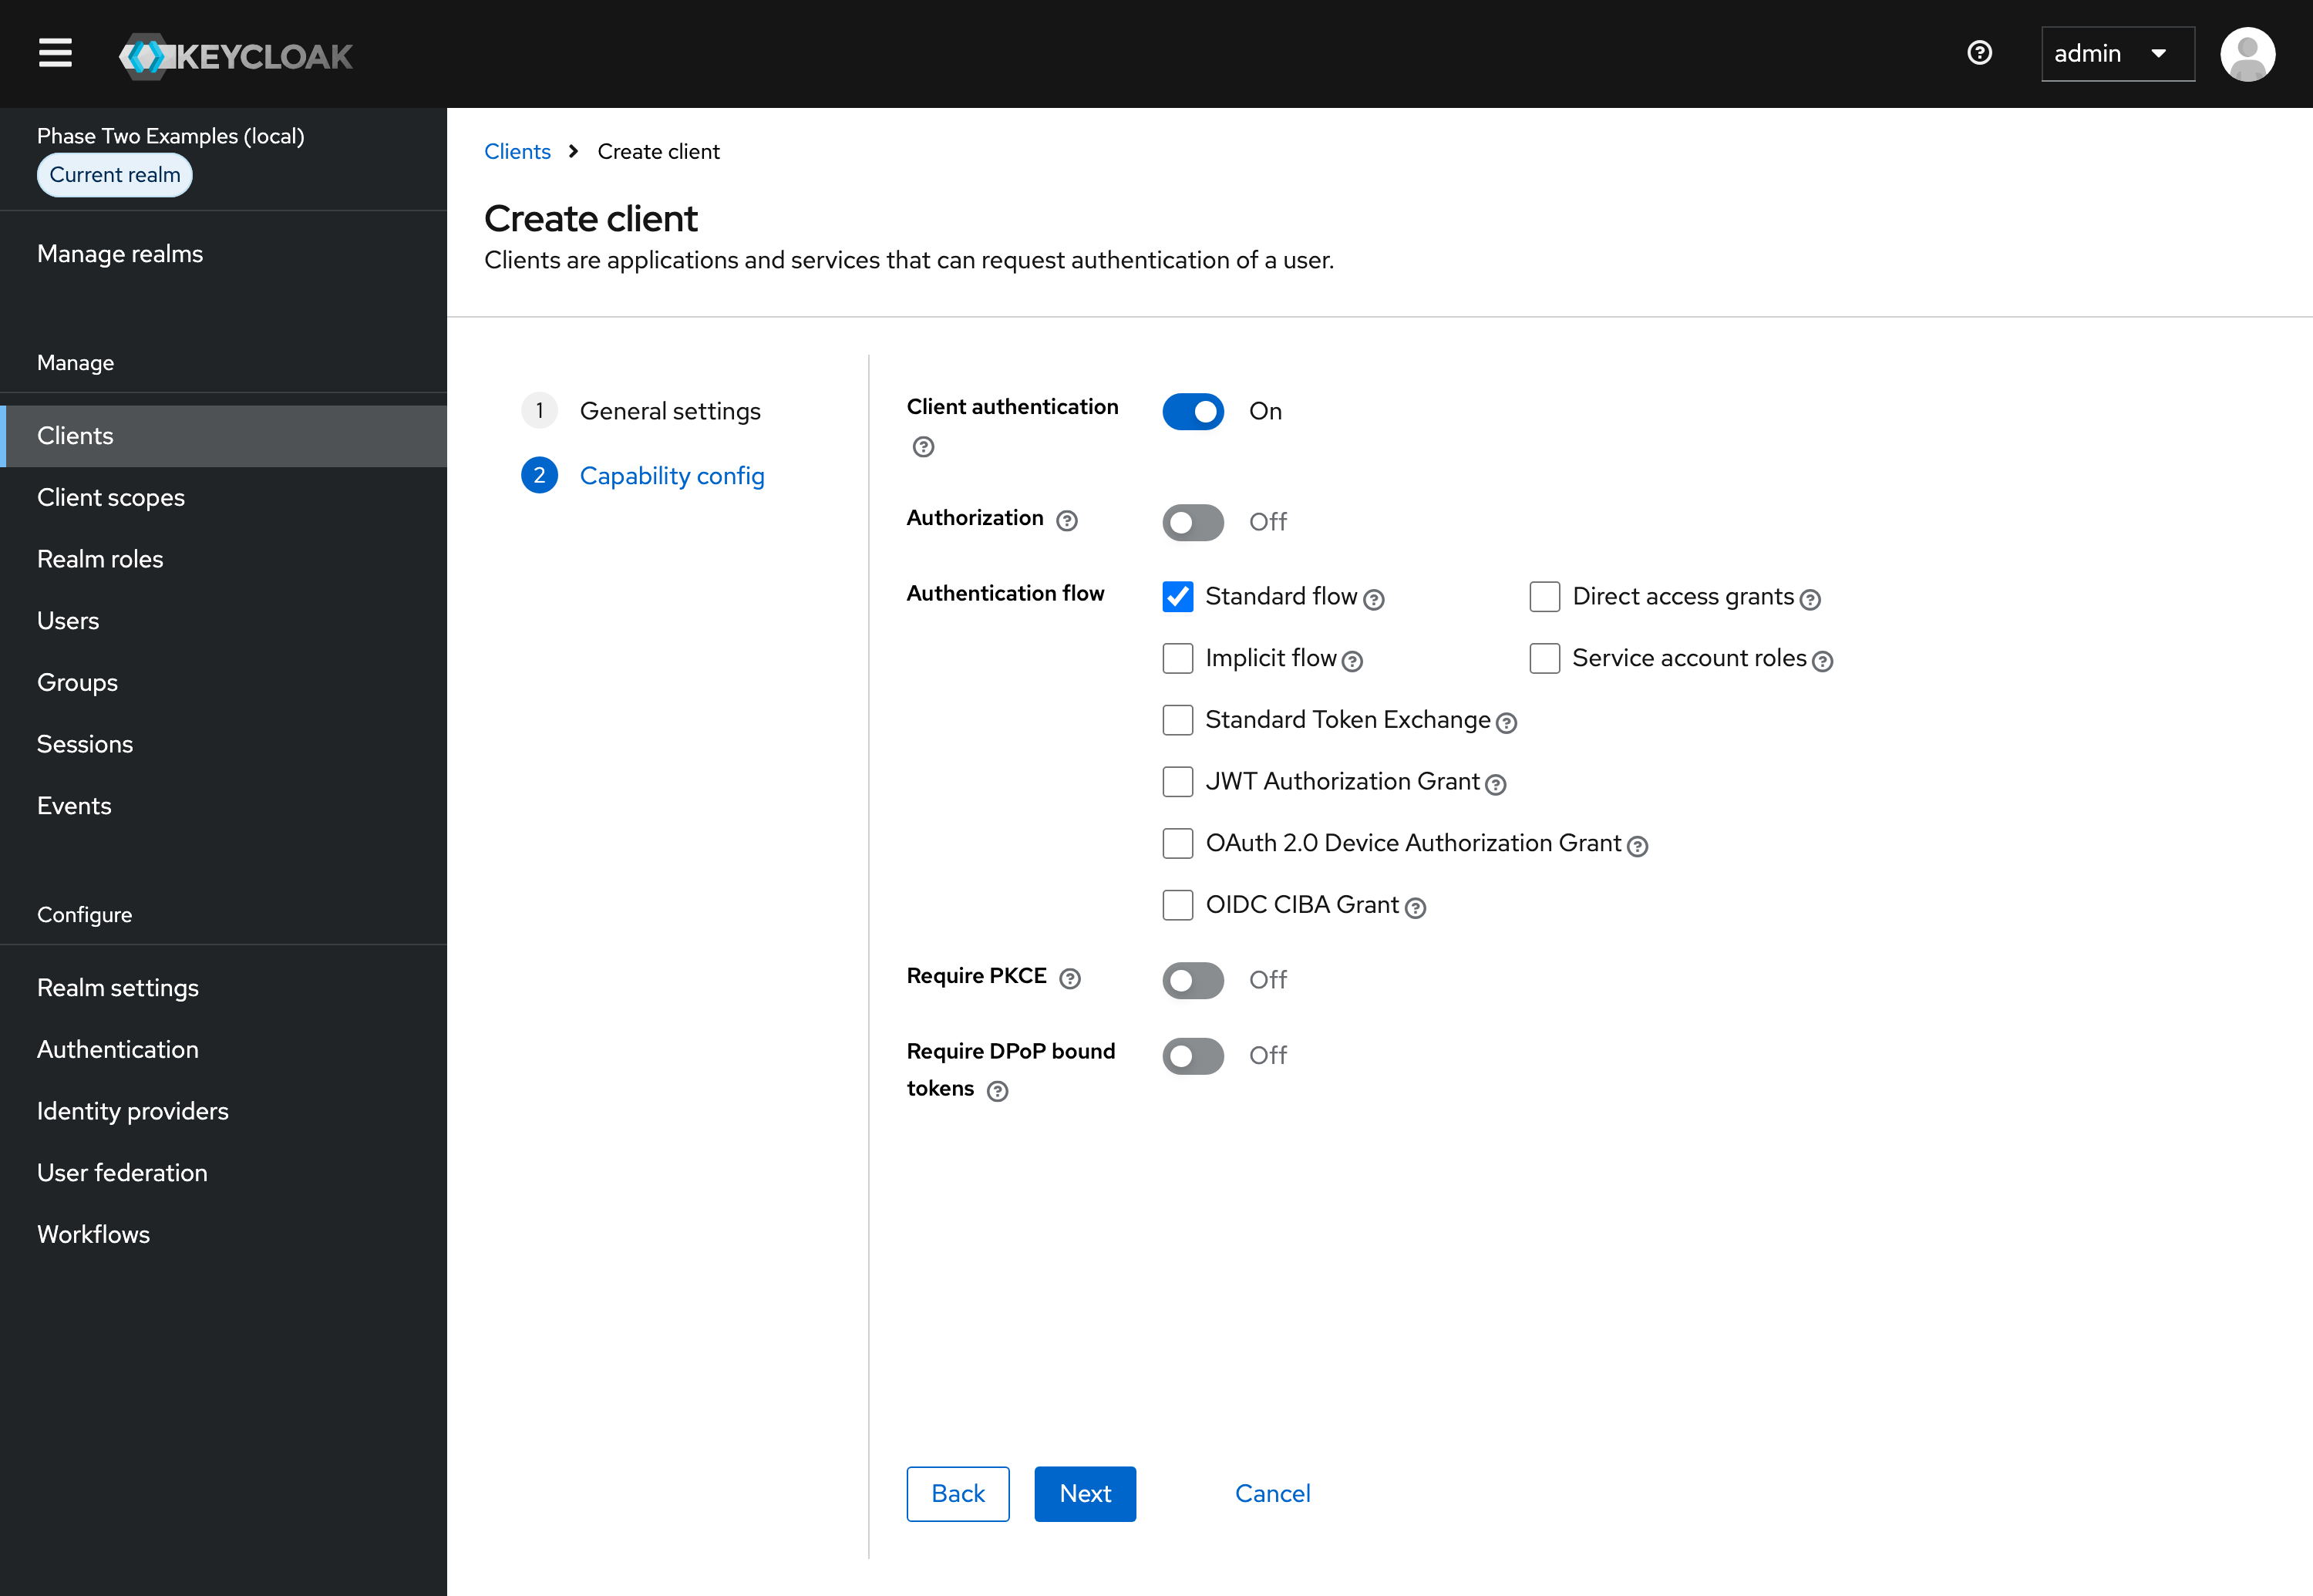
Click Next.
-
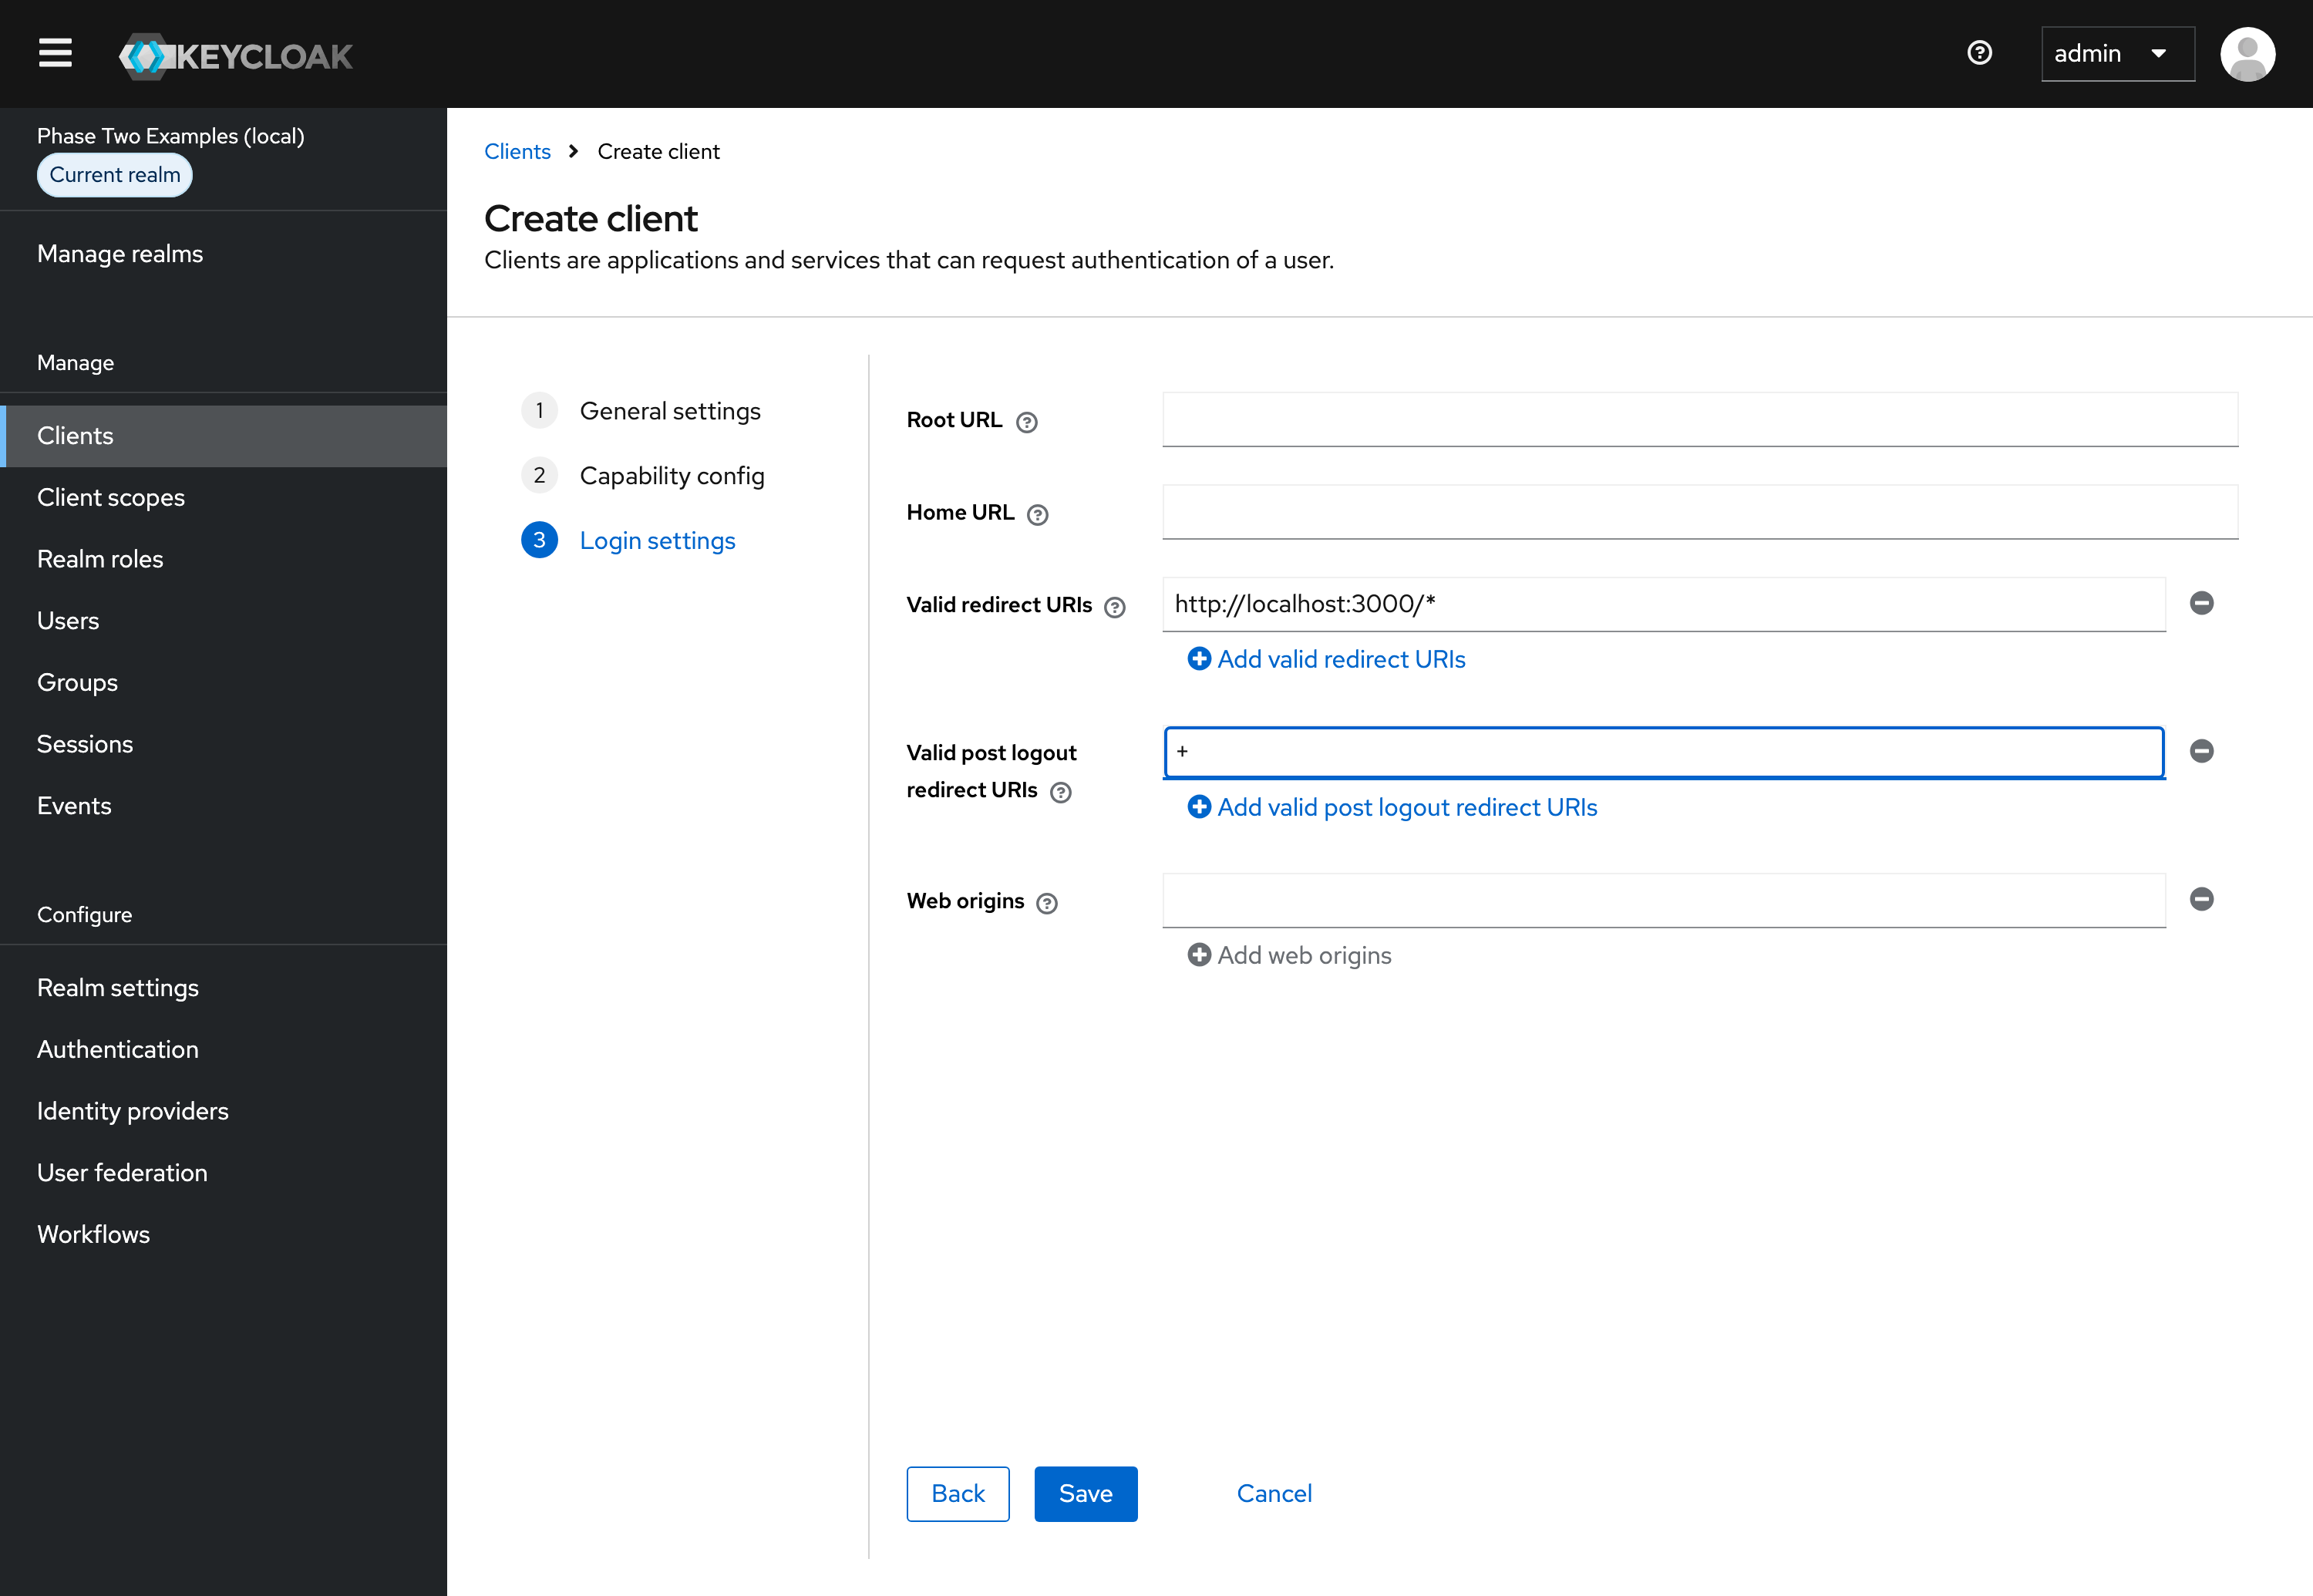
Under Login settings, enter the app's URLs. For an app running on
http://localhost:3000:Valid redirect URIs (where Keycloak may send users back after they log in)
http://localhost:3000/*Valid post logout redirect URIs (where Keycloak may send users back after they log out;
+means the valid redirect URIs)+The app's server calls Keycloak itself, so Web origins can stay empty.
URI Details
Use the port of the app you run: most examples run on port 3000, and the Django example on 8000. For an app deployed somewhere, use its URL instead of
localhost. -
Click Save.
-
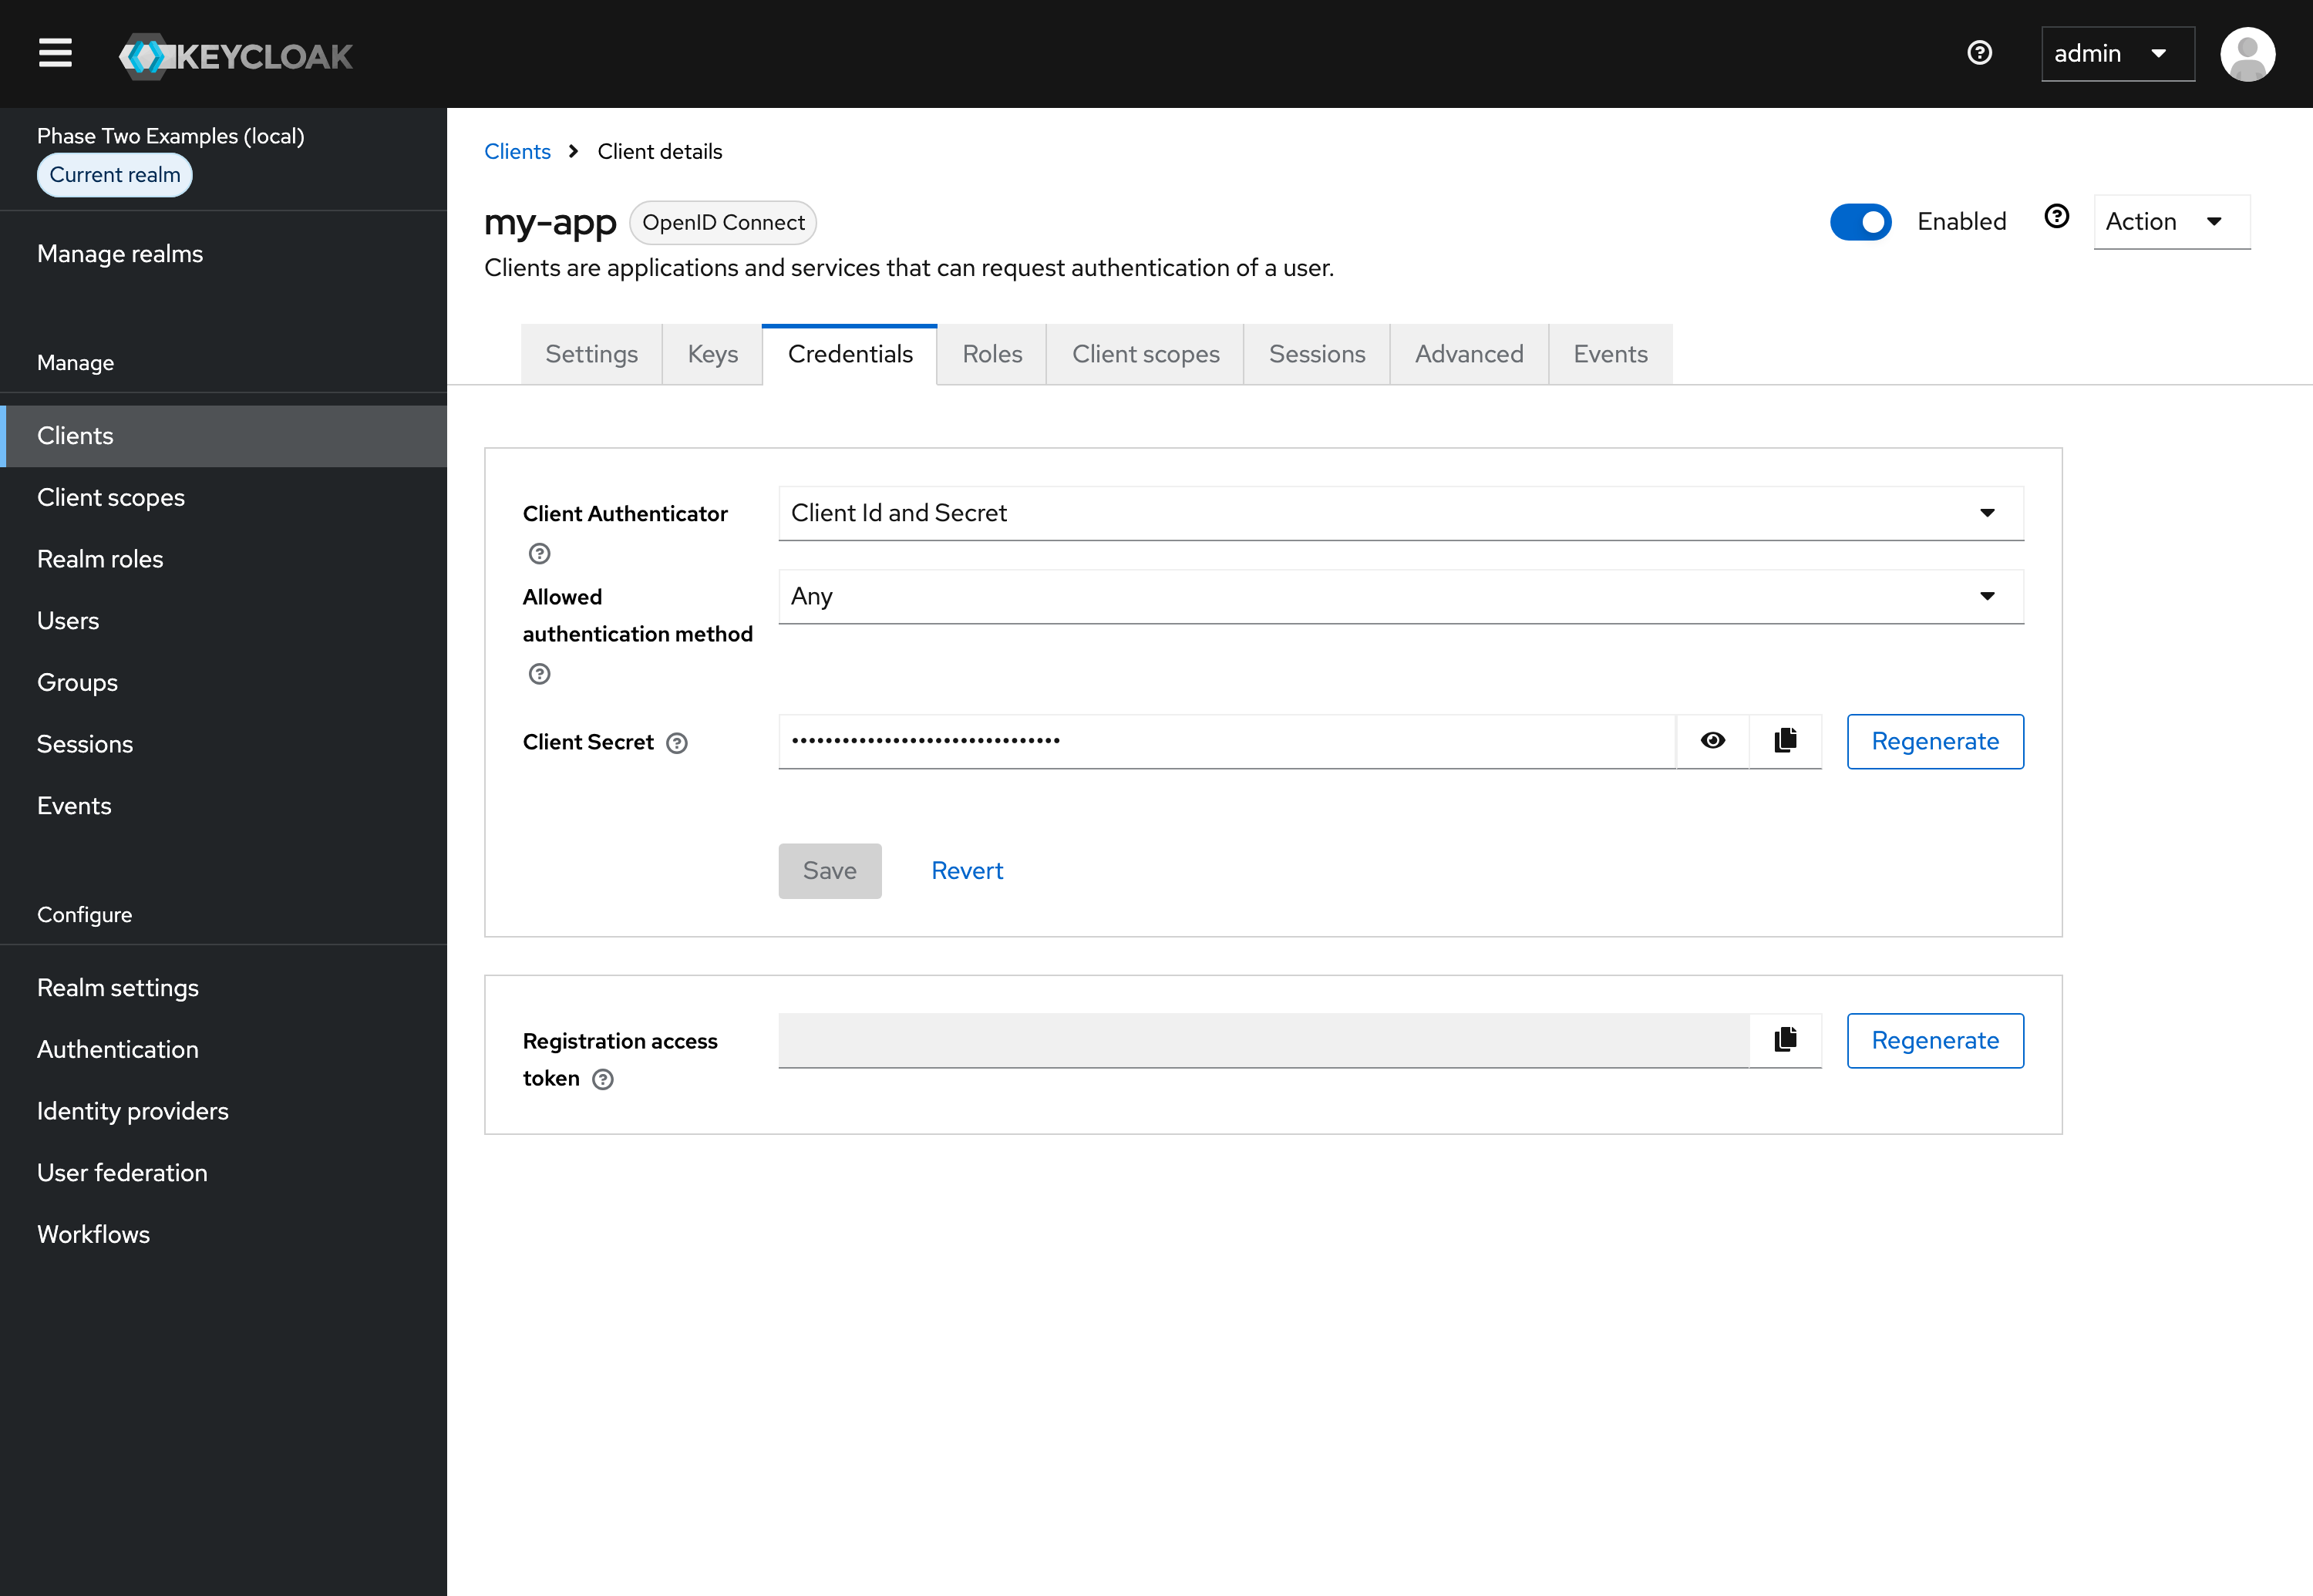
Open the Credentials tab and copy the Client Secret. Keep it for later in this tutorial, and out of your source code and version control.
OIDC Config
The app needs three values from Keycloak:
- Issuer URL: the realm's URL, such as
http://localhost:8080/auth/realms/p2examplesfor the local Keycloak, orhttps://<your-keycloak-host>/auth/realms/<your-realm>. Realm settings > General > Endpoints > OpenID Endpoint Configuration shows it asissuer. - Client ID: the ID you entered when you created the client.
- Client secret: the secret you copied from the Credentials tab.
Adding a Non-Admin User
Instructions
It is bad practice to use your admin user to sign in to an application.
The local Keycloak from the examples repo already has a non-admin user, demo / demo. On any other Keycloak, add one:
- Open the Keycloak admin console and select your realm.
- Click Users in the menu.
- Click Add user.
- Fill out the Username, Email, First name and Last name. Click Create.
- Open the Credentials tab and click Set password. Enter a password for the user. For this tutorial, you can turn Temporary off.
- Click Save, then confirm with Save password.
Install and configure the Django OIDC library
Now that we've installed and configured Keycloak, we need to set up Django to replace the native authentication method provided by the framework. The first task is to install a library that is compatible with Keycloak's OIDC implementation.
The mozilla-django-oidc library provides an easy way to integrate Keycloak (or any OpenID Connect-compliant identity provider) with your Django app. It abstracts many of the complexities of integrating authentication and authorization. Here's how you can set it up:
-
Install the Package: The example's
requirements.txtpinsmozilla-django-oidc==5.0.2, so the quick start already installed it, along withpython-dotenv, which reads.env. In your own project, install themozilla-django-oidcpackage using pip:pip install mozilla-django-oidc -
Configure Django Settings:
locallibrary/settings.pyreads its configuration from the environment and from.env, and sets upmozilla-django-oidc. These are the parts that matter for Keycloak:import osfrom pathlib import Pathfrom dotenv import load_dotenvBASE_DIR = Path(__file__).resolve().parent.parentload_dotenv(BASE_DIR / ".env")INSTALLED_APPS = ["django.contrib.admin","django.contrib.auth","mozilla_django_oidc","django.contrib.contenttypes","django.contrib.sessions","django.contrib.messages","django.contrib.staticfiles","catalog.apps.CatalogConfig",]AUTHENTICATION_BACKENDS = ["locallibrary.auth.KeycloakOIDCAuthenticationBackend","django.contrib.auth.backends.ModelBackend",]LOGIN_URL = "oidc_authentication_init"LOGIN_REDIRECT_URL = "/"LOGOUT_REDIRECT_URL = "/"OIDC_ISSUER = os.environ.get("OIDC_ISSUER", "http://localhost:8080/auth/realms/p2examples").rstrip("/")OIDC_OP_AUTHORIZATION_ENDPOINT = f"{OIDC_ISSUER}/protocol/openid-connect/auth"OIDC_OP_TOKEN_ENDPOINT = f"{OIDC_ISSUER}/protocol/openid-connect/token"OIDC_OP_USER_ENDPOINT = f"{OIDC_ISSUER}/protocol/openid-connect/userinfo"OIDC_OP_JWKS_ENDPOINT = f"{OIDC_ISSUER}/protocol/openid-connect/certs"OIDC_OP_LOGOUT_ENDPOINT = f"{OIDC_ISSUER}/protocol/openid-connect/logout"OIDC_OP_LOGOUT_URL_METHOD = "locallibrary.auth.keycloak_logout_url"OIDC_RP_CLIENT_ID = os.environ.get("OIDC_RP_CLIENT_ID", "django")OIDC_RP_CLIENT_SECRET = os.environ.get("OIDC_RP_CLIENT_SECRET", "")OIDC_RP_SIGN_ALGO = "RS256"OIDC_RP_SCOPES = "openid email profile"OIDC_USE_PKCE = TrueOIDC_STORE_ID_TOKEN = Truemozilla_django_oidcis inINSTALLED_APPS, afterdjango.contrib.auth.AUTHENTICATION_BACKENDSputs the Keycloak backend fromlocallibrary/auth.pyfirst. Use Username rather than Email explains it.LOGIN_URLsends pages that need a login tomozilla-django-oidc'soidc_authentication_initview, which redirects to Keycloak.- The Keycloak endpoints are derived from
OIDC_ISSUER, with Keycloak's paths.mozilla-django-oidcchecks the ID token'sRS256signature against the keys atOIDC_OP_JWKS_ENDPOINT. OIDC_RP_SCOPESasks for theemailandprofilescopes, which carry the user's email, name and username.OIDC_USE_PKCEadds PKCE to the login, on top of the client secret.OIDC_STORE_ID_TOKENkeeps the ID token in the session, where the function named inOIDC_OP_LOGOUT_URL_METHODfinds it to log out of Keycloak. Logging out explains both.
The Keycloak values come from
.env..env.examplehas the values for the local Keycloak:DJANGO_DEBUG=TrueOIDC_ISSUER=http://localhost:8080/auth/realms/p2examplesOIDC_RP_CLIENT_ID=djangoOIDC_RP_CLIENT_SECRET=django-local-dev-secretTo use another Keycloak, put the values from the OIDC Config section in
.env: the issuer URL inOIDC_ISSUER, the client ID inOIDC_RP_CLIENT_IDand the client secret inOIDC_RP_CLIENT_SECRET. Restart the server after you change.env. Variables that are already set in the environment take precedence over.env, which is ignored by git. -
Add URLs:
locallibrary/urls.pyincludes the authentication URLs provided bymozilla-django-oidc:from django.contrib import adminfrom django.urls import include, pathfrom django.views.generic import RedirectViewurlpatterns = [path("", RedirectView.as_view(url="/catalog/", permanent=True)),path("admin/", admin.site.urls),path("catalog/", include("catalog.urls")),path("oidc/", include("mozilla_django_oidc.urls")),]They are
/oidc/authenticate/(namedoidc_authentication_init), which redirects to Keycloak,/oidc/callback/, where Keycloak sends the user back after the login, and/oidc/logout/(namedoidc_logout). -
Log in: Open
http://localhost:8000and click Login. Log in asdemo/demoon the local Keycloak, or as the non-admin user you created. Back on the site, the sidebar shows your username and email.
Using it in your app
Protect your views
mozilla-django-oidc has no decorators of its own. Protect views with Django's login_required decorator and LoginRequiredMixin, as the example does. Because LOGIN_URL is oidc_authentication_init, they send anonymous users to /oidc/authenticate/, which redirects to Keycloak. The My Borrowed page in catalog/views.py uses the mixin:
from django.contrib.auth.mixins import LoginRequiredMixin


class LoanedBooksByUserListView(LoginRequiredMixin, generic.ListView):
    """Generic class-based view listing books on loan to current user."""
    model = BookInstance
    template_name = 'catalog/bookinstance_list_borrowed_user.html'
    paginate_by = 10

    def get_queryset(self):
        return (
            BookInstance.objects.filter(borrower=self.request.user)
            .filter(status__exact='o')
            .order_by('due_back')
        )
Function-based views use the decorator, as renew_book_librarian in catalog/views.py does:
from django.contrib.auth.decorators import login_required, permission_required


@login_required
@permission_required('catalog.can_mark_returned', raise_exception=True)
def renew_book_librarian(request, pk):
    """View function for renewing a specific BookInstance by librarian."""
    book_instance = get_object_or_404(BookInstance, pk=pk)
PermissionRequiredMixin, which the librarian's class-based views use, also sends anonymous users to the login.
Accessing user information
mozilla-django-oidc logs in a regular Django user, so there is no request.oidc_user: use request.user in views, as get_queryset does above, and user in templates. The sidebar in catalog/templates/base_generic.html shows the username, the email and the logout button, or the Login link:
{% if user.is_authenticated %}
  <li>User: {{ user.get_username }}</li>
  <li>Email: {{ user.email }}</li>
  <li><a href="{% url 'my-borrowed' %}">My Borrowed</a></li>
  <form action="{% url 'oidc_logout' %}" method="post">
    {% csrf_token %}
    <input type="submit" value="logout">
  </form>
{% else %}
  <li><a href="{% url 'oidc_authentication_init' %}">Login</a></li>
{% endif %}
By default, mozilla-django-oidc looks up a Django user matching the email field to the email address returned in the user info data from Keycloak.
If a user logs into your site and doesn’t already have an account, by default, mozilla-django-oidc will create a new Django user account. It will create the User instance filling in the username (hash of the email address) and email fields.
Use Username rather than Email
The example matches Django users to Keycloak users by username instead. Keycloak sends the username in the preferred_username claim, which is set up by default. KeycloakOIDCAuthenticationBackend in locallibrary/auth.py overrides the OIDCAuthenticationBackend class in mozilla_django_oidc.auth:
from mozilla_django_oidc.auth import OIDCAuthenticationBackend


class KeycloakOIDCAuthenticationBackend(OIDCAuthenticationBackend):
    def verify_claims(self, claims):
        return bool(claims.get("preferred_username"))

    def filter_users_by_claims(self, claims):
        return self.UserModel.objects.filter(username=claims["preferred_username"])

    def create_user(self, claims):
        user = self.UserModel.objects.create_user(claims["preferred_username"])
        return self.update_user(user, claims)

    def update_user(self, user, claims):
        user.email = claims.get("email", "")
        user.first_name = claims.get("given_name", "")
        user.last_name = claims.get("family_name", "")
        user.save()
        return user
verify_claimsrejects a login without apreferred_usernameclaim.filter_users_by_claimslooks up the Django user with that username, so a Keycloak user logs in to the Django account with the same username, including one created withcreatesuperuser.create_usercreates the user on their first login, without a Django password.update_usercopies the email, first name and last name from Keycloak on every login.
AUTHENTICATION_BACKENDS in locallibrary/settings.py, shown above, lists this backend first. Django's ModelBackend stays after it, so the admin site still accepts the local accounts that createsuperuser creates, and the tests can log in with client.login.
Logging out
There is no @oidc_logout decorator either. The oidc_logout view of mozilla-django-oidc, at /oidc/logout/, logs the user out, and it only accepts POST requests. The logout button in base_generic.html, shown above, is a form that posts to it.
Before it ends the Django session, the view calls the function that OIDC_OP_LOGOUT_URL_METHOD names, keycloak_logout_url in locallibrary/auth.py, and redirects to the URL it returns:
from urllib.parse import urlencode

from django.conf import settings
from django.shortcuts import resolve_url


def keycloak_logout_url(request):
    redirect_url = resolve_url(settings.LOGOUT_REDIRECT_URL)
    id_token = request.session.get("oidc_id_token")
    if not id_token:
        return redirect_url
    query = urlencode(
        {
            "client_id": settings.OIDC_RP_CLIENT_ID,
            "post_logout_redirect_uri": request.build_absolute_uri(redirect_url),
            "id_token_hint": id_token,
        }
    )
    return f"{settings.OIDC_OP_LOGOUT_ENDPOINT}?{query}"
That URL is Keycloak's end-session endpoint, with the ID token that OIDC_STORE_ID_TOKEN keeps in the session as id_token_hint. Keycloak ends its session without asking for confirmation, and redirects back to LOGOUT_REDIRECT_URL, which the client's valid post logout redirect URIs allow. A user who logged in without Keycloak, for example through the admin login form, only has their Django session ended.
Add support for Django Rest Framework
Django REST framework (DRF) is a flexible toolkit built on top of Django, specifically designed for building RESTful APIs. The example doesn't use it, but mozilla-django-oidc supports it.
If you want DRF to authenticate users based on an OAuth access token provided in the Authorization header, you can use the DRF-specific authentication class which ships with the package.
Add this to your settings:
REST_FRAMEWORK = {
    'DEFAULT_AUTHENTICATION_CLASSES': [
        'mozilla_django_oidc.contrib.drf.OIDCAuthentication',
        'rest_framework.authentication.SessionAuthentication',
    ],
}
Note that this only takes care of authenticating against an access token, and provides no options to create or renew tokens.
If you’ve created a custom Django OIDCAuthenticationBackend and added that to your AUTHENTICATION_BACKENDS, the DRF class should be smart enough to figure that out. Alternatively, you can manually set the OIDC backend to use:
OIDC_DRF_AUTH_BACKEND = 'locallibrary.auth.KeycloakOIDCAuthenticationBackend'
Learning more
Phase Two's enhanced Keycloak provides many ways to quickly control and tweak the log in and user management experience. Our blog has many use cases from customizing login pages, setting up magic links (passwordless sign in), and Organization workflows.