Secure Your Application With Keycloak

There are a lot of guides out there, official and unofficial, for how to secure applications with Keycloak. The subject is rather broad, so it's difficult to know where to start. To begin, we'll be focusing on Keycloak's use of OpenID Connect (OIDC), and how to use that standard, along with some helpful libraries, to secure a simple but instructive application.
For the purposes of the sample, we'll actually be using two common applications, a frontend single-page application (SPA) written in JavaScript, and a backend REST API written for Node.js. The language we selected for the sample is JavaScript, but the principles apply no matter the implementation technology you choose.
What is OIDC?
When learning about identity and access management technologies, you'll be confronted with an alphabet-soup of acronyms to learn. OIDC, or OpenID Connect is one of the most important ones for securing applications, be it browser-based, APIs, mobile or native. Our friend over at OneLogin does a great job of explaining OIDC in plain english for those that are curious.
For the purpose of this guide, it is sufficient to know that OIDC is an open authentication protocol that works on top of the OAuth 2.0 framework. OIDC allows individuals to use single sign-on (SSO) to access relying party sites using OpenID Providers (OPs), such as an email provider or social network, to authenticate their identities. It provides the application or service with information about the user, the context of their authentication, and access to their profile information.
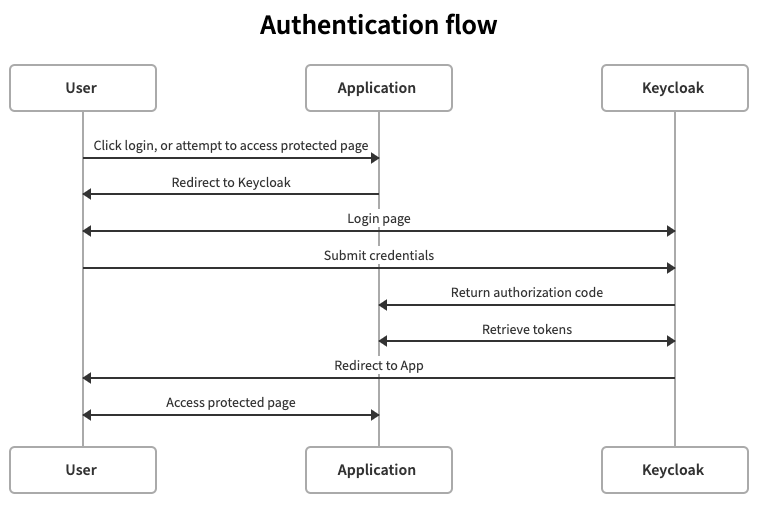
Login flow
A "flow" in OIDC terms is a mechanism of authenticating a user, and obtaning access tokens. The flow we'll be using in this guide is called the authorization code flow. Fortunately, the internals of the flow are not necessary to understand, as Keycloak handles the details for you.
However, it is useful to see what is going on in the login process, so that you understand your user's experience.
Setup
We'll make an assumption for this guide that you are using a cloud deployment of Phase Two enhanced Keycloak. If you haven't already set one up, go over to the self-service launch announcement for details. You may also use your own Keycloak setup, but that setup is beyond the scope of this article.
The sample applications are available in our demo repo on Github. Clone that repo to your local machine. You'll find the applications in the frontend and backend directory, and a set of supporting files for configuration and deployment.
git clone https://github.com/p2-inc/debug-app.git
cd debug-app
Client
Every application that Keycloak protects is considered a Client. Log into your Keycloak realm, and click on Clients in the left navigation, and click Create client.
- Enter
frontendas the Client ID and click Next - In the Capability config screen, keep the defaults and click Save
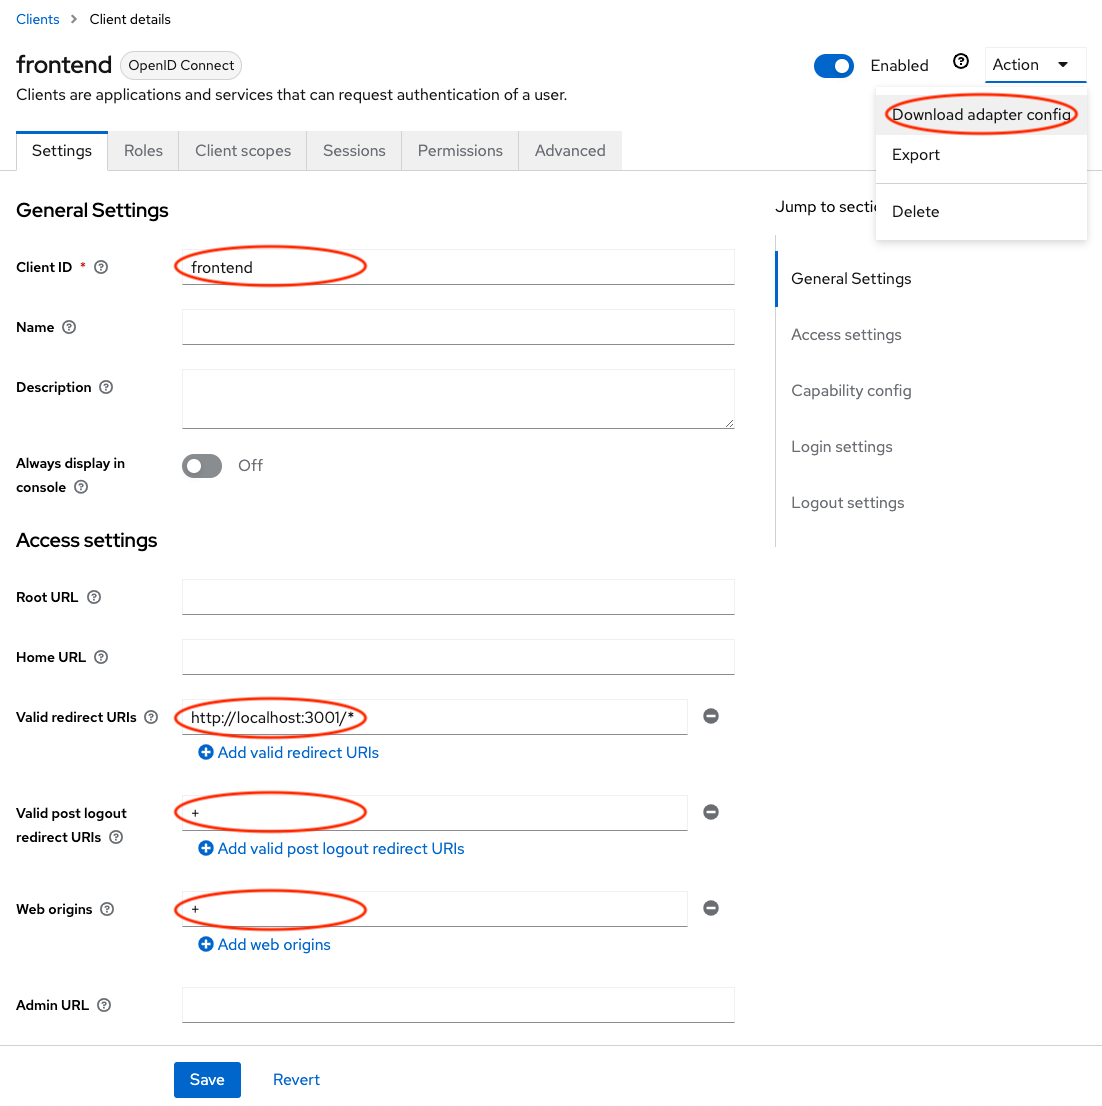
- In the Access settings screen, enter the following values:
http://localhost:3001/*for Valid redirect URIs+in Valid post logout redirect URIs+in Web origins
- Click Save
- In the upper right corner, open the Action menu and select Download adapter config. Click Download and move the file to the
debug-apprepo you cloned under thefrontendfolder.
Make a user
Before we run the application, we need to create a user to log in. Click on Users in the left navigation, and click Add user. You only need to give the user a username and click Create. Find the Credentials tab and click Set password to give the user a password.
Running the sample apps
Open two terminal windows and go to the directory of the repo you cloned in both. To start, run the following commands in each terminal:
Frontend:
cd frontend/
npm install
npm start
Backend:
cd backend/
npm install
KC_REALM=<your-realm-name> KC_URL=<your-keycloak-url> npm start
Be sure to replace the realm name, and the URL of your Keycloak installation (e.g. https://usw2.auth.ac/auth/).
This will install the necessary components using npm, and will start the servers for both applications. Note: the applications use ports 3001 and 3002 by default. If you have other applications running on these ports, you may have to temporarily shut them down.
Putting it all together
Load http://localhost:3001/ in your browser. This will load the frontend application, which will be immediately redirected to the Keycloak login page. Log in with the user you created.
Once you log in, you'll see your profile, and several menu items. First click to the Access token menu item. You'll see the information from the parsed access token that was returned by Keycloak. This contains information about the user, but also claims related to the users roles and groups. This is because access tokens are meant to be read and validated by resource servers (i.e. our backend service).
Next, click ID token. You'll see similar information to what we saw in the access token, but limited to a standardized set of information that identifies the authentication state of the user. ID tokens are not meant for calling resource servers, and because of that, don't contain claims that are meant to be validated by backend services.
Clicking Service will call the backend service. You'll see a message that indicates the frontend called the backend, passing the access token, and was authorized to access a secured service.
You can also try the built-in Keycloak Account Management console by clicking Account, which gives the user a simple way to manage their information that is stored in Keycloak. It is not necessary to use this with your applications, as you may choose to build it in to your app. However, it's a good tool to have out of the box.
Finally, clicking Logout will take you back to the login page. This is actually sending you to the frontend's initial page, which is redirecting you to the login page as its default behavior.
What just happened?
There's a lot that goes into implementation of the OIDC flow we used to secure our sample applications. Part of the reason to use Keycloak is the mature implementation and client libraries that make protecting applications in a secure way almost trivial.
We encourage you to look at the source in the sample applications (specifically frontend/app.js and backend/app.js) and observe how the Keycloak client libraries are used to secure these applications. This will be a good place to start when you are working on securing your own applications.
Your application
Another incredible advantage to using standards like OIDC is that you are not constrained to using Keycloak libraries. Because your applications may not be written in JavaScript also, it's easy to use other language OIDC client libraries. We maintain a list of OIDC libraries, and the OpenID Foundation also maintains lists of certified and uncertified implementations
Today you saw how to quickly secure an application using Keycloak, and learned more about the underlying OIDC standards. We look forward to seeing what you build!