Securing an Angular and Spring Boot Application with Keycloak

Spring Boot is an open-source tool which uses Java-based frameworks for building web applications.
In this article we'll be using Keycloak to secure an Angular application and access secured resources from a Spring Boot Web application.
If you just want to skip to the code, visit the Phase Two Spring Boot example. We are also building Keycloak examples for other frameworks.
Setting up a Spring Boot project
In order to set up a Spring Boot project, a JDK version must be chosen. The example uses Java 21. Spring Boot 4 runs on Java 17 or newer, so other JDK versions can also be used for developing the resource server according to the preference of the developer.
Starting with Spring Boot 2.x the Keycloak client adapters were deprecated. In Spring Boot 4.x we will use native functionalities of the spring-boot-starter-security-oauth2-resource-server to be able to configure the application security context.
Quick Start
To get this project up and running locally on your computer you can clone the Phase Two Spring Boot example or follow the instructions below to generate a project from scratch.
-
Set up the Spring Boot project.
To kickstart a project, we will use (and recommend) using the Spring Boot Initializr, a Web-based tool that provides a simple UI to generate the project.
Provide the following values to the Initializr:
Setting Value Project Gradle - Groovy Language Java Spring Boot 4.1.x (the example uses 4.1.1) Group com.exampleArtifact spring-boot-keycloakName spring-boot-keycloakDescription Demo project for Spring BootPackage name com.example.springbootkeycloakPackaging Jar Configuration YAML Java 21 Java package names can't contain hyphens, so the package name is
com.example.springbootkeycloak, as in the example. -
Add the required dependencies in spring initializr.
For the purpose of this project we will add the following dependencies:
- OAuth2 Resource Server
- Spring Web
- Spring Security
This will result in the following lines within
build.gradle:dependencies {implementation 'org.springframework.boot:spring-boot-starter-security'implementation 'org.springframework.boot:spring-boot-starter-security-oauth2-resource-server'implementation 'org.springframework.boot:spring-boot-starter-webmvc'testImplementation 'org.springframework.boot:spring-boot-starter-security-oauth2-resource-server-test'testImplementation 'org.springframework.boot:spring-boot-starter-security-test'testImplementation 'org.springframework.boot:spring-boot-starter-webmvc-test'testRuntimeOnly 'org.junit.platform:junit-platform-launcher'}With Spring Boot 4, Spring Web adds
spring-boot-starter-webmvc, and each starter comes with its own test starter.Generate the project with those settings. Open the .zip in your preferred text editor.
-
Set up JDK 21 for the project. Follow the instructions on the JDK installation page. The cloned example also builds with Java 17 or newer: its
settings.gradleapplies the foojay toolchain resolver, so Gradle downloads the Java 21 toolchain if you don't have one.
Setting up a Keycloak Instance
Before customizing the Spring Boot app, we need to set up and configure our Keycloak instance.
The example runs its own Keycloak: a Phase Two Keycloak 26.6 in Docker, on port 8888, with a realm set up for this post. You need Docker with the Compose plugin. Even if you generate your own project, start Keycloak from the example's folder:
git clone https://github.com/p2-inc/examples.git
cd examples/frameworks/spring-boot-keycloak
docker compose up -d --wait
Keycloak imports the realm demo-realm from keycloak/demo-realm-realm.json:
| What | Value |
|---|---|
| Issuer URL | http://localhost:8888/auth/realms/demo-realm |
| Admin console | localhost:8888/auth/admin, admin / admin |
| Client | demo-spa: public, standard flow with PKCE (S256), redirect URIs http://localhost:4200/* |
| Users | test / test has the realm role user; noaccess / noaccess doesn't |
The client and the users from the next two sections already exist in this realm, so you can skip both. docker compose down stops Keycloak, and the next up starts again from a fresh realm.
This isn't the shared Keycloak in the examples repo's keycloak/ folder, which the other tutorials use: its p2examples realm has no client for this example. The shared Keycloak also listens on port 8080, where the Spring Boot API runs, so stop it first with docker compose -f keycloak/docker-compose.yml down from the repo root.
Use another Keycloak
If you already have a Keycloak, open its admin console and select your realm. Otherwise, use a hosted Phase Two cluster:
- Sign up on the Phase Two Dashboard with an email address, a GitHub account or a Google account.
- Create a Starter cluster, which is free for 30 days, and add a realm to it.
- Click Open Console to open the realm in the Keycloak admin console.
The API and the Angular client connect to Keycloak through the realm's issuer URL, such as https://<your-keycloak-host>/auth/realms/<your-realm> on a Phase Two cluster. In the admin console, Realm settings > General > Endpoints > OpenID Endpoint Configuration shows it as issuer.
Keep the admin console open: the next two sections create the client and a user there.
Setting up an OIDC Client
Instructions
The example's Keycloak already has this client, demo-spa. On another Keycloak, create it as below, with these values for this example:
- Client ID:
demo-spa, the ID the Angular client uses. If you choose another ID, changeclientIdin the Angular client'senvironment.tstoo. - Valid redirect URIs:
http://localhost:4200/*, since the Angular client runs on port 4200.
The app needs an OpenID Connect client in Keycloak. The app runs in the browser, where it can't keep a secret, so it gets a public client and logs users in with the authorization code flow and PKCE. Keycloak's docs describe all the client settings.
-
Open the Keycloak admin console and select your realm.
-
Click Clients in the menu.
-
Click Create client.
-
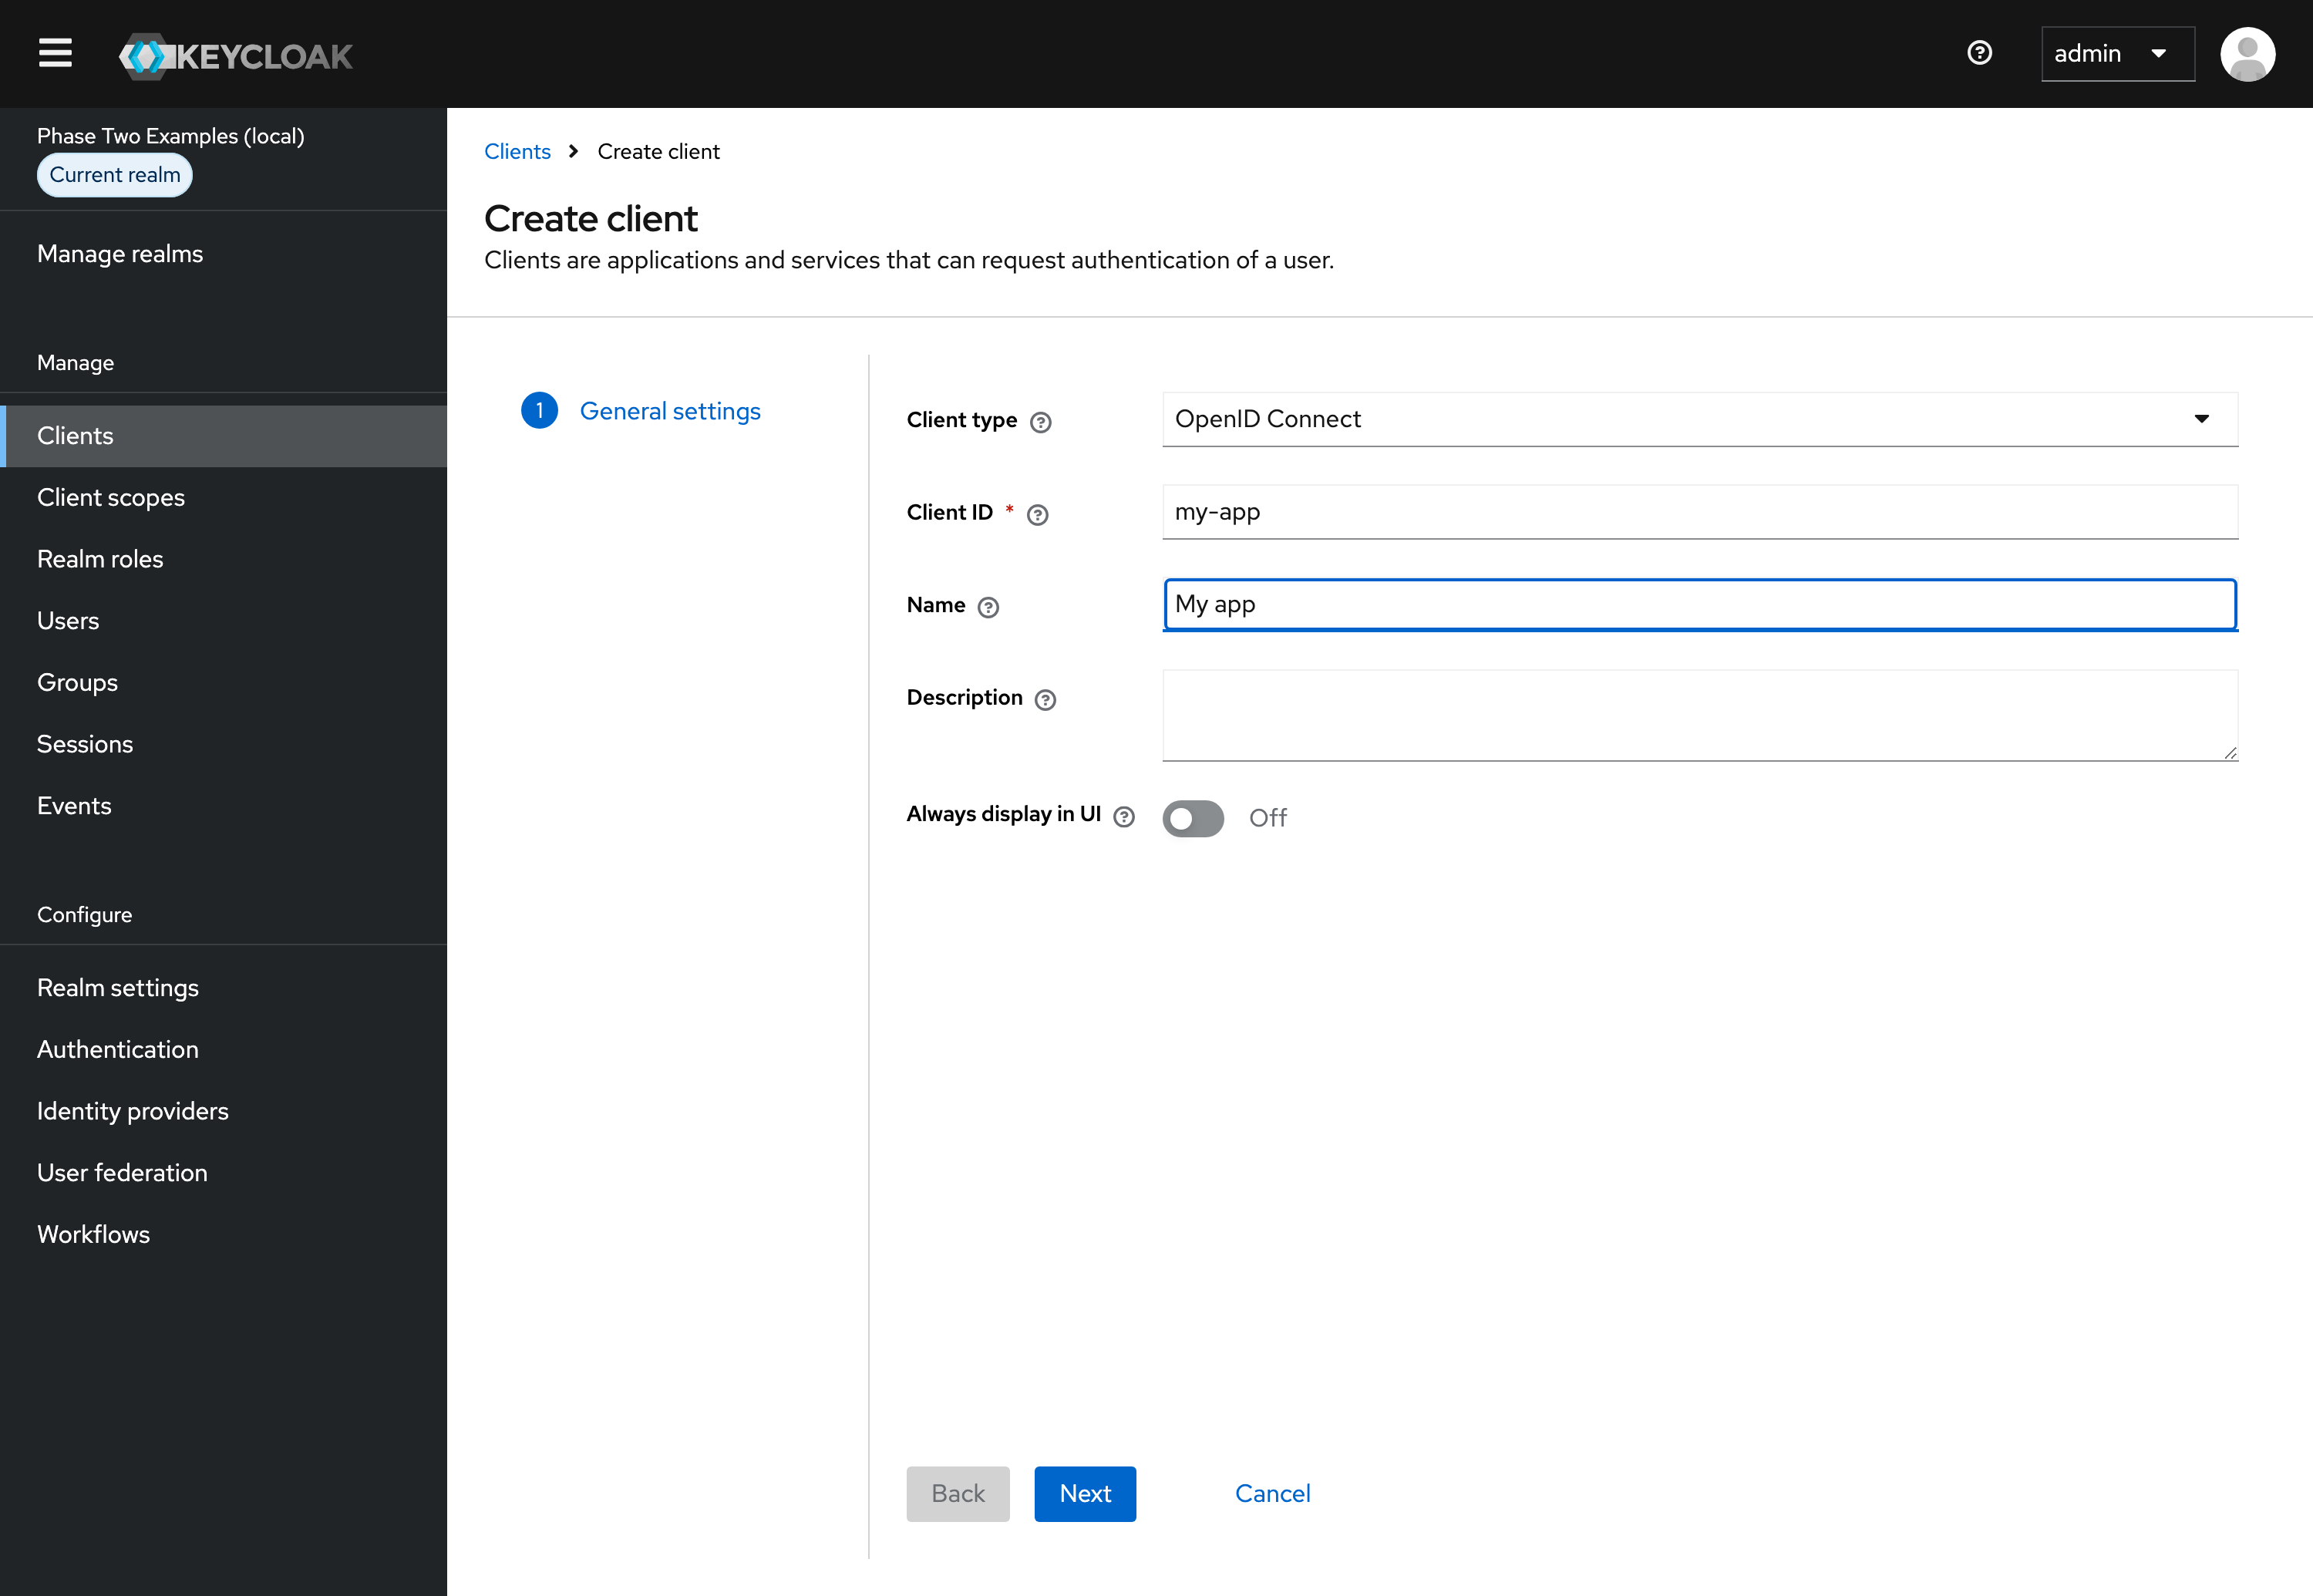
Leave Client type set to OpenID Connect.
-
Enter a Client ID. The app sends this ID in its OpenID Connect requests.
-
Supply a Name for the client.
-
Click Next.
-
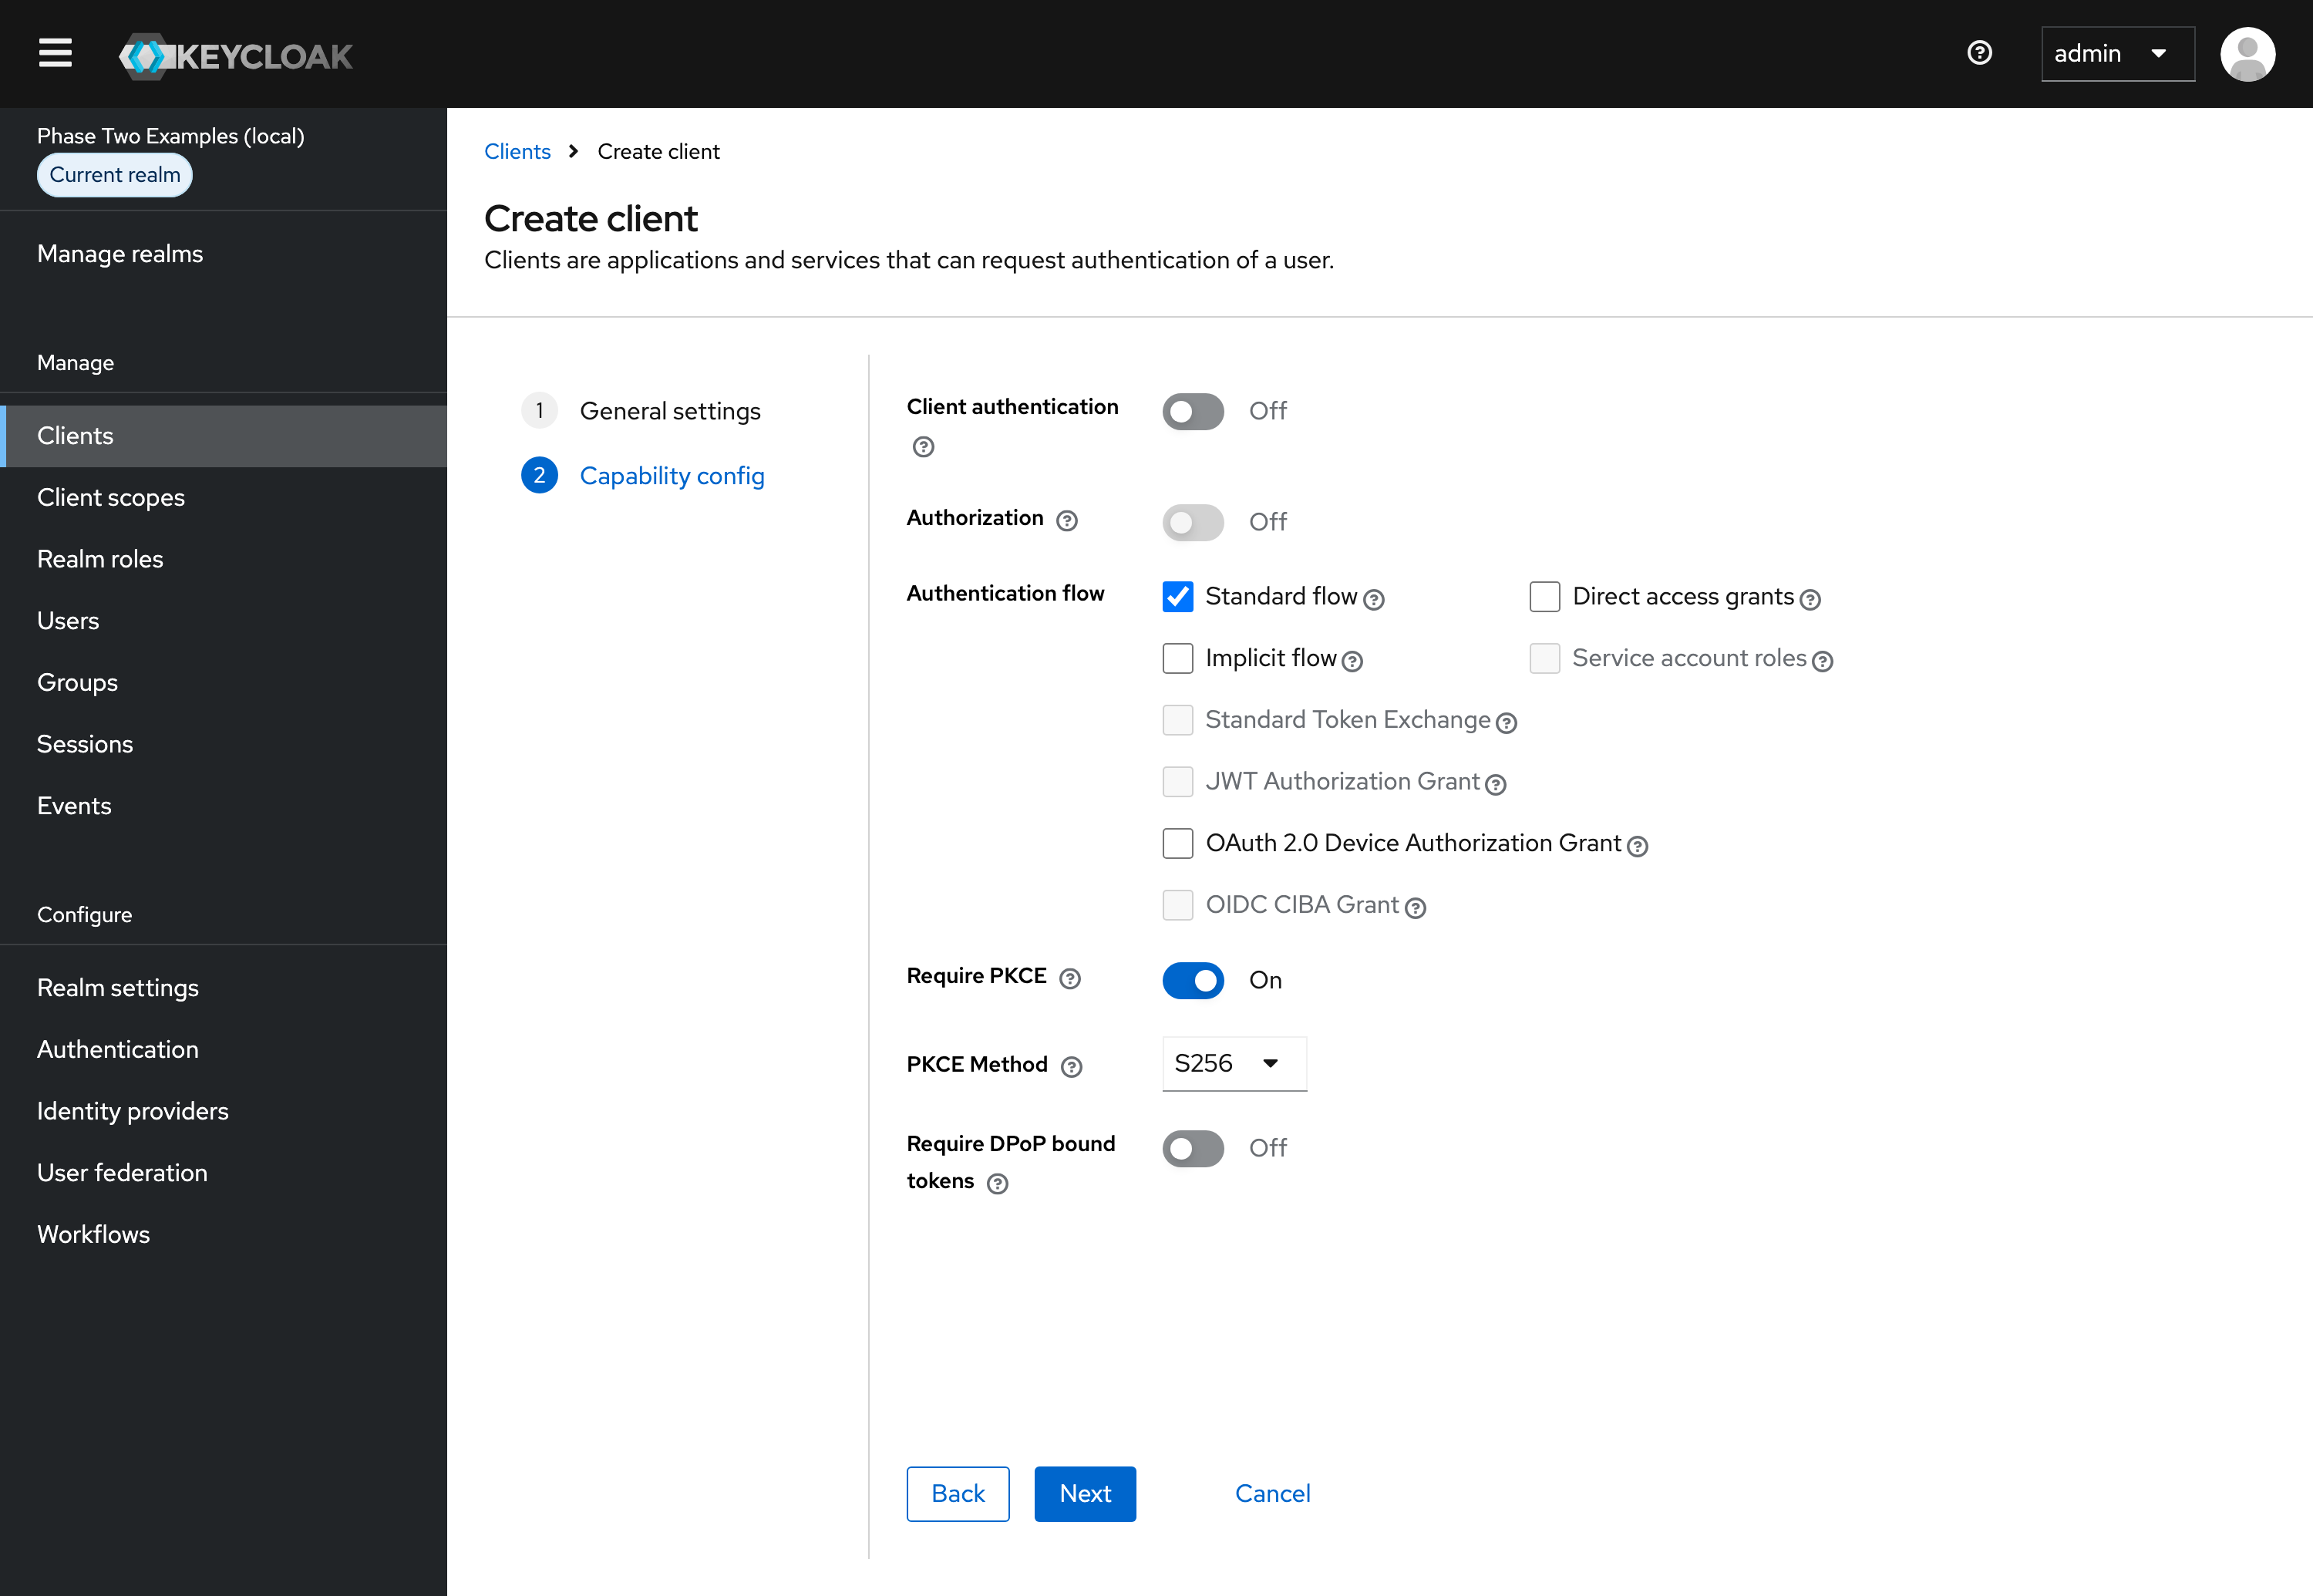
Under Capability config:
- Leave Client authentication off.
- Leave Standard flow checked and Direct access grants unchecked. The app logs users in through Keycloak's login page, so it never needs their password.
- Turn Require PKCE on, and leave PKCE Method set to S256.
-
Click Next.
-
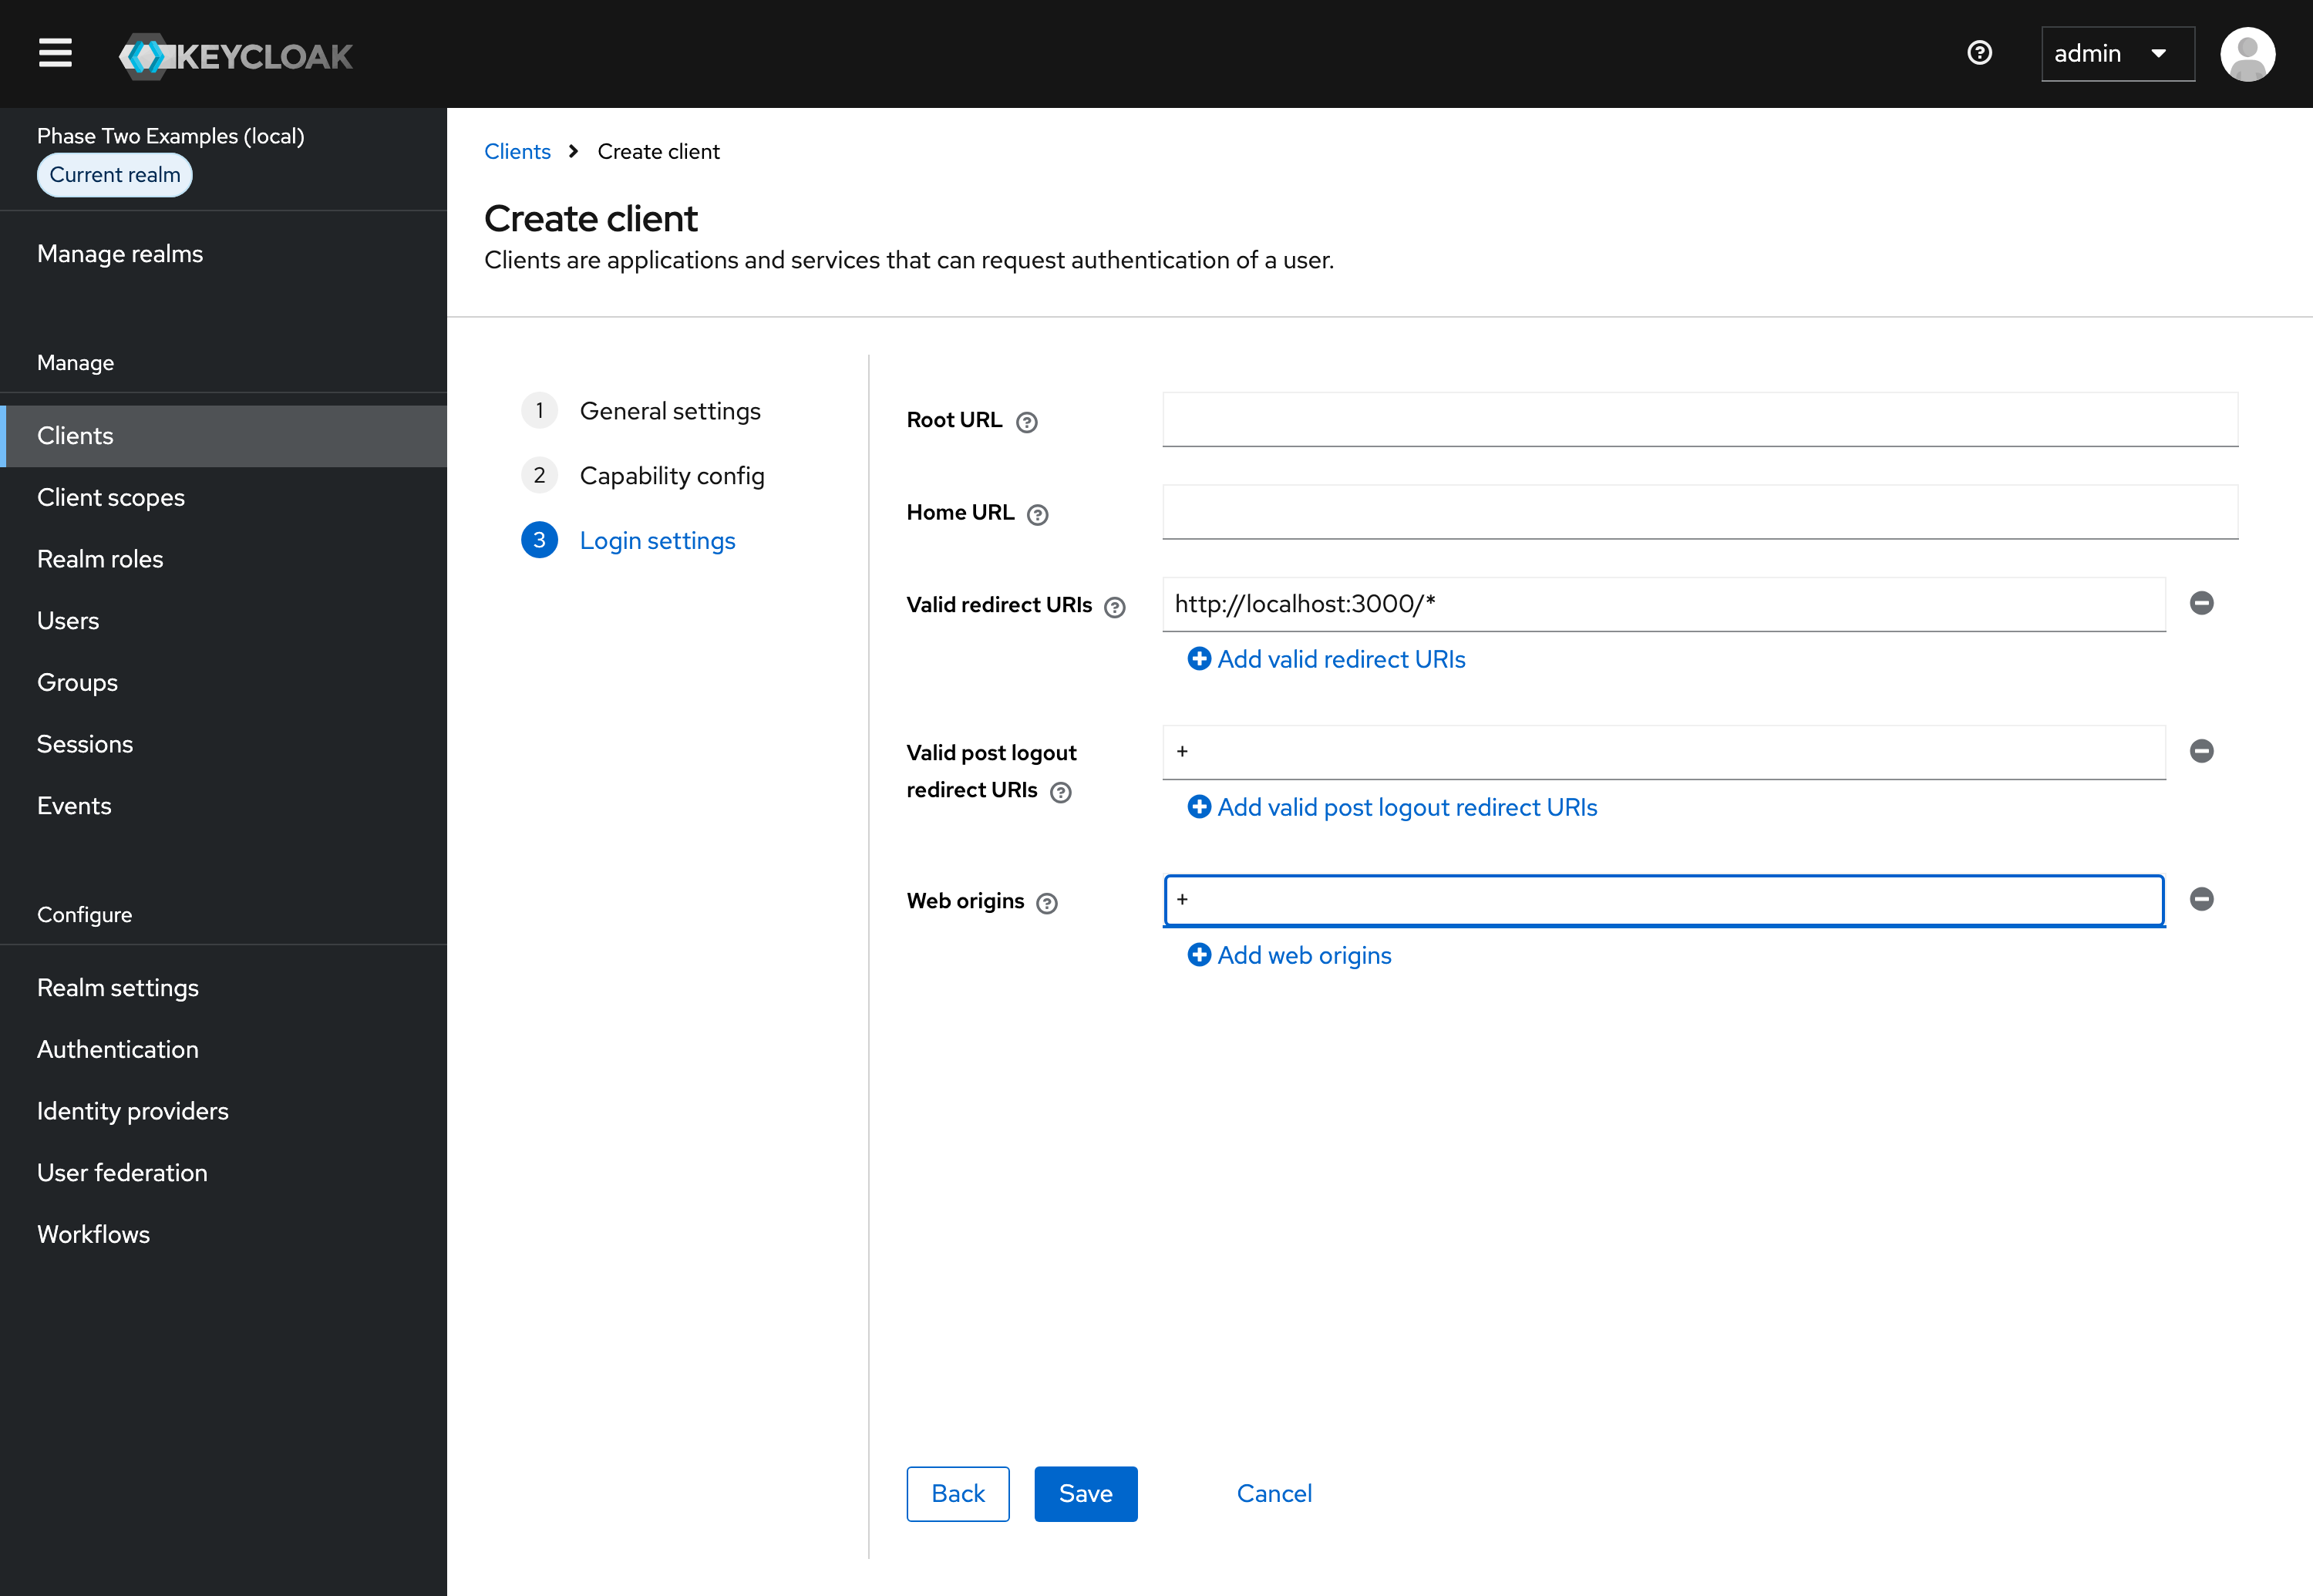
Under Login settings, enter the app's URLs. For an app running on
http://localhost:3000:Valid redirect URIs (where Keycloak may send users back after they log in)
http://localhost:3000/*Valid post logout redirect URIs (where Keycloak may send users back after they log out;
+means the valid redirect URIs)+Web origins (the origins allowed to call Keycloak from the browser, for example to get tokens;
+means the origins of the valid redirect URIs)+URI and Origin Details
Use the port of the app you run: most examples run on port 3000, and the Angular examples on 4200. For an app deployed somewhere, use its URL instead of
localhost. -
Click Save.
OIDC Config
The app needs two values from Keycloak:
- Issuer URL: the realm's URL, such as
http://localhost:8080/auth/realms/p2examplesfor the local Keycloak, orhttps://<your-keycloak-host>/auth/realms/<your-realm>. Realm settings > General > Endpoints > OpenID Endpoint Configuration shows it asissuer. - Client ID: the ID you entered when you created the client.
Adding a Non-Admin User
Instructions
The example's Keycloak isn't the shared one from the examples repo, which has the demo user mentioned below. Its users are test / test, who has the realm role user, and noaccess / noaccess, who doesn't. On another Keycloak, add a user as below, then give it the role user.
It is bad practice to use your admin user to sign in to an application.
The local Keycloak from the examples repo already has a non-admin user, demo / demo. On any other Keycloak, add one:
- Open the Keycloak admin console and select your realm.
- Click Users in the menu.
- Click Add user.
- Fill out the Username, Email, First name and Last name. Click Create.
- Open the Credentials tab and click Set password. Enter a password for the user. For this tutorial, you can turn Temporary off.
- Click Save, then confirm with Save password.
The API's /api/test/user endpoint only answers users with the realm role user. Create the role and assign it to your user:
- Click Realm roles in the menu, then Create role.
- Enter
useras the Role name and click Save. - Click Users in the menu and open your user.
- Open the Role mapping tab, click Assign role and assign the realm role
user.
Install and configure Spring Boot
Now that we've set up Keycloak and cloned or created our Spring Boot application, we need to configure the project to use Keycloak.
-
Configure application settings
Update the
src/main/resources/application.yamlconfiguration file with the Keycloak security configuration (if you picked Properties in the Initializr, your download includes anapplication.propertiesfile instead):spring:application:name: spring-boot-keycloaksecurity:oauth2:resourceserver:jwt:issuer-uri: ${KEYCLOAK_ISSUER_URI:http://localhost:8888/auth/realms/demo-realm}server:port: 8080app:cors:allowed-origins: ${CORS_ALLOWED_ORIGINS:http://localhost:4200}issuer-uriis the realm's issuer URL. It defaults to the example's Keycloak, and theKEYCLOAK_ISSUER_URIenvironment variable overrides it. On the first request, the API reads the realm's signing keys from it, and it only accepts tokens whoseissclaim is exactly this URL.app.cors.allowed-originslists the origins allowed to call the API from a browser: the Angular client. TheCORS_ALLOWED_ORIGINSenvironment variable overrides it with a comma-separated list.
To use another Keycloak, set
KEYCLOAK_ISSUER_URIto your realm's issuer URL when you start the API, for example:KEYCLOAK_ISSUER_URI=https://keycloak.example.com/auth/realms/myrealm ./gradlew bootRunThe below Java code omits the
packageandimportstatements. Reference our example for the necessary imports or use your text editor to assist with populating them. -
Configure Spring Boot resource server
Under
src/main/java/com/example/springbootkeycloakcreate a new package,config, and create a classSecurityConfig.java. In this class, add theHttpSecuritysettings and the CORS configuration:@Configuration@EnableMethodSecuritypublic class SecurityConfig {@BeanSecurityFilterChain securityFilterChain(HttpSecurity http) throws Exception {http.cors(withDefaults()).csrf(AbstractHttpConfigurer::disable).sessionManagement(session -> session.sessionCreationPolicy(SessionCreationPolicy.STATELESS)).authorizeHttpRequests(authorize -> authorize.requestMatchers("/error").permitAll().requestMatchers(HttpMethod.GET, "/api/test/anonymous").permitAll().requestMatchers("/api/**").authenticated().anyRequest().denyAll()).oauth2ResourceServer(resourceServer -> resourceServer.jwt(jwt -> jwt.jwtAuthenticationConverter(new JwtClaimsConverter())));return http.build();}@BeanCorsConfigurationSource corsConfigurationSource(@Value("${app.cors.allowed-origins}") List<String> allowedOrigins) {var configuration = new CorsConfiguration();configuration.setAllowedOrigins(allowedOrigins);configuration.setAllowedMethods(List.of("GET"));configuration.setAllowedHeaders(List.of("Authorization"));var source = new UrlBasedCorsConfigurationSource();source.registerCorsConfiguration("/api/**", configuration);return source;}}This configuration will make the Spring Boot app act as an OAuth2 Resource Server with JWT authentication:
- The API is stateless and CSRF protection is off: browsers send the access token in the
Authorizationheader, not a session cookie. /errorandGET /api/test/anonymousare public, the rest of/api/**needs a valid access token, and every other path is denied.JwtClaimsConverter, from the next step, turns the validated token into the user's authentication.@EnableMethodSecurityturns on the@PreAuthorizechecks of the endpoints.- CORS lets the origins from
app.cors.allowed-originscall/api/**withGETand theAuthorizationheader.
This configuration is part of the functionality provided by the
spring-boot-starter-security-oauth2-resource-serverdependency. Read more about its configuration here. - The API is stateless and CSRF protection is off: browsers send the access token in the
-
Add JWT token convert configuration
In the same
configpackage, create another class,JwtClaimsConverter.java. Add a converter for extracting the security context attributes from theaccess_tokenreceived from Keycloak.public class JwtClaimsConverter implements Converter<Jwt, AbstractAuthenticationToken> {@Overridepublic AbstractAuthenticationToken convert(Jwt jwt) {return new JwtAuthenticationToken(jwt, realmRoles(jwt), username(jwt));}private static String username(Jwt jwt) {String username = jwt.getClaimAsString("preferred_username");return username != null ? username : jwt.getSubject();}private static Set<GrantedAuthority> realmRoles(Jwt jwt) {if (jwt.getClaims().get("realm_access") instanceof Map<?, ?> realmAccess&& realmAccess.get("roles") instanceof Collection<?> roles) {return roles.stream().map(role -> new SimpleGrantedAuthority("ROLE_" + role)).collect(Collectors.toUnmodifiableSet());}return Set.of();}}The provided example uses the
preferred_usernameclaim, orsubif the token has none, for populating the principal of the security context and therealm_access.rolesto populate the authorities: the realm roleuserbecomesROLE_user.This configuration is part of the functionality provided by the
spring-boot-starter-security-oauth2-resource-serverdependency. Read more about its configuration here. -
Create the secured API resources:
In
src/main/java/com/example/springbootkeycloakcreate a new package,web, and create a new classTestController.java.To test the security integration two resource endpoints are defined:
/api/test/anonymous/api/test/user
Implemented with this code:
@RestController@RequestMapping("/api/test")public class TestController {@GetMapping("/anonymous")public Message anonymous() {return new Message("Hello Anonymous");}@GetMapping("/user")@PreAuthorize("hasRole('user')")public UserMessage user(Authentication authentication) {return new UserMessage("Hello Secured with user role.", authentication.getName());}public record Message(String message) {}public record UserMessage(String message, String user) {}}Anyone can call
/api/test/anonymous, sinceSecurityConfigmakes it public. The/api/test/userendpoint needs a valid access token, and@PreAuthorize("hasRole('user')")also requires the authorityROLE_user, which comes from the realm roleuser. Both endpoints return JSON, and/api/test/useradds the user name from the token.This logic can be used to extend access and authorization to any part of the application.
Start the API on port 8080 with
./gradlew bootRun.
Testing the secured endpoints
The secured endpoints can be tested using curl. The public endpoint needs no token:
curl http://localhost:8080/api/test/anonymous
It returns {"message":"Hello Anonymous"}.
The user endpoint needs an access_token in the Authorization header. Keycloak doesn't hand one out for a username and password here, since demo-spa is a public client that only allows the browser login flow. Take the token from the Angular client of the next section instead: log in, open the browser's developer console and run sessionStorage.getItem('access_token'). Then:
ACCESS_TOKEN='paste the access token here'

curl -i http://localhost:8080/api/test/user
curl -H "Authorization: Bearer $ACCESS_TOKEN" http://localhost:8080/api/test/user
The first call returns 401, the second {"message":"Hello Secured with user role.","user":"test"}, or 403 with the noaccess user's token. Access tokens expire after 5 minutes. If you get an unexpected 401 or 403, the Spring Boot Keycloak tutorial explains the causes of each.
At this point, your Spring Boot application is secured with Keycloak, but there is no "Frontend" to the application. In the next section, we will add an Angular SPA to demonstrate sign-in with Keycloak.
Integration with Angular
In order to access the secured resources of the Spring Boot server, we will create a client application which will authenticate our users. After Authentication, that user will then have access to the secured resources via their JWT token.
Generate Angular Application
Our Spring Boot example already has an Angular 22 application set up. We will use that for the rest of this setup.
In the example folder, open the angularclient folder.
If you do want to start your own Application, follow the instructions below:
- Set up a new Angular application with the Angular CLI, following these instructions.
- Use the Angular OAuth2 OIDC library to integrate authentication and authorization. The example also decodes the tokens with jwt-decode:
pnpm add angular-oauth2-oidc jwt-decode.
Securing views
The Angular client is a standalone application: src/main.ts starts it with the providers from src/app/app.config.ts, which set up the angular-oauth2-oidc library. In src/app/app.config.ts:
import { provideHttpClient, withInterceptorsFromDi } from '@angular/common/http';
import {
  ApplicationConfig,
  inject,
  provideAppInitializer,
  provideBrowserGlobalErrorListeners,
} from '@angular/core';
import { Router, provideRouter } from '@angular/router';
import { OAuthService, provideOAuthClient } from 'angular-oauth2-oidc';
import { environment } from '../environments/environment';
import { routes } from './app.routes';
import { authConfig } from './auth/auth.config';

export const appConfig: ApplicationConfig = {
  providers: [
    provideBrowserGlobalErrorListeners(),
    provideRouter(routes),
    provideHttpClient(withInterceptorsFromDi()),
    provideOAuthClient({
      resourceServer: {
        allowedUrls: [environment.apiBaseUrl],
        sendAccessToken: true,
      },
    }),
    provideAppInitializer(async () => {
      const oauth = inject(OAuthService);
      const router = inject(Router);
      oauth.configure(authConfig);
      oauth.setupAutomaticSilentRefresh();
      try {
        await oauth.loadDiscoveryDocumentAndTryLogin();
      } catch (error) {
        console.error('Could not reach Keycloak or finish the login', error);
        return;
      }
      if (oauth.state) {
        void router.navigateByUrl(decodeURIComponent(oauth.state));
      }
    }),
  ],
};
provideOAuthClientprovides theOAuthServiceand an HTTP interceptor, enabled bywithInterceptorsFromDi(), that sends the access token only with requests to the URLs inallowedUrls: the API's.provideAppInitializerruns before the app starts. It configures theOAuthService, refreshes the tokens before they expire and loads Keycloak's discovery document. When Keycloak redirects back after a login,loadDiscoveryDocumentAndTryLogin()exchanges the authorization code for tokens. If the login started from a guarded page, the app then navigates back to it.
Tokens from the OAuthService are stored in the browser's sessionStorage, the library's default.
The OAuthService's authorization code login flow is configured in src/app/auth/auth.config.ts:
import { AuthConfig } from 'angular-oauth2-oidc';
import { environment } from '../../environments/environment';

export const authConfig: AuthConfig = {
  issuer: environment.issuer,
  clientId: environment.clientId,
  redirectUri: window.location.origin + '/',
  postLogoutRedirectUri: window.location.origin + '/',
  responseType: 'code',
  scope: 'openid profile email',
};
The library uses PKCE with the authorization code flow, as the demo-spa client requires. The Keycloak issuer, the client ID and the API's URL are in src/environments/environment.ts:
export const environment = {
  issuer: 'http://localhost:8888/auth/realms/demo-realm',
  clientId: 'demo-spa',
  apiBaseUrl: 'http://localhost:8080',
};
To use another Keycloak, replace issuer with your realm's issuer URL and clientId with your client's ID.
Start the Angular client on port 4200. You need Node.js 24 and pnpm:
cd angularclient
pnpm install
pnpm start
Then open localhost:4200.
User Authentication
In the src/app/home/home.html file, we render the user's logged in state and conditionally render the login and logout buttons:
<div class="pb-8 text-xl italic">Your current status is:</div>
@if (auth.authenticated()) {
  <div class="mb-2 text-2xl text-p2blue-700">Authenticated</div>
  <div class="mb-6 text-p2blue-700">
    <div>{{ auth.idTokenClaims()?.name }}</div>
    <div>{{ auth.idTokenClaims()?.email }}</div>
  </div>
  <button
    type="button"
    class="cursor-pointer rounded-md bg-indigo-600 px-2.5 py-1.5 text-sm font-semibold text-white shadow-xs hover:bg-indigo-500 focus-visible:outline-2 focus-visible:outline-offset-2 focus-visible:outline-indigo-600"
    (click)="auth.logout()"
  >
    Log out
  </button>
} @else {
  <div class="mb-6 text-2xl text-p2blue-700">Not authenticated.</div>
  @if (!auth.keycloakReachable()) {
    <p class="mb-6 text-sm text-red-700">
      Keycloak is not reachable at {{ issuer }}. Start it with
      <code>docker compose up -d --wait</code>.
    </p>
  }
  <button
    type="button"
    class="cursor-pointer rounded-md bg-indigo-600 px-2.5 py-1.5 text-sm font-semibold text-white shadow-xs hover:bg-indigo-500 focus-visible:outline-2 focus-visible:outline-offset-2 focus-visible:outline-indigo-600"
    (click)="auth.login()"
  >
    Log in
  </button>
}
auth is the Auth service from src/app/auth/auth.ts. It turns the OAuthService's events into signals, so the page updates when the user logs in or out and when the tokens are refreshed:
import { Injectable, computed, inject } from '@angular/core';
import { toSignal } from '@angular/core/rxjs-interop';
import { OAuthService } from 'angular-oauth2-oidc';
import { JwtPayload, jwtDecode } from 'jwt-decode';
import { map, startWith } from 'rxjs';

export interface IdTokenClaims extends JwtPayload {
  name?: string;
  email?: string;
}

@Injectable({ providedIn: 'root' })
export class Auth {
  private readonly oauth = inject(OAuthService);

  private readonly session = toSignal(
    this.oauth.events.pipe(
      startWith(null),
      map(() => ({
        keycloakReachable: this.oauth.discoveryDocumentLoaded,
        authenticated: this.oauth.hasValidAccessToken(),
        accessToken: this.oauth.getAccessToken(),
        idToken: this.oauth.getIdToken(),
      })),
    ),
    { requireSync: true },
  );

  readonly keycloakReachable = computed(() => this.session().keycloakReachable);
  readonly authenticated = computed(() => this.session().authenticated);
  readonly accessTokenClaims = computed(() => decode<JwtPayload>(this.session().accessToken));
  readonly idTokenClaims = computed(() => decode<IdTokenClaims>(this.session().idToken));

  login(): void {
    this.oauth.initCodeFlow();
  }

  logout(): void {
    this.oauth.logOut();
  }
}

function decode<T>(token: string | null): T | null {
  return token ? jwtDecode<T>(token) : null;
}
Clicking the Log in button will redirect to the Keycloak login page. Clicking Log out logs the user out of the app and of Keycloak, which redirects back to the app.
Below the login state, the home page has buttons that call /api/test/anonymous and /api/test/user and show the response. They use the Api service. In src/app/api/api.ts:
@Injectable({ providedIn: 'root' })
export class Api {
  private readonly http = inject(HttpClient);

  get(path: string): Observable<ApiResponse> {
    return this.http.get<unknown>(environment.apiBaseUrl + path).pipe(
      map((body) => ({ path, text: JSON.stringify(body, null, 2) })),
      catchError((error: HttpErrorResponse) => of({ path, text: errorMessage(error) })),
    );
  }
}
The service never handles the token: the interceptor from provideOAuthClient adds it, since the URL starts with environment.apiBaseUrl. Logged out, /api/test/user returns 401. Logged in as test, it returns the message with the user name, and logged in as noaccess, 403.
Use Angular guards to secure routes
We can achieve route restriction by using guards. If the access token is not valid, authGuard in src/app/auth/auth.guard.ts initiates the login flow with the requested URL and cancels the navigation:
import { inject } from '@angular/core';
import { CanActivateFn } from '@angular/router';
import { OAuthService } from 'angular-oauth2-oidc';

export const authGuard: CanActivateFn = (_route, state) => {
  const oauth = inject(OAuthService);
  if (oauth.hasValidAccessToken()) {
    return true;
  }
  oauth.initCodeFlow(state.url);
  return false;
};
src/app/app.routes.ts applies the guard to the protected page:
import { Routes } from '@angular/router';
import { authGuard } from './auth/auth.guard';
import { Home } from './home/home';
import { Protected } from './protected/protected';

export const routes: Routes = [
  { path: '', component: Home },
  { path: 'protected', component: Protected, canActivate: [authGuard] },
  { path: '**', redirectTo: '' },
];
After the login, the app initializer in app.config.ts navigates back to /protected, which calls /api/test/user. You could optionally apply the guard to every route to enforce a full page login.
Learning more
Phase Two's enhanced Keycloak provides many ways to quickly control and tweak the log in and user management experience. Our blog has many use cases from customizing login pages, setting up magic links (passwordless sign in), and Organization workflows.