Set Up Email in Phase Two for a Better Branding Experience

Email is one of the highest touch-points for users with your application. Being able to configure and customize emails is key to user management and experience.
One of the first things you will need to do when getting a Keycloak Realm ready for use is to set up your email server configuration. There are many system emails that are sent to users in the course of verifying and updating user accounts: Email address verification, magic links, password reset, account update, login failure notifications, identity provider linking, etc.
In order to provide your users with a positive experience, these messages need a way to get to them. Keycloak supports any internet reachable SMTP server. If you are currently testing, and don't have an email server or service that you currently use, SendGrid provides free accounts that allow you to send up to 100 emails per day forever. For debugging, you can also use a service like MailTrap to give you a catch-all for emails coming from Keycloak.
If you are using a Phase Two Deployment, log in to the self-service dashboard, and click on the Open Console link for the Deployment you wish to use. Once in the Keycloak admin console, click Realm settings in the left menu, and then click the Email tab.
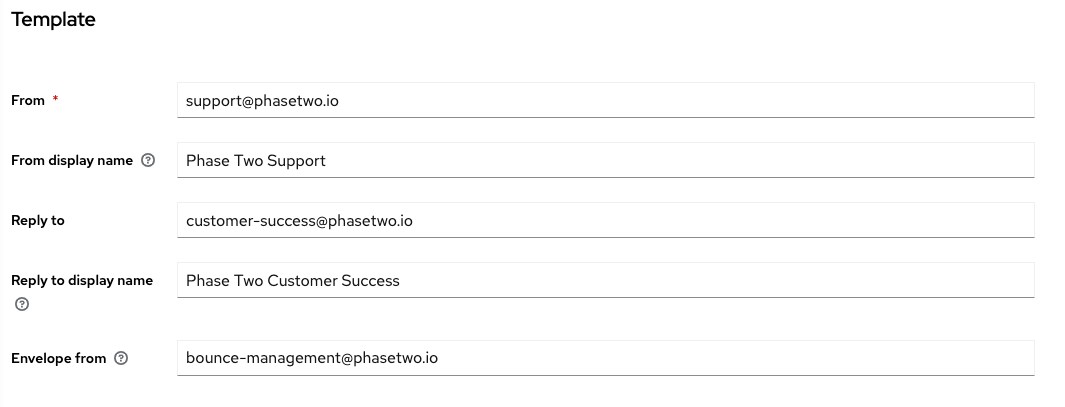
In the first section, labeled Template, you will set options that will be used in the templates for the emails that are sent to your users. The only required field is the From field, which must contain the email address the user will see the email originating from. This should be an email address that your email server is expecting, and it will not block for authorization reasons.
The other fields in the Template section are not required, but will enhance how your emails look:
- From address used to send emails (required)
- From display name a user-friendly name displayed along From
- Reply to an email address that will be used by email clients when your user replies to an email
- Reply to display name a user-friendly name displayed along Reply to
- Envelope from Bounce Address used for the mails that are rejected
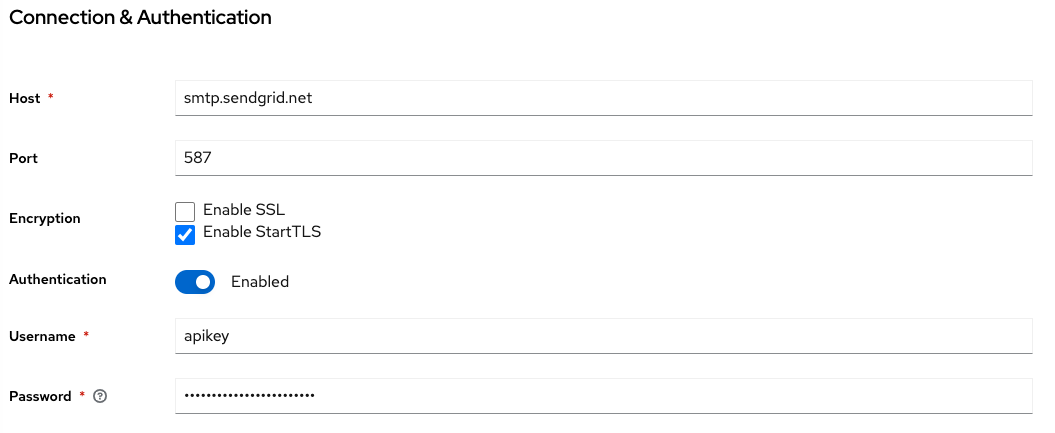
In the Connection & Authentication section, you will provide details of your SMTP server:
- Host indicates the SMTP server hostname used for sending emails
- Port indicates the SMTP server port (usually 25, 465, 587, or 2525)
- Encryption support encryption for communication with your SMTP server
- Authentication if your SMTP server requires authentication, and supply the Username and Password

Finally, before you click Save, click the Test connection button to send a test email to the email address of the currently logged in user. If you don't have that set, you might have click Save and edit your user before you come back. You'll receive a success message, or information that will help you resolve problems.
Once you do that, you'll have accomplished a significant task which enables lots of other functionality!
Also, stay tuned for another post on how to customize your email templates to match your branding and messaging.